
|
Quantum VS Help: File Maintenance |
The Customise option enables you to add, remove and move the tabs and fields visible when viewing, creating and/or editing 'admin'record types, such as your Product and Customer records. 'Customise' is available as a toolbar option when that record type (e.g. Product, Customer) is open.
For example, you might wish to configure Product records so that certain tabs, or sections within tabs, are visible when either viewing, creating or amending a Product record.
To customise a record:
1. Find and open the required record type. For example, to customise Product records, open any Product record from the Finder. See Record Types Available In The Finder.
2. Click Customise on the Toolbar - Sub Menu:

3. The View Selector window displays.
Select the required option from the View menu:
New: To customise a new, unsaved record (e.g. Product record).
Enquiry: To customise an existing saved record when in Enquiry mode (e.g. Product record).
Amend: To customise an existing saved record when in Amend mode (e.g. Product record).
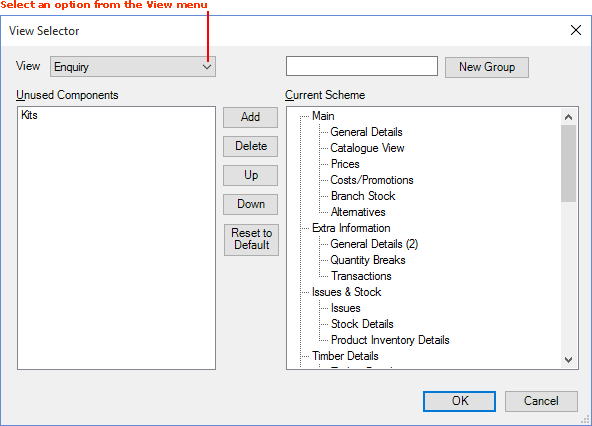
The View Selector window has two main sections:
Unused Components - shows unused/invisible tabs and 'components' (for the selected View option).
Current Scheme - shows used/visible tabs and 'components' (for the selected View option).
Note: Tabs and components are listed in tree view format. For example, in the Product tab, under Current Scheme, the tab 'Main' is listed as a parent item (i.e. tab), while beneath it the child items 'General Details', 'Catalogue View', 'Prices' etc. are listed as child items (i.e. sub-sections within the 'Main' tab).
There are buttons available to add selected components to (Add), remove selected components from (Delete) and move selected components within (Up/Down) the current scheme. You may use New Group to create a new group of components.
See:
Note: Clicking Reset To Default returns the component display to its default setting.
Any changes you make will be saved when you exit Quantum VS then reopen and log back in.
You may add an unused component to a new group (e.g to display a new tab) or to an existing group. To do this:
1. If you are adding an unused component to an existing group/tab, go to step 2.
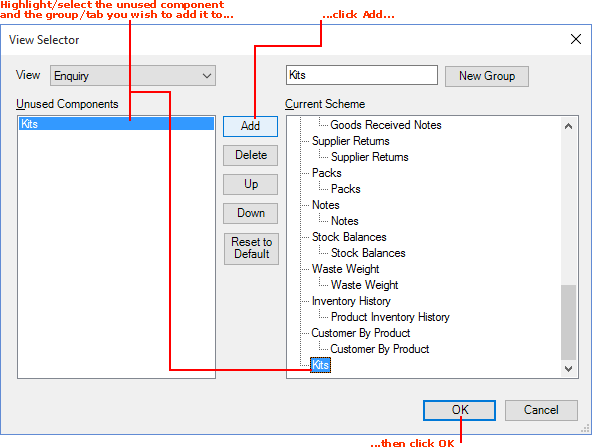
To add a component to a new group/tab, enter the name of the new group/tab (e.g. Kits) in the New Group field, then click New Group:

The new group/tab (e.g. Kits) will now be listed under Current Scheme as a parent item (i.e. tab).
2. To add an unused component to a group/tab in the current scheme:
Under Unused Components, click to select/highlight the component you wish to add (e.g. Kits); then
Under Current Scheme, click to select/highlight the group/tab you wish to add the component to (e.g. Kits); then
Click Add; then
Click OK to close the View Selector window.
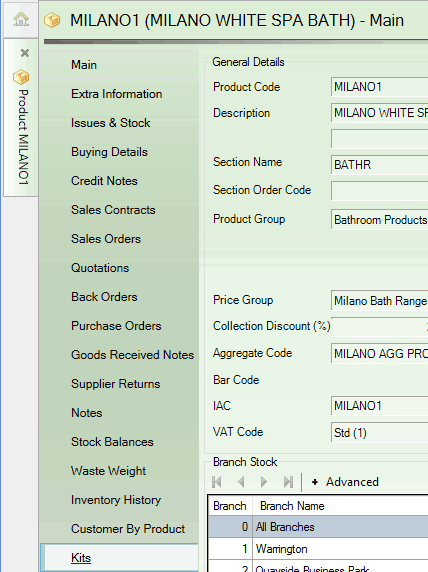
The group/tab should now be visible in the selected record type (based on the selected View option).
In this example we have added the unused component 'Kits' as a tab visible when viewing the Product record (i.e. in Enquiry mode):
To remove a component from the current scheme:
1. Under Current Scheme, click to select/highlight the group or tab you wish to remove.
In the following example we have selected to remove the Extra Information tab (i.e. a top-level/parent item) from the Product record when in Enquiry mode.
Alternatively you may remove a group (i.e. a section within a tab) by selecting/highlighting a second-level/child item (e.g. Quantity Breaks).
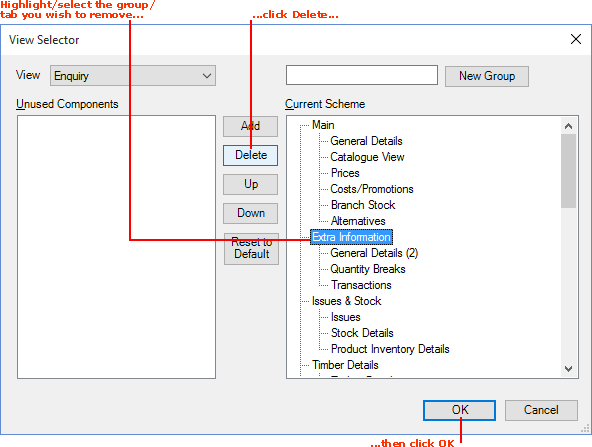
2. Then:
Click Delete; then
Click OK to close the View Selector window.
The selected tab or group will no longer be visible in the selected record type (based on the selected View option).
To change the display order of components in the current scheme:
1. Under Current Scheme, click to select/highlight the group or tab you wish to move.
In the following example we have selected to move the Extra Information tab (i.e. a top-level/parent item) within the Product record when in Enquiry mode.
Alternatively you may move a group (i.e. a section within a tab) by selecting/highlighting a second-level/child item (e.g. Quantity Breaks).
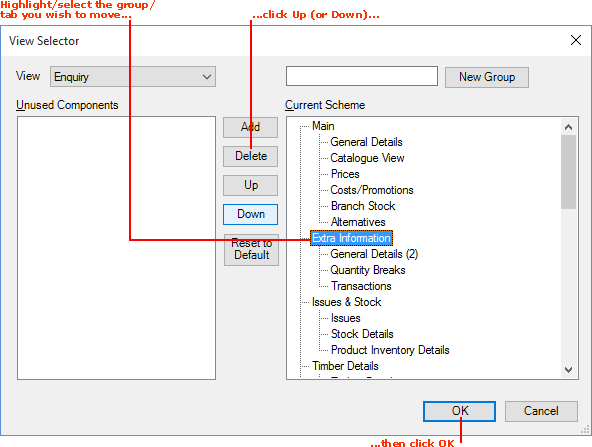
2. Then:
Click Up or Down - as many times as required - to move the selected item up or down in the list.; then
Click OK to close the View Selector window.
The selected group or tab will appear in its new position within the selected record type (based on the selected View option).