|
Quantum VS Help: Finder |
There are various ways in which you may customise the available Finders, including:
Optimising the column width - see Resizing Finder Columns; and
Specifying which columns will display, and in what order - see Showing/Hiding And Reordering Finder Columns.
Finder settings may be saved permanently for the current User and Finder type, so that they are available when you log off and back on again. For example, when you customise settings for the Customers Finder, the next time you open the Customers Finder the specified columns will display in the selected order, with the same optimised column dimensions.
When you update/save Finder settings as described below, Advanced settings (e.g. whether or not Advanced settings are displayed, which filter fields are on/off) are also saved for the current User and Finder type.
Note: You may wish to show/hide/reorder/resize Finder columns before performing a Finder export.
You may resize/optimise the column display for the current Finder type and then save the settings. To do this:
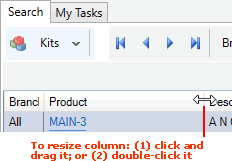
1. To resize columns, either:
place your mouse over a column divider in the Finder and drag it to a new position; or
double-click the column divider to resize the column to its optimum size:

2. To save the column settings, follow the steps in Showing/Hiding And Reordering Finder Columns below; i.e. right-click the column header bar in the Finder and select Show/Hide Columns (you may optionally show/hide and change the column display order), then select Update in the Column Editor Window to save settings.
This applies to the current User for the selected Finder type only. For example: if you optimise the column display in the Customers Finder and save your settings, the next time you open the Customers Finder, the columns will display with the set dimensions.
You may use the Show/Hide Columns right-click option to customise the selected Finder (e.g. Customers) by:
hiding (and showing) columns; and/or
reordering columns;
and then save your settings afterwards.
To do this:
1. Right-click on the column header bar in the Finder:

2. Select Show/Hide Columns from the menu - as shown in the example above.
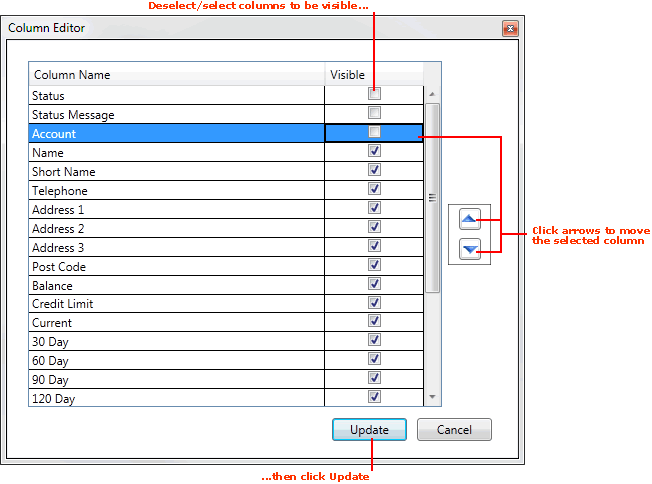
3. The Column Editor window displays a list of columns for the Finder window (based on the document/record type currently selected; e.g. Customers).
Uncheck the 'Visible' fields to hide columns as appropriate (or check them to make them visible again):

Click on the right-hand arrows to move the selected Finder column up or down the list. This moves the column to the left or right in the Finder columns layout.
4. Click Update. The Column Editor window is closed. Finder columns will be reorganised as specified and only the selected columns will be visible.
This saves Finder settings for the current User and Finder type. For example, if you customised settings for the Customers Finder, the next time you open the Customers Finder the specified columns will display in the selected order, with the saved column dimensions, as chosen by you.
NEXT: Finder Exports