|
Quantum VS Help: Credit Control And Reviews |
To create a Credit Review Mail Merge letter template using Microsoft Word:
1. Open Microsoft Word and create a New document.
2. Type and format the letter as you wish. Leave spaces where your Mail Merge fields will be inserted later. For example:
Dear [space],
Your current account balance is [space]
Your current credit limit is [space]
3. When you are happy with the basic layout and content of the letter you can begin entering the Mail Merge fields. These fields in your Word document map to fields in Quantum VS so that, when you Submit Actions following a Credit Review, customer data is inserted into your template letter to create bespoke individual or mass mailings.
Click at the point in the document where the field data is to be inserted. For example, if you wish to add the Mail Merge field <<Name>>, place your cursor just after the word Dear in your document.
4. You may now insert your first Mail Merge field where your cursor is placed.
Note: The procedure at this point may vary slightly, depending on which version of Microsoft Word you are using. The example below is for Word 2003. For further details please refer to Microsoft's own online Help on the topic of 'Mailmerge'.
To insert a MailMerge field: select Insert from the main Word menu, then select Field from the drop-down menu.
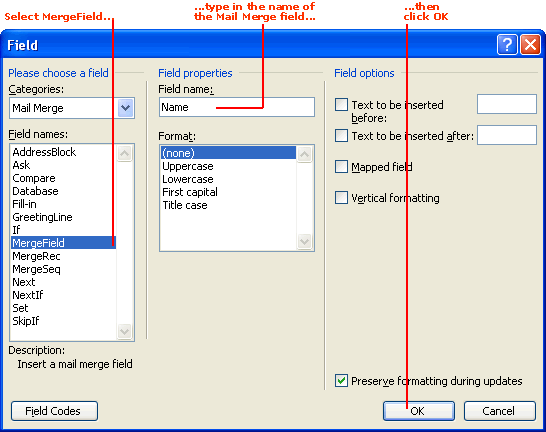
The Field window appears:
5. Under Field names (Please Choose A Field) select MergeField.
6. For the first Merge Field: under Field name (Field Properties) type the name of the Mail Merge field you wish to add (e.g. Name) using the following list as guidance:
Note: You must type the name of the field exactly as it appears in the Field name list below, otherwise the Mail Merge will not work. Note also that no key spaces are used in any of the Field names.
|
Field name |
Maps to the following field in Quantum VS
|
|
accountDisplay
|
The customer's Account Number. |
|
currentDate
|
Today's date. |
|
Name
|
The customer contact name. |
|
Address1
|
The first line of the customer's address. |
|
Address2
|
The second line of the customer's address.
|
|
Address3
|
The third line of the customer's address.
|
|
PostCode |
The customer's post code.
|
|
AccountBalance |
The current balance on the customer's account.
|
|
BalanceNextMonth
|
The customer's Next Month balance. |
|
CurrentBalance
|
The customer's Current Month balance. |
|
Balance30Day
|
The customer's 30 Day balance. |
|
Balance60Day
|
The customer's 60 Day balance.
|
|
Balance90Day
|
The customer's 90 Day balance.
|
|
Balance120Day
|
The customer's 120 Day balance.
|
|
Balance150Day
|
The customer's 150 Day balance.
|
|
UnappliedCash
|
Total Cash awaiting invoice matching. |
|
OnOrderBalance |
Total Orders awaiting Invoicing.
|
|
LastPaymentDate
|
Date last payment was entered on to the account. |
|
CreditLimit
|
The customer's Credit Limit. |
|
|
Note: You may view the above information for each customer in their customer record. See Viewing A Customer Record. |
7. Click OK to close the Field window. The Mail Merge field is added to your document in brackets; e.g. Dear <<Name>>,
8. Repeat steps 3 to 7 above to add additional Mail Merge fields to your document.
Each Mail Merge field you have added will be visible in brackets in the document. For example:
Dear <<Name>>,
Your current account balance is <<AccountBalance>>
Your current credit limit is <<CreditLimit>>
You may wish to make final amendments to your Mail Merge template letter at this point before saving the document.
Note: You may view the Merge Field formatting on screen in Word. To do this: (1) Select the entire document using Ctrl + A on the keyboard or by selecting Edit > Select All from the Word Menu Toolbar; then (2) Press Shift + F9 to display the fields. Pressing Shift + F9 again will hide the Merge Field detail.
9. Save the Word document you have created. To do this:
Select File > Save from the Word Menu Toolbar. Or:
Select the Save icon from the Toolbar.
The Save As… dialogue box appears.
Enter a suitably descriptive file name and then select Save.
10. The Credit Review Mail Merge document has now been created and saved on your local PC. The next steps are to:
Copy the Credit Review Mail Merge document to an appropriate directory on the Quantum VS server used by your system. The location/path to the file on the server must be noted, as this is required in the following section. It is envisaged that this will be handled by Quantum VS Professional Services.
Define (i.e. save the path to) the Credit Review letter in Quantum VS. See Adding The Credit Review Letter To Quantum VS.