From the Home tab: under links, select Processes.
|
Quantum VS Help: File Maintenance |
The Bulk Changes process is used to update text, numeric or date field values in a selected range of Product, Customer or Supplier records.
To run the Bulk Changes process:
1. Either:
From the Home tab: under links, select Processes.
Or: From the Toolbar - Main Menu: select Tools > Show Processes.
OR: Click the appropriate module on the Mega Menu then - under processes - select the required Process.
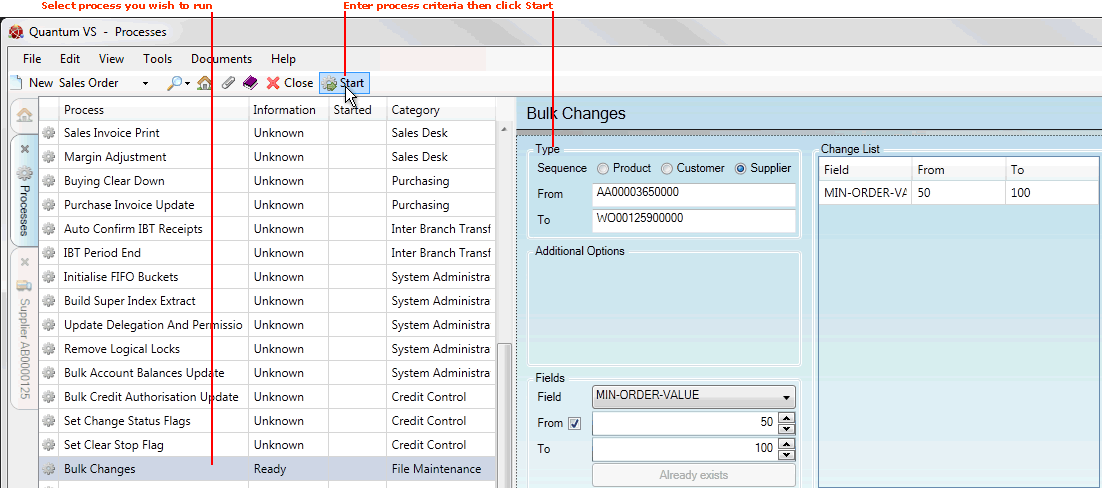
The Processes record opens in a new tab, listing all Processes by Name and Category.
2. Use your mouse or [Tab] key to select the Bulk Changes process:

3. Select process options in the available fields as required, using the following as a guide:
Note: You may use your [Tab] key to move from one field to the next.
|
Field |
Definition
|
|
Type
|
|
|
Sequence |
Select whether to run the process on a range of Product, Customer or Supplier records.
|
|
From / To
|
To limit the process to a certain range of products / customers / suppliers: enter the Product, Customer or Supplier Code in the From and/or To fields.
If you enter nothing in the From / To fields, the process will be run against every Product, Customer or Supplier record in your database.
If you don't know the Product / Customer / Supplier Code you may enter it automatically using the Finder. To do this:
|
|
Product Filter
|
|
|
Sequence
|
If you selected Product above:
From the Product range selected (above), select whether to restrict the process by Product Group, Section or Supplier.
|
|
From / To
|
Select/enter values to define the range of Product Groups / Sections / Suppliers the process will be limited to.
|
|
Additional Options
|
|
|
Additional Options
|
If you wish to display additional fields in the Field menu (below), select one of the following additional options:
If you selected Product above:
If you selected Customer above:
Note: The Restricted option should be used with extreme caution as 'restricted' fields are not normally made accessible for updating. |
|
Fields
|
|
|
Field
|
Select the field you wish to make changes to (i.e. a Product, Customer or Supplier record field).
|
|
From / To
|
In the To field, enter the value you wish to enter (in the selected field, for the selected records).
For example: you might wish to change the value in the Minimum Order Value field of all selected Supplier records to '100', regardless of what the current value is. Therefore you would enter '100' in the To field (i.e. change field value to...).
If you wish to change a particular value only, check the From field then enter a value in the field to the right.
Continuing the above example, say you wish to change all of the selected Supplier records for which the Minimum Order Value is '50' to '100'. Therefore you would check the From option and enter a from value of '50' (i.e. change field value from...), then enter '100' in the To field (i.e. change field value to...).
Note: Only records where the value in the selected field matches exactly the 'From' value you have entered will be updated. Continuing the above example, all Supplier records in the selected range for which the Minimum Order Value is exactly '50' will be updated to '100'. Any Supplier records in the selected range for which the Minimum Order Value is anything other than '50' will be left unchanged.
Click Add (below) to add the specified changes to be made:
|
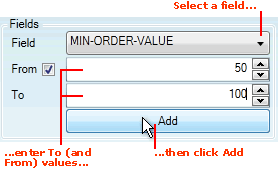
4. After entering your Field, To (and From) values, click the Add button (below):

Each change you add will be displayed in the Change List.
5. If necessary, add further changes for the selected record type (i.e. Product, Customer or Supplier) by selecting another Field, entering To (and From) values and clicking Add.
Note: Changing the 'Type' will clear the Change List.
Each additional change to be made will be displayed in the Change List.
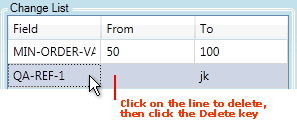
To delete a value from the Change list: click on the 'change' line you wish to delete, then click the Delete key on your keyboard:

6. When you have finished specifying changes, click Start on the Toolbar - Sub Menu to begin running the process.
7. When the process has finished running, a Status message will be shown. Click OK to close this message. You may now close the Processes tab if you wish.
The changes will be written to the selected records.