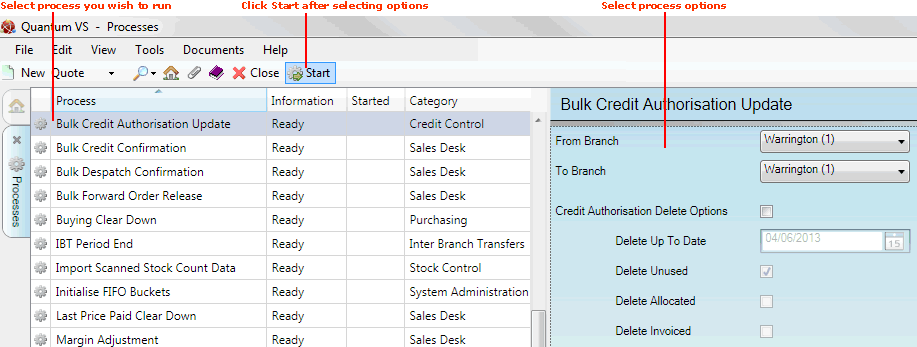
From the Home tab: under links, select Processes.
|
Quantum VS Help: File Maintenance |
The Bulk Credit Authorisation Update process can be used to create a new set of unused Credit Authorisation codes. These can then be selected in the Finder - see Finding Credit Authorisation Records - and used in Credit Authorisation. For further details see Credit Release Authorisation.
This process can be used to delete certain types of Credit Authorisation record up to a specified date. You may limit the process to a certain Branch or range of Branches if you wish.
To run the Bulk Credit Authorisation Update process:
1. Either:
From the Home tab: under links, select Processes.
Or: From the Toolbar - Main Menu: select Tools > Show Processes.
OR: Click the appropriate module on the Mega Menu then - under processes - select the required Process.
The Processes record opens in a new tab, listing all Processes by Name and Category.
2. Use your mouse or [Tab] key to select the Bulk Credit Authorisation Update process:

3. Select process options in the available fields as required, using the following as a guide:
Note: You may use your [Tab] key to move from one field to the next.
|
Field |
Definition
|
|
From / To Branch |
Use these fields to select the Branch - or range of Branches - to run the process on.
|
|
Credit Authorisation Delete Options |
If you leave this field unchecked, this process will create a new set of Unused credit authorisation codes. These can then be selected in the Finder - see Finding Credit Authorisation Records - and used in Credit Authorisation. For further details see Credit Release Authorisation.
By checking this field you will enable the following fields in order to perform further tasks:
|
|
Delete Up To Date
|
The process will delete all Credit Authorisation records dated on or before the date entered.
|
|
Delete Unused
|
Check this field to delete all unused Credit Authorisation records.
|
|
Delete Allocated
|
Check this field to delete all allocated Credit Authorisation records.
|
|
Delete Invoiced
|
Check this field to delete all invoiced Credit Authorisation records.
|
4. Click Start on the Toolbar - Sub Menu to begin running the process.
5. When the process has finished running, a Status message will be shown. Click OK to close this message. You may now close the Processes tab if you wish.
NEXT: Set Change Status Flags