|
Quantum VS Help: File Maintenance |
The next stage of the 'stock take' procedure is to select the Stock Counts tab/header and enter actual count figures for each product included in the count.
After entering a Stock Count reference - created in the previous step by running the Stock Count Listing Report - the list of products to be counted is displayed. You may now add count figures for each product. If an included product is flagged for 'batch traceability' the count will involve entering figures for each Batch Reference, Serial Number and/or Bin Location for that product.
During the count you may 'skip' products, add products to be counted and edit count figures as required. You may also end the stock count early and resume it later as necessary.
Note: The count may be carried out by a remote 'scanner user' via an RF bar code scanner running the Quantum VS Warehouse System application. See Running A Stock Take Using Hand Held Bar Code Scanners.
Note: The full stock take procedure is explained in Overview Of The Stock Take Procedure.
To enter Stock Count figures:
1. Open the Stock Control tab. See Opening The Stock Control Tab.
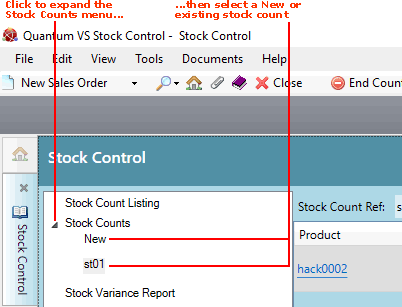
2. Click the 'arrow' next to Stock Counts on the left-hand menu, then either:
Click New to create a new stock count;
Or: Click to select an open stock count (if displayed):

3. If you are creating a new stock count: In the Stock Count Ref field, enter the reference from the Stock Count Listing report you ran earlier.

Note: If you selected an open stock count in step 2, skip to step 4.
4. The first/next product to be counted is displayed, with the cursor automatically placed in the Count field:
Note: Details from the Stock Count Listing report are displayed in the Properties area.

Enter the actual number of units counted in the Count field then click [Tab].
Note: If the Timber Stock Control window displays, see Recording Counts For Timber And Pack Products below.
To skip the count for this product: click Skip.
This lists each product included in the Stock Take, including the on-file and actual counted quantities, and the counted date:
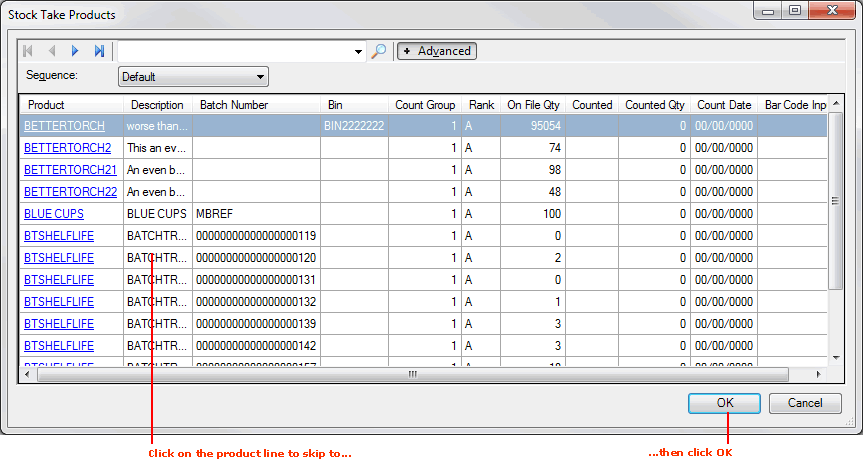
To enter counts for another product included in the current Stock Count, click on that product line to highlight it, then click OK (or click Cancel to close the Stock Take Products window).
To locate a specific product, enter the Product Code in the Finder field, then click the Search icon.
By default, the products are ordered as per the Sequence setting entered in the Stock Count Listing report. To change the product sequence, click the Advanced button and select an alternative from the Sequence menu.
5. The Confirm Balance window is displayed, indicating the number of units counted and any gain/loss (i.e. the difference between the counted number of units and the 'on file' stock figure):
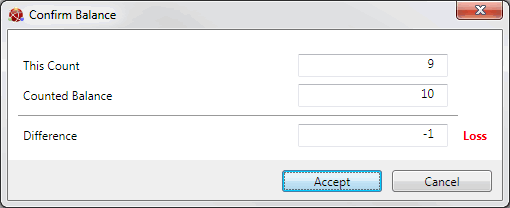
Click Accept to accept the number counted (or Cancel to cancel it).
The Counted Balance and any Difference (i.e. variance) are entered in the appropriate fields. A new line appears below, where you may enter the Count for the next product:

At any time during a Stock Count you may edit the count entered for a product. Click within the Count column against the product, re-enter the Count figure then click [Tab] - as shown above.
The Stock Already Counted window displays when you enter a count figure for a product which has already been counted within the current Stock Count:
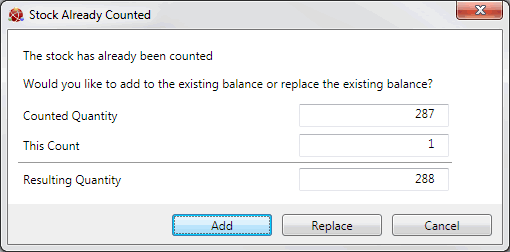
If you see this window, click one of the following:
Add: To add the new count figure to the previously-entered figure.
Replace: To replace the previously-entered figure with the new count figure.
Cancel: To avoid entering a new count figure.
6. Repeat steps 4 - 6 for each product to be counted.
When you have finished the stock count, click End Count on the Toolbar - Sub Menu:

This generates the Terminate Stock Count Entry process, which indicates to the server that the user has stopped entering product counts for the given Stock Count Reference.
When the process has completed, the Information field will read 'Process Complete', while the Started field lists the date and time on which the process was run. A URL will be shown, at which a report can be viewed and printed if necessary. The report lists the counted quantity and 'difference' for each product included in the Stock Take, including their Count Group, Batch Reference and Bin Location.
This ends the counting procedure for the selected Stock Count Reference. When you have finished you may:
Close the Stock Control tab if you wish. Or:
Keep the Stock Control tab open and move to the next stage of the stock take procedure - Running The Stock Variance Report - in which you will turn off the 'Stock Count Active' flag on the counted products, completing the Stock Count.
Note: If you simply wish to close the Stock Count tab, click Close on the Toolbar - Sub Menu. You may later resume the count by reopening the Stock Control tab, selecting New under the Stock Counts tab/header and entering the Stock Count Reference for this count, then resuming the count procedure - as described it the various steps above.
Be aware that the Stock Count is not complete until the Stock Variance Report has been run with one of the 'Complete Stock Take Cycle' options selected in the Print Option field - see the next stage: Running The Stock Variance Report. This will formally end the Stock Count for the given Stock Count Reference, turning off the 'Stock Count Active' flag on any products included in the count, updating their stock figures on the system and making them available to sales documents again.
However, the Stock Variance Report has options whereby you may print a 'variance' or 'products not counted' report without completing the Stock Count, enabling you to check stock figures and continue the counting procedure before finally completing the Stock Count.
At any stage of an open Stock Count you may add a new product to be counted. To do this:
1. Click Add Product To Count on the Toolbar - Sub Menu:

2. The following window displays:
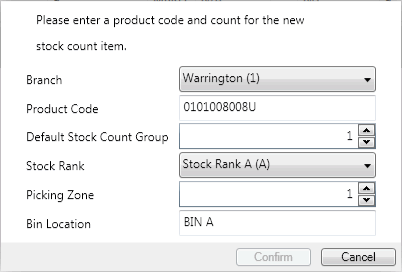
Enter the product's Branch, Product Code, Default Stock Count Group, Stock Rank, Picking Zone and Bin Location, then click Confirm. The product is added to the current Stock Count.
If a Timber (or Pack) product is included in the Stock Take, the Timber Stock Control window will appear when you click on that product line. This allows you to record either:
Tally counts for different lengths of the current timber product (e.g. 10 x 1.20m length pieces etc.); or:
Total Quantity/Pieces/Volume/Length of the current timber product.
Note: Entering a Quantity/Pieces/Volume/Length total will clean any tallies entered in the tally section.
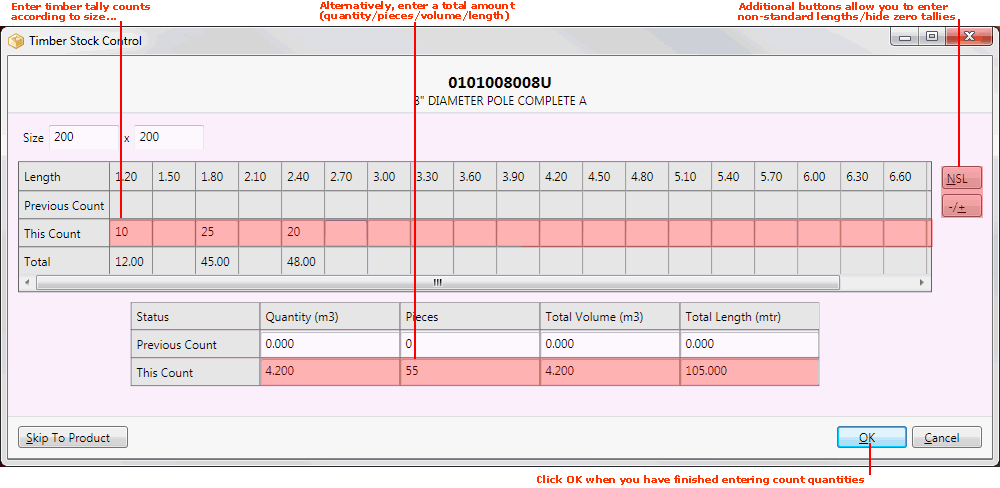
Click the +/- button to the right of the Timber Stock Control window to show or hide zero tallies. This hides all tally fields with zero quantities.
To enter count figures for timber pieces of non-standard length:
1. Click the NSL button to the right of the Timber Stock Control window.
2. In the Add Non Standard Length window which displays, enter the Length and Quantity for the non-standard length timber, then click OK to add the values to the count record.
3. A warning will appear, indicating that you are entering a non-standard length - click Yes or No as appropriate.
4. A further warning will appear if the stock record does not already exist, asking if you wish to add the record to the file. Click Yes or No as appropriate.
Non-standard lengths are shown in red within the Timber Stock Control window.
When you have recorded counts of the current timber product, click OK. (Or click Cancel to cancel the count for this product and close the Timber Stock Control window.)
A summary of the count figures will appear at the bottom of the Timber Stock Control window, along with the amount of any Gain:

Click Accept to accept the count for this product. (Or click Cancel to cancel the count for this product and close the Timber Stock Control window.)
The count for the timber product is added to the Stock Take record. You may continue counting remaining products in the Stock Take as described above.
Note: To skip from one timber product to another in the Stock Take, click the Skip To Product button in the bottom-left of the Timber Stock Control window. Use the same method described in Skipping From One Product To Another to select another product to enter quantities for.