|
Quantum VS Help: File Maintenance |
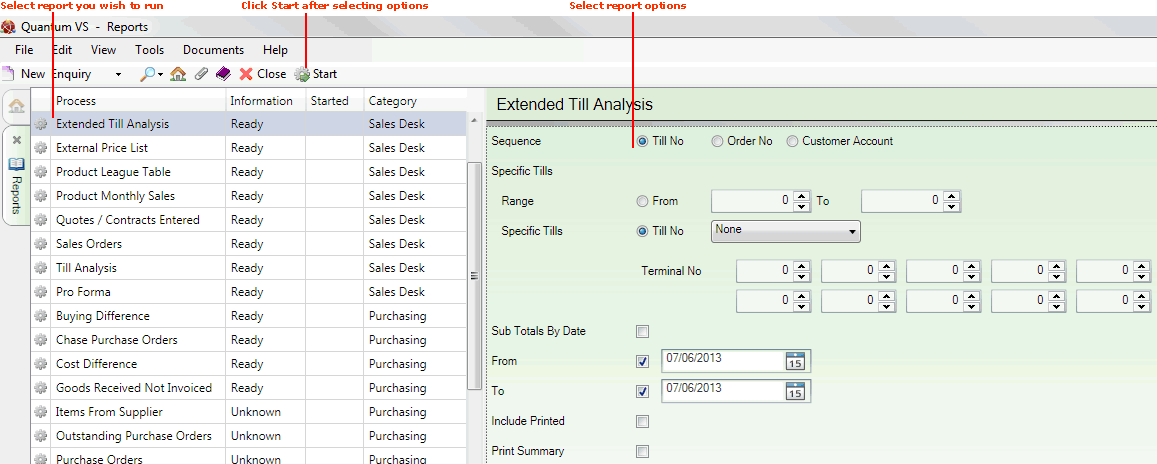
The Extended Till Analysis report generates a list of all cash received, showing value broken down by payment type (e.g. full payment; deposits), for a selected range of terminals, tills, sales orders or customer accounts, either for today or for a specified date.
This report is useful for getting a breakdown of cash received at the till, and/or float amounts, either for today or for a specified date.
Note: The Till Analysis report provides a similar breakdown.
Multiple terminals may be set up for a till. The TILL Table File has values corresponding to till numbers (e.g. 0001, 0002 etc.). Description 2 of each TILL Table File record is used to specify a string of terminal numbers that the till represents. For example, till 0001 may be the trade counter and might have three terminals - terminal 123,456 and 789. Therefore Description 2 of the TILL Table File record 0001 would be set as '123456789'.
To run the Extended Till Analysis report:
1. Either:
Or: From the Toolbar - Main Menu: select Tools > Show Reports.
OR: Click the appropriate module on the Mega Menu then - under reports - select the required Report.
The Reports record opens in a new tab, listing all Reports by Name and Category.
2. Use your mouse or [Tab] key to select the Extended Till Analysis report:

3. Click the appropriate Sequence button in order to sequence the report results by:
Till No;
(Sales) Order No; or
Customer Account.
4. Select remaining report options in the available fields as required, using the following as a guide:
Note: You may use your [Tab] key to move from one field to the next.
If you chose Till No in the previous step:
|
Field |
Definition
|
|
Terminal Range / Specific Tills
|
To run the report on a range of terminals, select the 'From' button next to Terminal Range, then enter a terminal number (i.e. a number from 1-9999) in the From and/or To fields to specify the range to report on.
Note: If nothing is entered in the From/To fields the report will include all terminals.
Alternatively, to report on specific tills:
|
|
Sub Totals By Date
|
Check this field to list Sub Totals by date. |
If you chose Order No in the previous step:
|
Field |
Definition
|
|
From / To Sales Order Key
|
Enter the first and last Sales Order Key in the sequence to define the range to be printed.
If you don't know the Sales Order Key you may enter it automatically using the Finder. To do this:
Note: The sales order key is defined as follows:
The first 4 characters must be a valid Branch number.
The next character must be numeric in the range 1 - 4 to correspond to one of the following sale types:
1. Account Sales Order 2. Account Credit Note 3. Cash Sale 4. Cash Sale Credit Note
The next 7 characters must be numeric (zeroes permitted) to correspond to a sales order number.
If nothing is entered in the From / To fields, the report will be run on your whole range of branches/sale types/sales orders.
|
|
Available Branches / Selected Branches
|
Select the Branch(es) to report on.
Note: If no Branches are selected, the report is run on ALL Branches.
To select Branches, move them from the Available Branches list (which lists all of your branches) to the Selected Branches list by:
To remove branches from the Selected Branches list: use the < key to remove highlighted branches, or use the << key to remove all branches.
|
If you chose Customer Account in the previous step:
|
Field |
Definition
|
|
From / To Customer Account
|
If necessary you may limit the report to a certain range of customer accounts by entering the first and last customer account in the sequence here.
If you don't know the Customer Account Code you may enter it automatically using the Finder. To do this:
Note: The Customer Account Code is made up of a unique series of letters and numbers assigned to the customer. They start with two characters, followed by up to seven numbers; e.g. WE/0001234. Zeros are permitted. |
|
Available Branches / Selected Branches
|
Select the Branch(es) to report on.
Note: If no Branches are selected, the report is run on ALL Branches.
To select Branches, move them from the Available Branches list (which lists all of your branches) to the Selected Branches list by:
To remove branches from the Selected Branches list: use the < key to remove highlighted branches, or use the << key to remove all branches.
|
5. Define the remaining fields, using the following as a guide:
|
Field |
Definition
|
|
From / To
|
To run the report on a selected date range only, enter appropriate dates in the From / To fields.
|
|
Include Printed
|
Check this field to include items already printed.
|
|
Summary Only
|
Check this field to produce a Summary Report only, rather than the full report.
|
6. Click Start on the Toolbar - Sub Menu to begin running the report.
Note: If you have not selected a branch or branches to report on, a warning will display to indicate that, by default, the report will run against all branches. If this displays, click Yes to continue. Or, click No to cancel then select the Branch(es) to report on as described above.
7. When the report has finished running, a Status message will be shown listing a URL at which the report can be viewed and printed or emailed if necessary.
Note: You may use Print Groups to view, print or email the report at a later date. See Viewing, Printing And Emailing Documents.
Click OK to close this message. You may now close the Reports tab if you wish.