|
Quantum VS Help: File Maintenance |
The Stock Variance report forms part of the 'stock take' procedure and has a number of functions.
The main option is to run this report with one of the 'Complete Stock Take Cycle' options selected in the Print Option field, which will formally end the Stock Count for the given Stock Count Reference. This turns off the 'Stock Count Active' flag on any products included in the count, updating their stock figures on the system and making them available to sales documents again.
An alternative is to run this report with the 'Cancel The Stock Take' option selected in the Print Option field, which cancels the Stock Count for the given Stock Count Reference. This makes the included products available to sales documents again but without updating their stock figures on the system.
Running this report with one of the 'Variant Report' options selected in the Print Option field will generate/print a list of products where the actual counted stock figures differed from the stock figures on the system. A common scenario is as follows:
After the initial Stock Count, run the Stock Variance Report with the 'Variant Report Only' Print Option selected. This enables the count to continue.
A member of staff may then use the printed variance report to perform a recount of stock, reopening the Stock Count record in Quantum VS and entering new count figures as necessary.
The above steps may be performed as many times as necessary. When you are happy that the count figures are correct you may then re-run the Stock Variance report with the 'Variant Report and Complete Stock Take Cycle' option selected in the Print Option field. This generates/prints the variance report and also completes the 'stock take cycle' as described above.
A further option is to run this report with the 'Products Not Counted Report Only' option selected in the Print Option field to generate/print a 'products not counted' report (without completing the Stock Count). This is commonly used when you wish to count certain products now and some later.
Note: The Stock Variance report is normally run as part of the stock take procedure. See Performing A Stock Take.
To run the Stock Variance report:
1. Either:
Or: From the Toolbar - Main Menu: select Tools > Show Reports.
OR: Click the appropriate module on the Mega Menu then - under reports - select the required Report.
The Reports record opens in a new tab, listing all Reports by Name and Category.
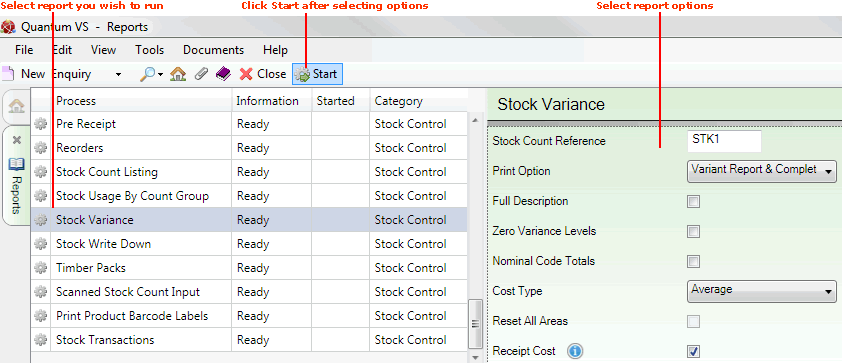
2. Use your mouse or [Tab] key to select the Stock Variance report:

3. Select report options in the available fields as required, using the following as a guide:
Note: You may use your [Tab] key to move from one field to the next.
|
Field |
Definition (* = mandatory field)
|
|
Stock Count Reference *
|
Enter a reference for the stock count here. This must consist of four alphanumeric characters (e.g. STK1).
|
|
Print Option *
|
Select one of the following options depending on the action you wish to take:
|
|
Full Description
|
Check this field to print a full description in the report.
This not required if you have selected either of the following Print Options:
|
|
Zero Variance Levels
|
Check this field to include Zero Variance Lines in the report.
This not required if you have selected either of the following Print Options:
|
|
Nominal Code Totals
|
Check this field to include Totals By Nominal Code in the report.
This not required if you have selected either of the following Print Options:
|
|
Cost Type *
|
Use the drop-down menu to select the cost type to be printed in the report, from the following options:
This not required if you have selected either of the following Print Options:
|
|
Reset All Areas
|
Check this field to reset the Count Flag for all areas (i.e. turn off the 'Stock Count Active' flag on any products included in the Stock Take).
This not required if you have selected either of the following Print Options:
|
|
Receipt Cost
|
If enabled, variances for products which are 'Batch Traceable' are costed using the GRN Receipt Cost, whereas variances for non-'Batch Traceable' products are based on the Cost Type selected (see above).
|
4. Click Start on the Toolbar - Sub Menu to begin running the report.
5. When the report has finished running, a Status message will be shown listing a URL at which the report can be viewed and printed or emailed if necessary.
Note: You may use Print Groups to view, print or email the report at a later date. See Viewing, Printing And Emailing Documents.
Click OK to close this message. You may now close the Reports tab if you wish.
NEXT: Stock Write Down Report