|
Quantum VS Help: File Maintenance |
The Works Orders List lists 'Works Order' Sales Orders created on the system - potentially within a chosen date range and Works Order range. A list of the 'input products' required for picking and despatch (i.e. Kit components and/or raw materials required for processing) is produced for each Works Order with a status of anything other than Cancelled, Completed or Held.
To run the Works Order List:
1. Either:
Or: From the Toolbar - Main Menu: select Tools > Show Reports.
OR: Click the appropriate module on the Mega Menu then - under reports - select the required Report.
The Reports record opens in a new tab, listing all Reports by Name and Category.
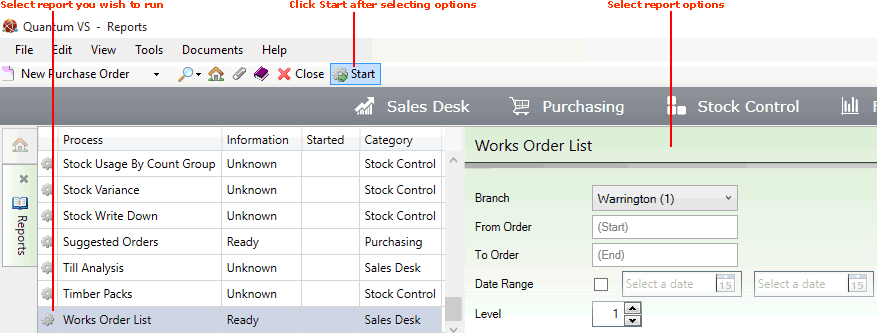
2. Use your mouse or [Tab] key to select the Works Order List:

3. Select report options in the available fields as required, using the following as a guide:
Note: You may use your [Tab] key to move from one field to the next.
|
Field |
Definition
|
|
Branch
|
By default, the report will be run against all of your branches (i.e. the default choice of 'All' will be selected in the Branch menu).
However, you may run the report against an alternative single branch by selecting it from the drop-down menu.
Note: Branch menu options are held in the table file B and must be defined using Branch Maintenance. |
|
From / To Order
|
You may optionally use these fields to restrict the range of 'Works Order' Sales Orders considered for inclusion in the report. If necessary, enter the first and/or last in the required range of Works Order numbers.
If these fields are not used, the process will consider all Works Orders for inclusion - subject to other report criteria entered.
If you don't know the Works Order number you may enter it automatically using the Finder. To do this:
|
|
Date Range
|
To limit the report to a particular day or date range, check the Date Range field and enter/select the From and/or To date in the fields to the right.
|
|
Level
|
Potentially, a component of a Kit might be another Kit (i.e. a sub-assembly), which may itself have a Kit as a component (i.e. a sub-sub-assembly), and so on. When this is the case, you may use the Level option to select the number of levels to show.
For example, if you select 3, a list of components will be produced for up to 3 levels; i.e. the report will list components, sub-components and sub-sub-components for each Works Order.
|
4. Click Start on the Toolbar - Sub Menu to begin running the report.
5. When the report has finished running, a Status message will be shown listing a URL at which the report can be viewed and printed or emailed if necessary.
Note: You may use Print Groups to view, print or email the report at a later date. See Viewing, Printing And Emailing Documents.
Click OK to close this message. You may now close the Reports tab if you wish.
NEXT: Stock Control Reports