|
Quantum VS Help: Purchasing |
When working with Expenses (*) or Debit Note (**) type invoices, the 'matching' procedure involves:
generating lines for allocating/matching Nominal Codes; and then
allocating or Modifying amounts to each Nominal Code line as appropriate; until
all lines have been allocated/matched and the Purchase Invoice Registration record is complete.
Note: (*) An Expenses invoice is the 'Type' entered when registering an invoice for non-stock business expenses such as an electricity bill or a payment for window cleaning. (**) A Debit Note invoice is the 'Type' entered when registering a Credit Note received from a supplier in response to you issuing them with a Debit Note to recoup a buying deficit.
After entering invoice totals - and re-opening the Purchase Invoice Registration record if necessary - you must click Continue on the Toolbar - Sub-Menu (see Matching Invoice Totals).
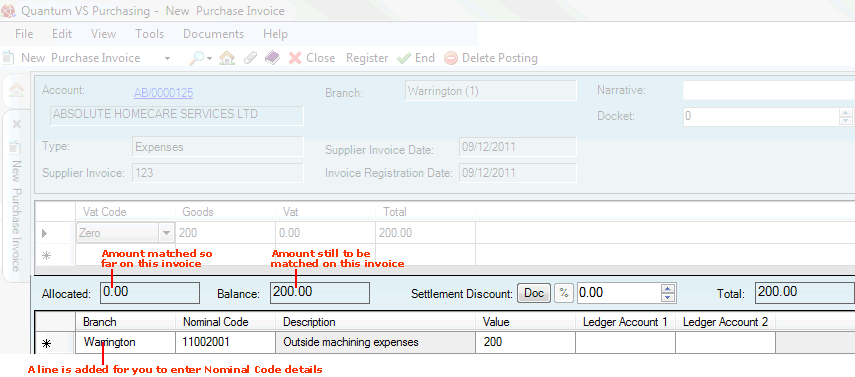
Lines are added, allowing you to match the invoice total against one or more of your nominal codes. For example:

Note: Initially just one line is added. If you wish to apportion the invoice total between two or more Nominal Codes, you may add further lines.
Click the [Tab] key - or use your mouse - to place your cursor in the lines section below and enter the following details:
Note: You may use your [Tab] key to move from one field to the next.
1. In the Branch field, select the Branch to which the invoice is registered. Your own Branch is selected by default, but you may select an alternative if necessary.
2. In the Nominal Code field, enter the Nominal Code you wish to match all or part of the invoice total with. For example, if it is a haulage invoice you will want to select a Nominal Code for assigning haulage expenses.
If you don't know the Nominal Code you may enter it automatically using the Finder. To do this:
place your cursor in the Nominal Code field;
click [F3] to make Nominal Codes active in the Finder;
in the Finder, locate the Nominal Code you wish to add (see Finding Nominal Codes); then
double-click on the Nominal Code line in the Finder to add the Nominal Code.
The Description is entered automatically when you enter the Nominal Code.
3. In the Value field, enter the amount to register against the appropriate nominal code.
Note: With Debit Note type invoices (i.e. when registering a Credit Note received from a supplier in response to you issuing them with a Debit Note) the value must be negative. You also have the option of referencing the original Purchase Order in the next field.
4. In the Ledger Account 1 and 2 fields you may enter a value against the Nominal Code for analysis within Quantum Financials, such as:
A - Account Analysis
B - Branch Analysis
P - Product Group Analysis
V - VAT Analysis
space - No Analysis
Note: This applies only if the Optional Enhancement - Optional Features 028 (Purchase Ordering: Quantum Interface; 6OF00028) is switched on.
Note: These fields are related to the interface to Quantum Financials. When transactions are passed to Quantum Financials, additional information can be sent which allows the transaction to be analysed at a more granular level. For instance, when a Sales Invoice is created, the sales information will typically be allocated against a Trade Debtors nominal code. Without additional information, it would be impossible to determine which customer the invoice belongs to. In this case, the Nominal Code will have the ledger code 1 set to A for account, and the Ledger Name 1 set to match the Debtors ledger name set up in Quantum Financials. Each time anything is posted to this Nominal Code, the appropriate Account code is also found and sent in the message to Quantum Financials. In the same way, the system can send Branch and/or Product group information to Quantum Financials for specified nominal codes. For further details see Nominal Code Maintenance.
5. You may wish to match the invoice total against two or more nominal codes. To do this, use your [Tab] key, mouse or Return key to create an additional line and repeat the procedure above, apportioning the invoice total between two or more nominal codes.
In the example above, the full Expenses invoice total of £200 has been allocated to Nominal Code 11002001 - Outside Machining Expenses.
When you have allocated/matched every line and you have finished working with the Purchase Invoice record, click End on the Toolbar - Sub-Menu to save and close the record:

Note: With Debit Note type invoices you are given the option to clear the Debit Note.
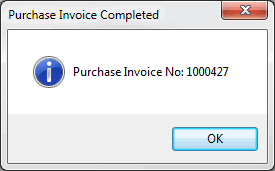
A window like the following will display to show the Purchase Invoice Registration is complete:

Click OK to close the window.
Once invoice totals have been matched and the Purchase Invoice completed/passed as described above, the record is no longer retrievable in the Finder under Registered Purchase Invoices. However, completed/passed Purchase Invoice records may be viewed by selecting Passed Purchase Invoices in the Finder.