|
Quantum VS Help: Document Scanning |
To scan documents or attach images for archiving against an individual Despatch Note, Picking Note, Purchase Invoice, Goods Received Note or Batch Certificate, first select the record and use one of the available Scan options. See Individual Document Scanning Methods.
The Scan Documents tab now displays. Note that the document type and number are already selected.
You may now scan documents - or attach images - and archive them against the selected record. To do this:
1. If you are attaching files only, go to the next step.
If you are scanning documents, ensure everything is ready for scanning:
Switch on your scanner;
Ensure the scanner is connected to the PC running Quantum VS; and:
Load the documents to be scanned.
Optional: To ensure the correct scanner is selected for scanning, click Choose Scanner on the Toolbar - Sub Menu, select Show Scanner Settings and click OK. A list of available Sources (i.e. scanners) is displayed. The scanner you wish to use should be highlighted. To select an alternative scanner, click to highlight it in the list then click Select (or Cancel to cancel the selection).
2. Scan or attach documents as described below:
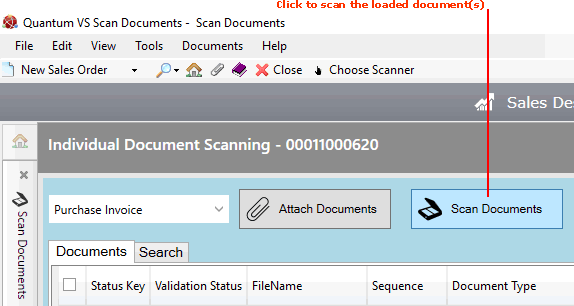
To scan the loaded documents, click Scan Documents:

In this example we are scanning documents to be stored against the Purchase Invoice Registration record 1000620.
Your scanner will automatically begin scanning the loaded documents.
Note: Temporary windows display when scanning begins. To stop scanning (e.g. if you clicked Scan Documents in error) click STOP.
If the scanner's 'Preferences' window displays at this point, see If The Scanner's Preferences Window Displays.
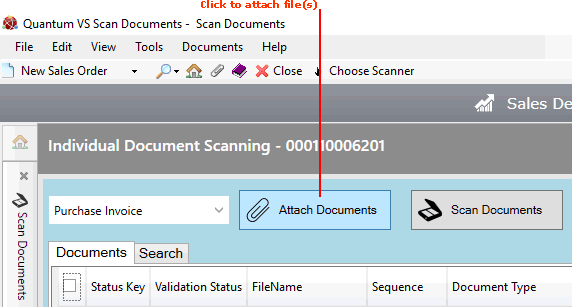
To attach an existing document file, click Attach Documents:

In this example we are attaching documents to be stored against the Purchase Invoice Registration record 1000620.
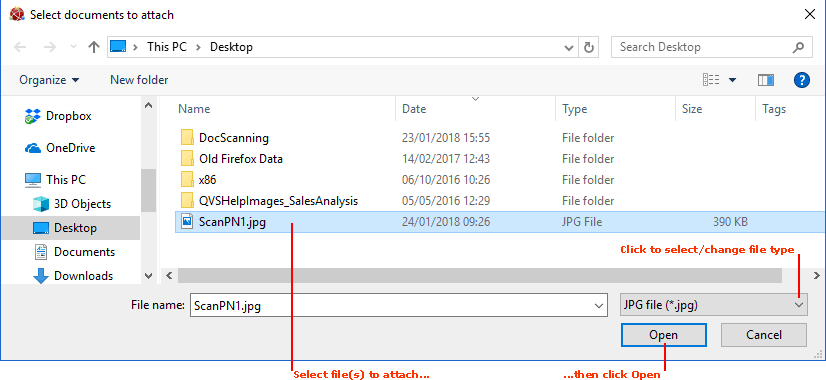
Next, select documents to attach, so that they display in the File name field, then click Open:
Note: If necessary, use the menu to select/change the file type. Available file types are: TIF, JPG, PNG, BMP, PDF.

3. Scanned - or attached - documents are added to the list as you scan/attach them. They remain there until they are archived or deleted:

In the above example we have scanned one document against the Purchase Invoice Registration record 1000620. Hence there is one line/document listed, with Sequence number 1. When you scan or attach multiple documents against a single record there will be multiple lines/documents, with Sequence number 1, 2 and so on.
Since we are scanning against a selected record (e.g. Purchase Invoice Registration record 1000620), the scanned document's status after scanning is Valid. The Scanned/Attached Date is displayed along with the document number.
You may now proceed with 'archiving' the scanned documents if you wish, although a number of alternative options are available at this point:
Scan - or attach - further documents against the selected record, using the above procedure. These will be added to the list.
View scanned/attached documents, change their order, or delete them (e.g. if the documents are incorrect, damaged or illegible). See Viewing, Reordering And Deleting Documents.
Close the Scan Documents tab without continuing. All non-archived documents will remain in the list when you log back on or re-open the Scan Documents tab.
4. To archive the listed documents for search and retrieval, click Archive Documents:

5. Click OK to the Archiving Documents Completed dialogue.
All of the scanned documents are saved against the selected record for later retrieval.
The Documents list in the main screen will now be blank as this document batch has now been archived.
You may now:
Use the search facilities to view, delete, print, save and email archived documents. See Working With Archived Documents.
Scan/attach further items as necessary to the same record (i.e. the same Despatch Note, Picking Note, Purchase Invoice, Goods Received Note or Batch Certificate).
Select a different record (i.e. a different Despatch Note, Picking Note, Purchase Invoice, Goods Received Note or Batch Certificate) and scan/attach items to it.