|
Quantum VS Help: File Maintenance |
The Cost Difference report generates a list of Purchase Orders where the cost does not match what was actually booked in via the Goods Received Note.
The report compares the cost recorded on the Goods Received Note with the cost recorded on the Supplier's invoice registered via Purchase Invoice Registration. The Purchase Order and Supplier account details are printed, along with the Supplier's Reference from the GRN, the date and GRN number, the GRN value and then the cost differences according to the stock record and any percentage change.
This report may be used to identify situations where it is necessary to cross reference goods received with the amount invoiced, in order to correct mistakes and/or take action with Suppliers.
To run the Cost Difference report:
1. Either:
Or: From the Toolbar - Main Menu: select Tools > Show Reports.
OR: Click the appropriate module on the Mega Menu then - under reports - select the required Report.
The Reports record opens in a new tab, listing all Reports by Name and Category.
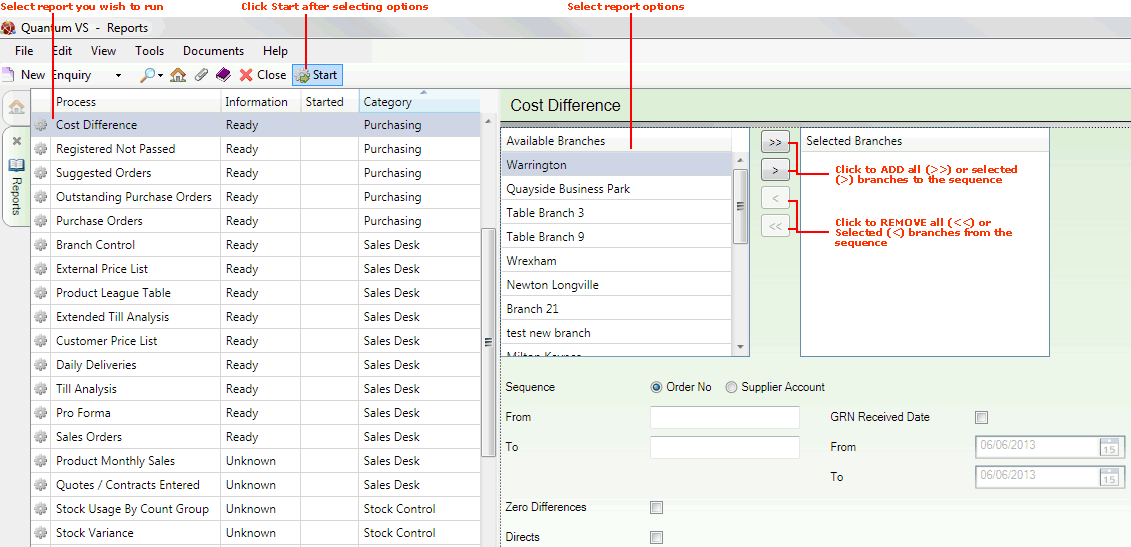
2. Use your mouse or [Tab] key to select the Cost Difference report:

3. Select report options in the available fields as required, using the following as a guide:
Note: You may use your [Tab] key to move from one field to the next.
|
Field |
Definition
|
|
Available Branches / Selected Branches
|
If no branches are selected, the report will include ALL branches.
Moving Branches To The Selected Branches List: You may select a specific branch - or branches - to report on by moving branches from the Available Branches list - which lists all of your branches - to the Selected Branches list. Click:
Removing Branches From The Selected Branches List: To remove branches from the Selected Branches list, click:
|
|
Sequence |
Click the appropriate button in order to sequence the report results in Product or Supplier Account code order.
|
|
From / To |
If the report is in Product sequence:
Note: A Product Code is a unique code comprising up to eleven characters. For example: 0502GRA0005. Product Codes are entered on the Product Code field of the Product record (Main tab). For further details see Defining Product Codes And Descriptions.
If the report is in Supplier Account code sequence:
Note: The three-part Supplier Account code is made up of a unique series of letters and numbers assigned to the supplier. They start with two characters - often the first two letters of the supplier's name - followed by up to seven numbers to represent the supplier, followed by four numbers to represent the site. For example, the code for the main site of the supplier AAP Internet might be AA/0000108/0001. Supplier Account Codes are entered on the Supplier field of the Supplier record (General tab). For further details see Supplier Maintenance. |
|
Currency Code
|
By default, the report will cover all Currency Codes set up on your system. However, you may select a Currency from the menu so that only GRNs matching this currency will be included in the report.
Note: Currency Code menu options are held in the table file CURR and must be defined using Table File Maintenance. |
|
GRN Received Date
|
By default, the report will show all relevant Purchase Orders to the present date. To focus on a specific GRN Received Date range check this field and enter the dates in the From / To fields below.
|
|
From / To
|
If the GRN Received Date field is checked (above) you may focus on a specific date range by entering the first and last GRN Received dates in the From / To fields.
|
|
Zero Differences
|
Check this field to include 'zero difference' orders in the report; i.e. Purchase Orders where the cost matches what was actually booked in via the Goods Received Note.
|
|
Directs
|
Check this field to include Direct Orders in the report.
|
4. Click Start on the Toolbar - Sub Menu to begin running the report.
5. When the report has finished running, a Status message will be shown listing a URL at which the report can be viewed and printed or emailed if necessary.
Note: You may use Print Groups to view, print or email the report at a later date. See Viewing, Printing And Emailing Documents.
Click OK to close this message. You may now close the Reports tab if you wish.