|
Quantum VS Help: File Maintenance |
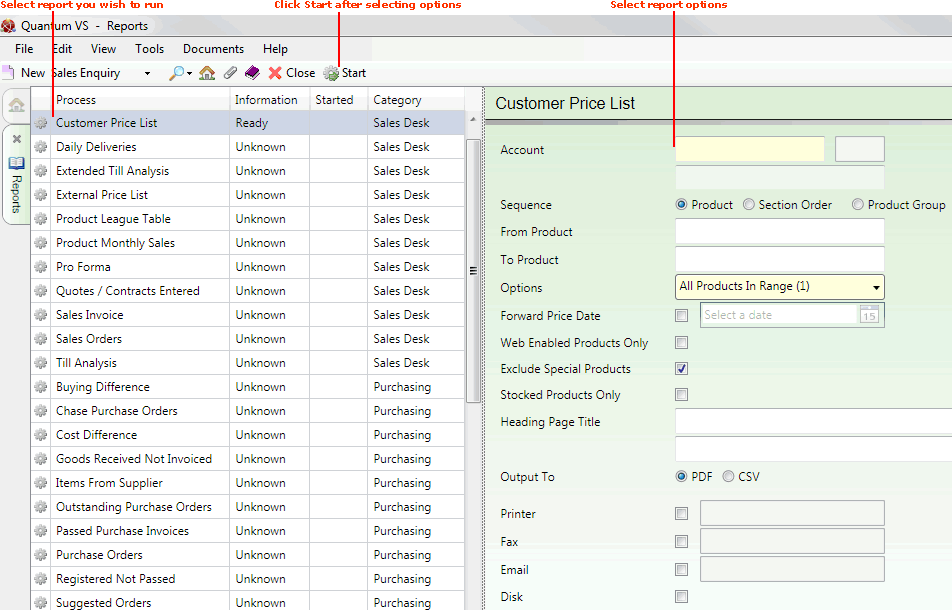
The purpose of the Customer Price List report is to generate a customer-specific price for a range of products in either PDF or CSV format, which can be printed, saved to disk, or emailed/faxed to the customer. There are options to report only on web-enabled and/or stocked products and to include/exclude Forward Prices and/or Special Prices.
To run the Customer Price List report:
1. Either:
Or: From the Toolbar - Main Menu: select Tools > Show Reports.
OR: Click the appropriate module on the Mega Menu then - under reports - select the required Report.
The Reports record opens in a new tab, listing all Reports by Name and Category.
2. Use your mouse or [Tab] key to select the Customer Price List report:

3. Select report options in the available fields as required, using the following as a guide:
Note: You may use your [Tab] key to move from one field to the next.
|
Field |
Definition
|
|
Account
|
Enter the Account number of the Customer you are generating prices/terms for.
If you don't know the Customer Account Code you may enter it automatically using the Finder. To do this:
The field to the right enables you to enter a Customer Site Number (e.g. 001, 002, 003 etc.). Use this option to generate a report for a specific customer site for the selected account.
|
|
Sequence
|
Click the appropriate button in order to sequence the report results in Product, Section Order or Product Group order.
|
|
From / To Product / Section Order / Product Group |
By default, the report will include customer prices for all products (in the Sequence selected above).
To limit the report to a selected Product, Section Order or Product Group range (*), enter the first and/or last item in the range in the available fields.
* This is also subject to the option selected in the Options menu below.
If you are using the Sequence 'Product' and don't know the Product Code you may enter it automatically using the Finder. To do this:
|
|
Options
|
Define the product/stock range to be included by using the drop-down menu to select from the following options:
|
|
Analysis Code
|
If 'Flagged By Code 1' was selected in the Options menu (i.e. option 10 above):
Enter the corresponding Analysis Code - a numeric in the range 0 - 9999 - in this field.
|
|
Forward Price Date
|
To include Forward Prices (i.e. prices to be applied on a date in the future) in the report, check this field and enter the 'Forward Price From' date (i.e. the date from which Forward Prices are to be included) in the field to the right.
If this option is selected, today's date is entered by default, but you may select an alternative date using the menu to the right.
|
|
Web Enabled Products Only
|
Check this field if you wish to report on 'web enabled' products only.
|
|
Exclude Special Products
|
Special products are excluded from the Customer Price List report by default (i.e. this field is checked). Uncheck this field to include Special Prices.
|
|
Stocked Products Only
|
Check this field if you wish to report on stocked products only.
|
|
Heading Page Title
|
You may enter up to two lines of text to be used as a report header, if required.
|
|
Output To
|
Click to select whether to output the report as a PDF or CSV file.
|
|
Printer
|
To output the report to a printer, select this option and enter the printer address in the field to the right.
|
|
Fax
|
To output the report to fax, select this option and enter the fax address in the field to the right.
|
|
|
To output the report to email, select this option and enter the email address in the field to the right.
|
|
Disk
|
To output the report to disk, select this option.
|
4. Click Start on the Toolbar - Sub Menu to begin running the report.
5. When the report has finished running, a Status message will be shown listing a URL at which the report can be viewed and printed or emailed if necessary.
Note: You may use Print Groups to view, print or email the report at a later date. See Viewing, Printing And Emailing Documents.
Click OK to close this message. You may now close the Reports tab if you wish.
NEXT: Daily Deliveries Report