|
Quantum VS Help: File Maintenance |
The Scanned Stock Count Input report generates/prints data captured by hand held bar code scanners as part of a Bar Coded Stock Take.
Note: This report is also included in the Stock Control tab for performing a bar coded 'stock take' - see Performing A Stock Take. The bar coded Stock Count procedure is explained in Running A Stock Take Using Hand Held Bar Code Scanners.
To run the Scanned Stock Count Input report:
1. Either:
Or: From the Toolbar - Main Menu: select Tools > Show Reports.
OR: Click the appropriate module on the Mega Menu then - under reports - select the required Report.
The Reports record opens in a new tab, listing all Reports by Name and Category.
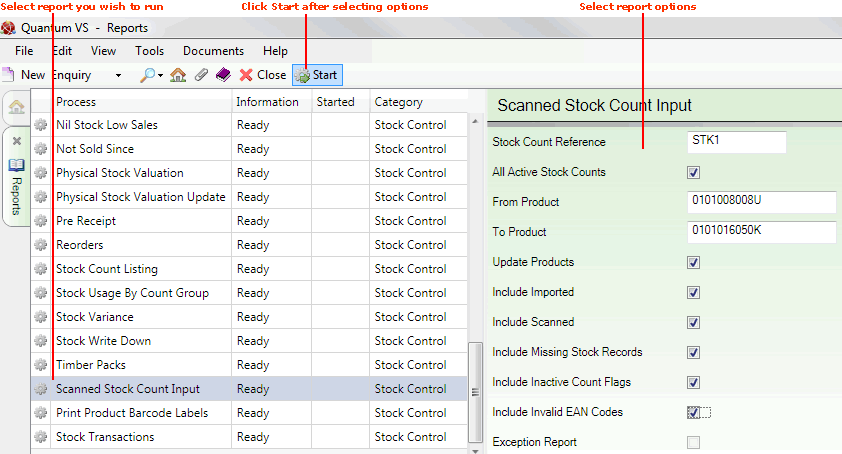
2. Use your mouse or [Tab] key to select the Scanned Stock Count Input report:

3. Select report options in the available fields as required, using the following as a guide:
Note: You may use your [Tab] key to move from one field to the next.
|
Field |
Definition
|
|
Stock Count Reference |
Enter the Stock Count Reference here. This is made up of exactly 4 alphanumeric characters without any embedded spaces (e.g. STK1).
|
|
All Active Stock Counts
|
Check this field to include all active Stock Reference files.
|
|
From / To Product
|
Enter the first and/or last Product code in the sequence of products you wish to include in the report.
If you enter nothing in the From / To fields, the report will be run on your whole Product list.
If you don't know the Product Code you may enter it automatically using the Finder. To do this:
|
|
Update Products
|
Check this field to update the Bar Code Stock File from your Product records.
|
|
Include Imported
|
Check this field to include imported records.
|
|
Include Scanned
|
Check this field to include scanned records.
|
|
Include Missing Stock Records
|
Check this field to include entries with missing stock records.
|
|
Include Inactive Count Flags
|
Check this field to include entries with an inactive count flag.
|
|
Include Invalid EAN Codes
|
Check this field to include entries with invalid EAN Codes.
|
|
Exception Report
|
Check this field to report on exceptions only.
Note: This is only available if the above check box fields have not been checked. |
4. Click Start on the Toolbar - Sub Menu to begin running the report.
5. When the report has finished running, a Status message will be shown listing a URL at which the report can be viewed and printed or emailed if necessary.
Note: You may use Print Groups to view, print or email the report at a later date. See Viewing, Printing And Emailing Documents.
Click OK to close this message. You may now close the Reports tab if you wish.