|
Quantum VS Help: File Maintenance |
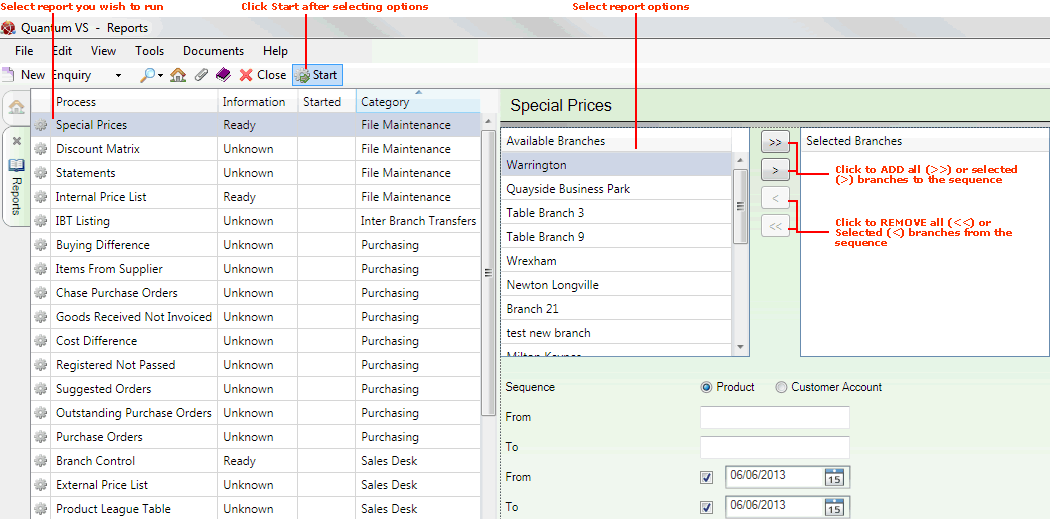
The Special Prices report generates a list of all active Special Prices for a given range of products or customers.
Note: Special Prices are created using Special Price Maintenance.
To run the Special Prices report:
1. Either:
Or: From the Toolbar - Main Menu: select Tools > Show Reports.
OR: Click the appropriate module on the Mega Menu then - under reports - select the required Report.
The Reports record opens in a new tab, listing all Reports by Name and Category.
2. Use your mouse or [Tab] key to select the Special Prices report:

3. Select report options in the available fields as required, using the following as a guide:
Note: You may use your [Tab] key to move from one field to the next.
|
Field |
Definition
|
|
Available Branches / Selected Branches
|
If no branches are selected, the report will include ALL branches.
Moving Branches To The Selected Branches List: You may select a specific branch - or branches - to report on by moving branches from the Available Branches list - which lists all of your branches - to the Selected Branches list. Click:
Removing Branches From The Selected Branches List: To remove branches from the Selected Branches list, click:
|
|
Sequence |
Click the appropriate button in order to sequence the report results in Product or Customer Account code order.
|
|
From / To
|
If the report is in Product sequence:
Note: A Product Code is a unique code comprising up to eleven characters. For example: 0502GRA0005. Product Codes are entered on the Product Code field of the Product record (Main tab). For further details see Defining Product Codes And Descriptions.
If the report is in Customer Account sequence:
Note: The Customer Account Code is made up of a unique series of letters and numbers assigned to the customer. They start with two characters, followed by up to seven numbers; e.g. WE/0001234. Zeros are permitted. |
|
From / To (Date)
|
By default, the report will show all active Special Prices for a given range of Products or Customers to the present date. To focus on a specific date range enter the From / To dates in these fields.
|
4. Click Start on the Toolbar - Sub Menu to begin running the report.
5. When the report has finished running, a Status message will be shown listing a URL at which the report can be viewed and printed or emailed if necessary.
Note: You may use Print Groups to view, print or email the report at a later date. See Viewing, Printing And Emailing Documents.
Click OK to close this message. You may now close the Reports tab if you wish.
NEXT: Statements Report