|
Quantum VS Help: Sales Desk |
You may select single or multiple lines on a Sales Order then select the following options from the More... menu in the Toolbar - Sub Menu to perform actions for the selected line(s):
Switch To Normal Line: to change selected Forward Order lines into Normal lines (* not available once stock has been allocated to a line);
Modify Line Schedule: to change the Required Date and/or Allocation Date for selected lines;
Add Forward Order Schedule: to create a Forward Order schedule for the selected line (* available when the last Forward Order line only is selected).
The above options are available on a new open Sales Order and also on a Completed order (in Amend mode).
Note: This section assumes you have the requisite Role/User Permissions enabled. See Enabling Forward Ordering In Quantum VS.
To select line actions for Forward Order lines:
Use the left-hand checkbox fields on the Sales Order to select (or deselect) one or multiple Forward Order lines. The uppermost checkbox field can be used to select (or deselect) all lines on the order:

To change Forward Order lines into Normal lines:
1. Select a single Forward Order line or multiple lines, as described in Selecting Line Actions For Forward Order Lines above.
2. From the Toolbar - Sub Menu select More... > Switch To Normal Line.
Note: If you have selected multiple lines, the number of lines displays after the menu option; e.g. Switch To Normal Line (2 lines) if two lines are selected.
All selected lines are converted into Normal order lines. Where free stock of a selected Product line is available, the entered Quantity is released to the order line(s) immediately and the Allocated total on the line is updated.
Note: If a Forward Order line is changed to a Normal line and stock is allocated to the line the Required Date and Allocation Date will no longer display.
3. If you do not receive any Insufficient Stock warnings (see below) you may add further Sales Order lines as necessary then Complete the order, as described in Sales Orders: Adding Forward Order Lines (steps 7 - 8).
Note: Switch To Normal Line is no longer available to a selected line once stock has been allocated.
Converting one or multiple Forward Order lines into Normal lines involves allocating free stock to the line(s). The Warning: Insufficient Stock window displays if there is insufficient free stock available to be released to an order line. At this point you have various options, including back ordering or 'force allocating' the line. See When You Receive An Insufficient Stock Warning for further details.
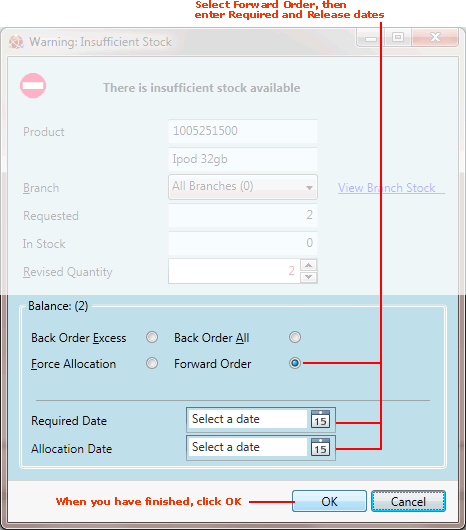
When you have Forward Ordering enabled, the Warning: Insufficient Stock window displays an additional Balance option - Forward Order - enabling you to revert the line to a Forward Order line. To do this:
1. When the Warning: Insufficient Stock window displays, click to select Forward Order. Required Date and Allocation Date fields will display below:

2. Enter the following details:
Required Date: the date on which the order goods are required by the Customer. Then click [Tab] to enter the:
Allocation Date: the date on which stock will be allocated - or released - to the order line.
3. Click OK to close the Warning: Insufficient Stock window.
The Normal line is converted/reverted to a Forward Order line with the given Required/Allocation dates. Details are displayed/updated on the Sales Order. Free stock details are updated on the system.
4. Repeat the above steps if the Warning: Insufficient Stock window displays for any other lines you were converting.
If you do not receive any Insufficient Stock warnings you may add further Sales Order lines as necessary then Complete the order, as described in Sales Orders: Adding Forward Order Lines (steps 7 - 8).
To change the Required and/or Allocation date for one or multiple Forward Order lines:
1. Select a single Forward Order line or multiple lines, as described in Selecting Line Actions For Forward Order Lines above.
2. From the Toolbar - Sub Menu select More... > Modify Line Schedule.
Note: If you have selected multiple lines, the number of lines displays after the menu option; e.g. Modify Line Schedule (2 lines) if two lines are selected.
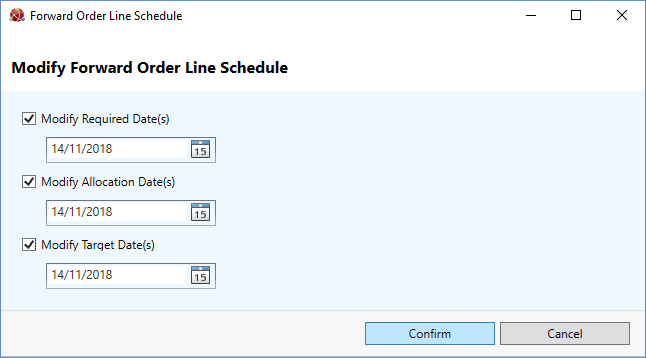
The Modify Forward Order Schedule dialogue window displays for the selected line(s):

3. To change the Required, Allocation and/or Target (if enabled) date(s) for the selected lines:
Check the Modify Required Date(s) and/or Modify Allocation Date(s) and/or Modify Target Date(s) fields as required, then
In the field below, either type in the date manually in the following format (01/01/20XX) or click the 'calendar' icon and use it to select a date.
4. When you have finished, click Confirm.
The Forward Order Schedule window is closed. The selected Forward Order lines on the Sales Order are updated to reflect the entered Required/Allocation/Target Dates.
You may use the More... menu to create a Forward Order schedule for a selected line. Note that this option is available for the last listed line on the Sales Order only and is not available when multiple lines are selected.
Note: For alternative methods of creating a Forward Order schedule for a Sales Order line see Generating A Repeating Forward Order Schedule and Manually Creating A Forward Order Schedule.
To Create a Forward Order schedule for the selected (last) line:
1. Select the last Forward Order line on the Sales Order. For further details see Selecting Line Actions For Forward Order Lines above.
2. From the Toolbar - Sub Menu select More... > Add Forward Order Schedule.
3. The Forward Order Schedule window displays for the selected Forward Order line. Continue from step 5 of Sales Orders: Adding Forward Order Lines.
NEXT: Forward Order Lines: Allocating Stock And Releasing Lines For Picking/Despatch