|
Quantum VS Help: Sales Desk |
Follow the procedure below to add a 'Forward' Product line to a Sales Order. This is similar to adding a standard Product line, except there are a few additional steps.
Note: When adding a Forward Order line you may create a Forward Order schedule which is either a repeating daily/weekly/monthly/yearly order or has irregular delivery quantities and dates. See step 5 below.
To enter Forward Order lines on a Sales Order, do the following:
Note: This section assumes you have the requisite Role/User Permissions enabled. See Enabling Forward Ordering In Quantum VS.
2. Enter Sales Order header details then click [Tab], so that your cursor is focused on the Product Code field of the first Product line (Line 100), ready for you to enter the lines required by the Customer.
3. Select one of the following Lines View Modes, so that Required, Allocation and Target (if enabled) dates will display for any Forward lines added:
Forward Order View; or
Date View
To do this, select Lines View > Lines View Modes > Forward Order View (or Date View) from the Toolbar - Sub Menu.
Note: For further details see Lines View Modes.
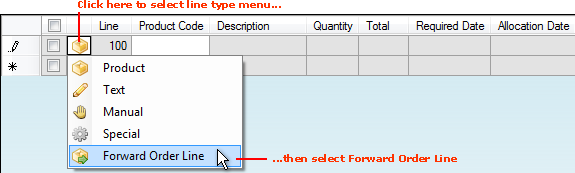
4. To add a 'Forward' Product line, click the 'line type selector' field to the left of the line and select Forward Order Line from the menu:
Then enter the Product and Quantity required in the usual way. See Adding Product Lines.
Note: If your Role/User Permissions are set so that Default Line To Normal Order is off (see Enabling Forward Ordering In Quantum VS), any Product line you add is a Forward line by default.
The Forward line is added. The line will display a Required Date and Allocation Date (and Target Date, if enabled), assuming the 'Date View' or 'Forward Order View' Lines View is selected, as described in step 3 above:

The following dates are displayed for the added 'Forward' Product line. These will typically be dates in the future, although they may be any date from 'today' onwards:
Required Date: The date on which the Customer requires the goods to be delivered (which partially determines when the line can be released for Picking/Despatch). This defaults to the Required Date in the Sales Order header, but you may amend it as required - see following step.
Note: The default Required Date is today's date plus a certain number of days as defined in the Required Days field in the Selling tab of the Price Book General control record. See Price Book General: Selling Record.
Allocation Date: The date on which free stock will be allocated - or 'released' - to the order line.You may amend it as required - see following step.
Note: The default Allocation Date is the Required Date plus a certain number of days as defined in the Allocate Prior To Required Days field in the Selling tab of the Price Book General control record. See Price Book General: Selling Record.
Target Date (if enabled): The date, agreed between you and the customer, on which you will aim to deliver the goods. This defaults to the Target Date in the Sales Order header, but you may amend it as required - see following step.
Note: The Target Date displays only if 'Enable Target Dates' is enabled in the Price Book Flags > Miscellaneous control record. Required Date and Target Date header and line fields can be updated by the User as the order progresses and used retrospectively to assess how well you met your delivery targets. See Sales Order Date Fields And Delivery Performance.
Note that, since this is a 'Forward' Product line, available stock is not usually allocated to the line immediately - see After Sales Order Completion: Stock Allocation And Picking Note Generation.
5. Take action as necessary:
Go to step 7: i.e. enter further lines then Complete the Sales Order as necessary.
Click the line's Required Date, Allocation Date or Target Date hyperlink, as shown in the example above.
This will display the Forward Order Schedule window, in which you may edit the dates and/or set up a delivery schedule by splitting the total Sales Order line quantity into a series of smaller quantities with different Required/Allocation/Target dates:
The upper area shows the Forward line's Product Code and Name. The Ordered Quantity defaults to the Sales Order line Quantity; you may amend this as necessary.
The Outstanding Quantity shows the difference between the Ordered Quantity and the total Forward Order Schedule quantity. This will initially show 0, but will change when you begin editing quantities.
The lower 'lines view' area shows the default schedule for this Forward line, showing the default Quantity and its default Required Date, Allocation Date and (if enabled) Target Date.
You may modify/add to this schedule in the following ways:
To edit a line's Required Date, Allocation Date or Target Date (if enabled):
Click the date in the Required Date, Allocation Date or Target Date column;
Then: Either type in the date manually in the following format (01/01/20XX) or click the 'calendar' icon and use it to select a date - then either click [Rtn] or click [Tab] to move to the next cell.
Note: If the Update Target Date dialogue displays after amending the line's Required Date, click either Yes - to update the line's Target Date to the same date, or No - to leave the line's Target Date as it is.
You may edit a Forward Order line's Required Date, Allocation Date and Quantity at any time before or after Sales Order Completion, up until stock is allocated to the line. See Editing Forward Order Lines.
Click the Create Repeat Schedule tab to generate a repeating Forward Order Schedule of Daily, Weekly, Monthly or Yearly deliveries. The line's total Ordered Quantity is split into a repeating delivery schedule of smaller quantities, each with their own Required Date, Allocated Date and (if enabled) Target Date. See Generating A Repeating Forward Order Schedule.
Use the Add To Schedule tab to create a Forward Order Schedule by manually adding lines with different quantities and Required/Allocated/Target dates. This option is useful if you do not require a repeating schedule. See Manually Creating A Forward Order Schedule.
6. When you have finished adding/editing dates and/or quantities in the Forward Order Schedule window, click Confirm.
Note: You cannot Confirm unless the Outstanding Qty is 0 (i.e. the aggregate Quantity of all lines in the Schedule section matches the Ordered Quantity).
The Forward Order Schedule window is closed. If you:
Created a delivery schedule for a 'Forward' line: new lines are added to the Sales Order with a specified Quantity, Required Date, Allocation Date and (if enabled) Target Date.
Edited the 'Forward' line's delivery schedule in the Forward Order Schedule window: edited dates and quantities are updated on the Sales Order.
7. Add further Forward Order lines to the Sales Order as necessary by repeating the above steps.
Note: You may - User Permissions permitting - change one or multiple Forward Order lines on the order into Normal order lines. These lines will have stock allocated to them - if available - on Completion of the Sales Order. See Changing Forward Order Lines Into Normal Lines.
Note: If necessary you may also add a Special, Manual line or Text line to the Sales Order in the usual way.
8. When you have finished adding Sales Order lines, click Complete on the Toolbar - Sub Menu to Complete the Sales Order, as described in Completing Sales Orders.
Once the Sales Order has been Completed:
Stock must be allocated to the line. This can take place on the line's Allocation Date if stock is available.
AND: A Picking Note must be generated so that the line can proceed through Picking, Despatch and Invoicing. This is based on the line's Required Date and on your system's Process Days Prior To Required Date value.
Typically a Forward Order line's Release and/or Allocation date will be a date in advance of when the Sales Order is initially Completed. Therefore it will be necessary to run one or both of the following Processes on a later date as appropriate:
Forward Order Stock Allocation - to allocate stock to Forward Order lines; and/or
Forward Order Document Release - to release lines to Picking/Despatch.
Once stock has been allocated and a Picking Note generated for a Forward Order line, the Picking Note will display in the Sales Order's Tracking tab and the order/line will progress through the Picking, Despatch and Invoicing cycle as normal.
For further details and examples see Forward Order Lines: Allocating Stock And Releasing Lines For Picking/Despatch.
Note: To edit the details of a single Forward Order line, or multiple Forward Order lines on a Sales Order - such as the Required Date, Allocation Date and/or Quantity - see Editing Forward Order Lines.