|
Quantum VS Help: File Maintenance |
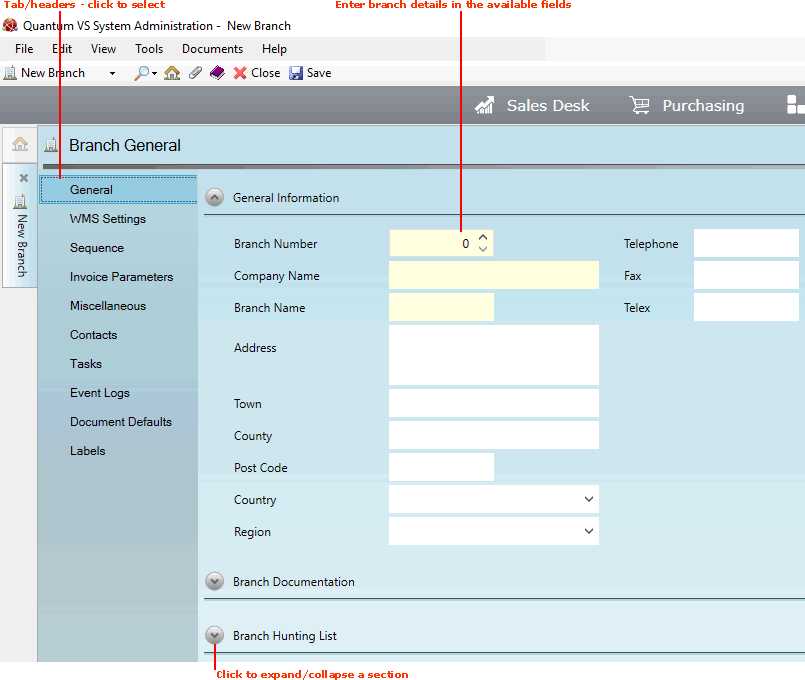
When you create a new Branch record the General tab is active by default:

Record the Branch's General details in the various available fields and sections, using the information below as guidance:
Note: Use your [Tab] key to move from one field to the next. Mandatory Fields (fields which must contain a value before a function can be completed) have a yellow background.
|
Field |
Definition (* = mandatory field)
|
|
General Information
|
|
|
Branch Number *
|
Select the required Branch Number. All branches must be assigned a number in sequence; i.e. 1 for the first branch (i.e. the 'parent' branch), 2 for the second, and so on.
Make sure the new branch number does not correspond to any branches already created. For example, if you have already created six branches, the new branch number should be 7 or more.
You may view existing branches/branch numbers by selecting Search Branches in the Finder. For further details see Finding Branch Records.
|
|
Company Name *
|
Enter the company name to which the branch belongs, as it should be presented on letters and other documents (e.g. Universal BM Ltd).
|
|
Branch Name *
|
Enter the branch's name.
This will typically be the name of the town/city/place in which the branch is based (e.g. Warrington). Or, if there is more than one branch in that town/city place, it might refer to the street or area.
|
|
Address / Town / County / Post Code
|
Enter the branch's full address and post code, as it should be presented on letters and other documents. Note that post codes should be divided into two; e.g. S8 1BH.
To use the Postal Address Finder (PAF): ensure your cursor is within the Address field then click [F3] to display the Address Finder window. This enables you to search for and select an address. For details see Using The Postal Address Finder (PAF).
|
|
Country *
|
Select the country to which the branch is assigned using the drop-down menu.
Note: Country values are held in the table file COUN (Country Codes) and may be set up and amended using Table File Maintenance. |
|
Region *
|
Select the region to which the branch is assigned using the drop-down menu.
Note: Region values are held in the table file REG (Region Codes) and may be set up and amended using Table File Maintenance. |
|
Telephone / Fax / Telex
|
Enter the branch's telephone, fax and telex numbers if known. Please ensure that the full STD codes are specified. Spaces can be used for presentation purposes, but are not essential.
|
|
Stocking Branch
|
If the branch will not stock its own products, select the Stocking Branch using the drop-down menu.
|
|
Branch Documentation
|
|
|
EDI Text **
|
This text field may be used to map various types of text to the Branch record (EDI Electronic Data Interchange Text and so on).
Not available at present.
|
|
Collection Text **
|
These fields may be used to record text for printing on Collection Notes specific to this Branch.
|
|
Goods In Text
|
These fields may be used to record text for printing on Goods Received Notes specific to this Branch.
|
|
Spare Text **
|
These fields may be used to record text for printing on miscellaneous documentation specific to this Branch.
|
|
Branch Hunting List
|
|
|
GRN Print Sales Back Order All Branches
|
This field controls what happens when Goods Received Notes which include back-ordered stock are printed. See Confirming And Printing A Goods Received Note.
If this field is:
|
|
|
Note: * = mandatory field; ** = secure field |
You may now continue by adding Branch details in the other available tabs. For further details see Creating A New Branch Record.
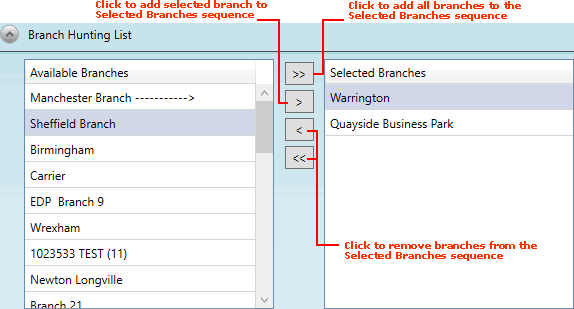
A Branch record's Branch Hunting List determines the sequence of alternative branches to be checked for available stock when stock is not available at the current branch.
Note: Before setting up an individual Branch's Branch Hunting List you will need to create records for all of your branches. See Editing A Branch Record.
Use the arrow buttons to add branches from the Available Branches list to the Selected Branches list to create a stock hunting sequence:

When you have finished, save the record by clicking Save on the Toolbar - Sub Menu.