From the Home tab: under links, select Processes.
|
Quantum VS Help: File Maintenance |
The Print Picking Note Labels process will print a selected number of Address/header or Product labels for a selected range of Picking Notes and/or Picking Note lines. These may be attached to consignments or individual items being picked.
Note: You may alternatively set up label printing when a Picking Note is Confirmed - see Printing Labels On Picking Note Confirmation. For an overview of label printing, including details of setting up label printing in Quantum VS, see Label Printing.
To run the Print Picking Note Labels process:
1. Either:
From the Home tab: under links, select Processes.
Or: From the Toolbar - Main Menu: select Tools > Show Processes.
OR: Click the appropriate module on the Mega Menu then - under processes - select the required Process.
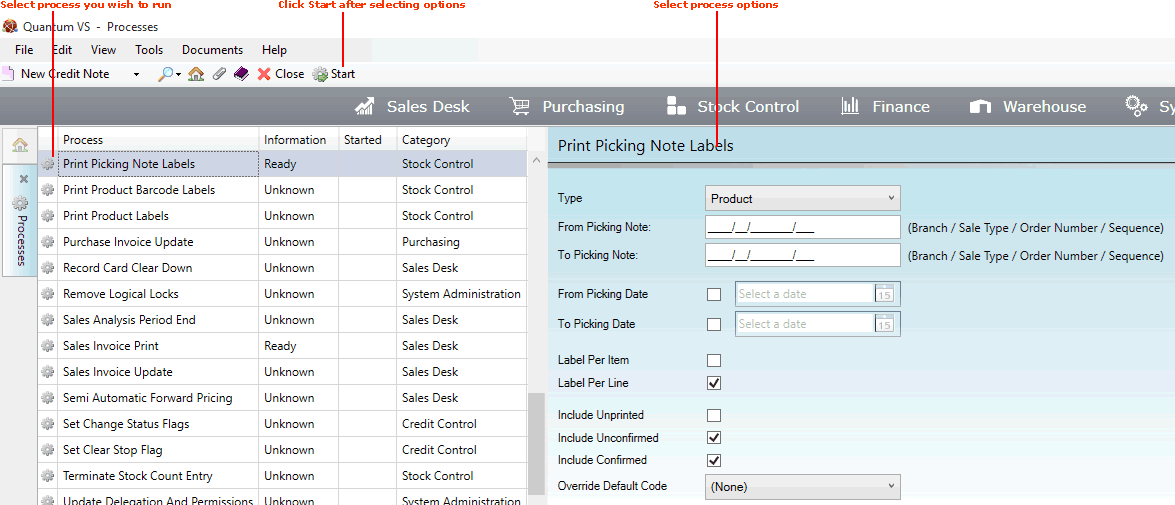
The Processes record opens in a new tab, listing all Processes by Name and Category.
2. Use your mouse or [Tab] key to select the Print Picking Note Labels process:

3. Select options in the available fields as required, using the following as a guide:
Note: You may use your [Tab] key to move from one field to the next.
|
Field |
Definition
|
|
Type
|
Select either:
|
|
From / To Picking Note
|
To print labels for a:
When manually entering the key, use the format Branch / Sales Type / Order Number / Sequence (e.g. 0001 / 01 / 2107809 / 001), where:
If you don't know the Picking Note number/key you may enter it automatically using the Finder. To do this:
|
|
From / To Picking Date
|
These fields - which display only when printing labels for multiple Picking Notes - give the option to filter by Picking Note date.
If these fields are displayed but the From and To Picking Date fields are not checked, labels will be printed for all Picking Notes in the selected range.
To filter Picking Notes in the selected range by date, check the From and/or To Picking Date fields as required and enter/select the date in the field(s) to the right.
|
|
From / To Line No
|
These fields - which display only if you have selected (above) to print Product labels for an individual Picking Note - give the option to print labels for specific Picking Note lines.
If these fields are displayed but the From and To Line No fields are not checked, labels will be printed for all lines on the selected Picking Note.
To filter by (i.e. only print labels for) specific lines, check the From and/or To Line No fields as required and enter the line number in the field(s) to the right.
Examples: (1) To print labels only for Picking Note lines 3 to 6, check the From and/or To Line No fields and enter the line numbers 3 and 6 in the fields to the right. (2) To print labels only for the first 4 lines on the selected Picking Note, leave the From Line No field unchecked, then check the To Line No field and enter 4 in the field to the right.
|
|
Label Per Item / Line
|
You may either:
For example: you have selected to print labels for one Picking Note which has two lines. Line 1 is 10 refrigerators and line 2 is 3 washing machines. With Label Per Item:
The Label Per Line setting adjusts automatically depending on whether you are printing Address (header) or Product labels and on the Label Per Item setting.
|
|
Include Unprinted
|
Check this field to include Picking Notes / Picking Note lines with the Status 'Unprinted'.
|
|
Include Unconfirmed
|
Check this field to include Picking Notes / Picking Note lines with the Status 'Unconfirmed'.
|
|
Include Confirmed
|
Check this field to include Picking Notes / Picking Note lines with the Status 'Confirmed'.
|
|
Override Default Code
|
If required, you may override the Label Types to be printed by selecting an option from the menu (i.e. make all product labels to be printed use this Label Type).
If you select (None), the system will use the Label Type associated with each selected product.
Note: The Label Types (i.e. Label Description and Code) available in this menu are set up in Label Maintenance. See Creating A New Label Record. |
4. Click Start on the Toolbar - Sub Menu to begin running the report.
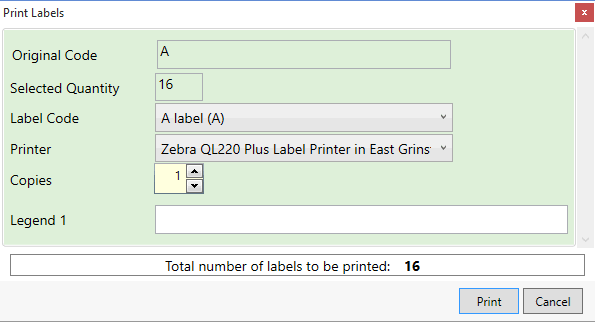
5. The Print Labels window displays, showing the default label - or labels - for the selected Picking Note/lines range. You may now specify further options or accept the displayed default options.
Note: Default Label types for Picking Notes and Picking Note lines are defined for each Branch via the Branch record > Labels tab. The Default Picking Header Label field defines the default Label type used when printing Picking Header/Address labels. The Default Picking Line Label defines the default Label type used when printing Picking Line labels. See Adding Branch Label Settings.
For example:

The fields displayed - and options available - are as follows:
Note: In the above example, the system has selected only one Label Type - A - for the Picking Note range we have selected to print labels for. Potentially multiple Label Types may be displayed, although the available options for each Label Type are the same.
|
Field |
Definition
|
|
Original Code
|
The Label Type selected to be printed (based on the entered criteria).
In the example above, all 16 of the Picking Notes/lines selected for label printing are associated with the Label Type 'A'.
|
|
Selected Quantity
|
The quantity of this Label Type selected to be printed (based on the entered criteria).
In the example above, 16 labels are due to be printed of the Label Type 'A'.
|
|
Label Code
|
The current selected Label Type to be printed (showing Label Code and Description).
This is initially the same as the Original Code. However, you may assign a different Label Type by selecting an option from the menu.
In the example above, all 16 of the Picking Notes/lines selected for label printing are associated with the Label Type 'A'. If you decided you would prefer to use the Label Type 'B' instead of 'A', you would select this option from the menu.
|
|
Printer
|
The default Printer to be used for this Label Type, as defined in the Label record.
You may select an alternative from the menu as necessary.
|
|
Copies
|
The number of copies of this Label Type to be printed. This defaults to 1, but you may select an alternative.
For example, if you required 2 of each label you would alter the number of Copies to 2.
Note: Setting the Copies quantity to zero means that none of this Label Type will be printed. |
|
'Legend' Fields
|
Up to five 'Legend' fields may be displayed. These are User-definable and specified in the Label record for each Label Type.
For each 'Legend' field displayed, you may enter a value which will be printed on the label.
For example, if this Label Type had the 'Legend' field 'Warehouse Name', you might enter the name of the warehouse in the available field. This would then be printed on each label for this Label Type.
|
The Total number of labels to be printed displays at the bottom of the Print Labels window.
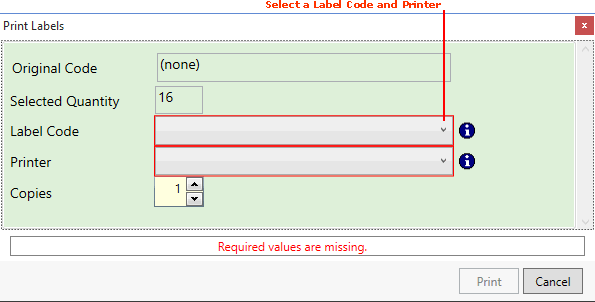
If Picking Notes/lines selected for label printing have not been associated with a default Label Type they are listed in the Print Labels window with the Original Code (None) and the Print option is disabled.
To enable printing of these labels you will need to assign the Label Code and Printer to be used:

Alternatively you may disable printing by amending the number of Copies to zero.
Another option is to go back and associate Default Label types for Picking Notes and Despatch Note lines for each Branch via the Branch record > Labels tab (in the Default Picking Header Label and Default Picking Line Label fields - See Adding Branch Label Settings) then resume Picking Note Label Printing with the same criteria as before.
6. When you have finished, click Print. The specified label(s) will be printed using the specified printer(s).
7. When the process has finished running, a Status message will be shown. Click OK to close this message. You may now close the Processes tab if you wish.