From the Home tab: under links, select Processes.
|
Quantum VS Help: File Maintenance |
The Sales Invoice Print process will print out invoices which have been created using the Sales Invoice Update process. This includes sales invoices, sales invoice (credits) and/or invoices for cash sales and cash credits.
The Sales Invoice Print process may also be used to re-print (i.e. print a copy of) invoices which have already been printed, and also to generate a report of invoices with a zero value.
Note: The default 'print' destination for Invoices are held in your User record > IO Control Fields tab within the following fields: 'Invoice' for Sales Invoices and Sales Invoice Credit Notes; 'Cash Sales Invoice' for Cash Sales Invoices and Cash Sales Invoice Credit Notes. You may also manually print, re-print and/or change the print options for an individual Sales Invoice - see Printing Sales Invoices.
To run the Sales Invoice Print process:
1. Either:
From the Home tab: under links, select Processes.
Or: From the Toolbar - Main Menu: select Tools > Show Processes.
OR: Click the appropriate module on the Mega Menu then - under processes - select the required Process.
The Processes record opens in a new tab, listing all Processes by Name and Category.
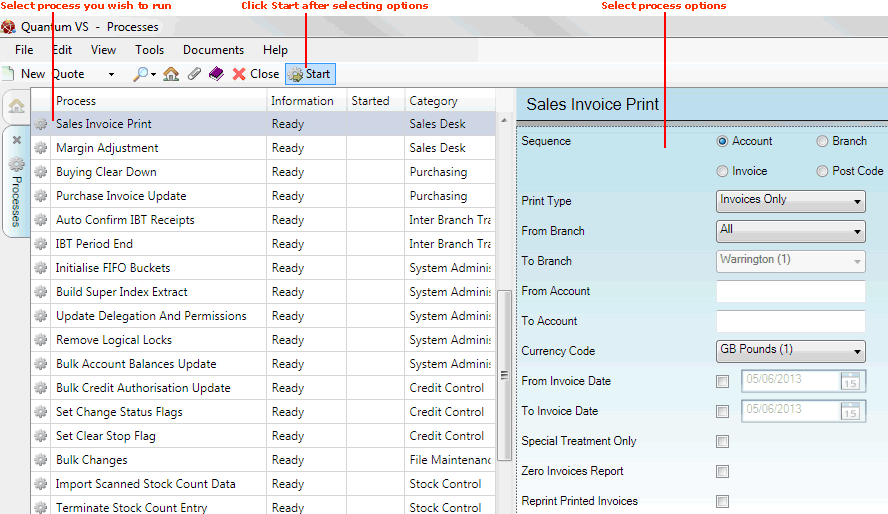
2. Use your mouse or [Tab] key to select the Sales Invoice Print process:

3. Select process options in the available fields as required, using the following as a guide:
Note: You may use your [Tab] key to move from one field to the next.
|
Field |
Definition
|
|
Sequence
|
Check the Account, Branch, Invoice or Post Code radio button to select the order in which the invoices will be printed.
|
|
Print Type
|
Use the menu to select one of the following options:
|
|
From / To Branch
|
To limit the process to a single Branch, select it using the From Branch menu. To run the process on a range of Branches, enter the last Branch in the sequence using the To Branch menu.
|
|
From / To Account (or Invoice)
|
Leave these fields blank if you wish to run the routine against all customer accounts (if you selected Account, Branch or Post Code in the Sequence field) or all sales invoice/credit note numbers (if you selected Invoice in the Sequence field).
To print a selected range of invoices/credit notes only, enter the first account/invoice/credit note number to be printed in the From field and the last account/invoice/credit note number in the print sequence in the To field.
|
|
Currency Code |
Use the menu to select the required Currency Code. Only Invoices/Credits matching this currency will be included in this invoice print run.
|
|
From / To Invoice Date
|
By default, all invoice/credit note dates will be printed.
To print invoices/credit notes with a specific date or date range, check the From Invoice Date field and select the 'From' date from the menu.
To print to a specific date, check the To Invoice Date field and select the 'To' date from the menu.
|
|
Special Treatment Only
|
Check this field if you need to print off invoices/credit notes for customers who have been marked as requiring special treatment. Otherwise, leave this field blank.
|
|
Zero Invoices Report
|
Check this field to produce an additional Zero Value Invoices report, flagging any invoices/credit notes which had a zero value.
|
|
Reprint Printed Invoices
|
Check this field if you need to print a copy of invoices/credit notes which have already been printed. The invoice/credit note copies will have 'Copy' printed on them. Otherwise, leave this field blank.
|
|
Send Via Highway
|
If the Reprint Printed Invoices option has been checked above:
Check this field to send 'printed' copy Sales Invoices to the Customer via Quantum VS XML Highway.
To enable this, the Invoice Layout / Invoice Headers / Invoice Trailers fields in the Price Book Flags > Documentation tab must be set to PDF for XML Invoice Printing.
Relevant XML records must also be set up in order to enable the 'Via Highway' Print option for a Customer. For further details see Configuring XML Print Records For Quantum VS Highway and Setting Up XML To PDF Document Printing.
|
4. Click Start on the Toolbar - Sub Menu to begin running the process.
5. When the process has finished running, a Status message will be shown. Click OK to close this message. You may now close the Processes tab if you wish.
NEXT: Sales Invoice Update