|
Quantum VS Help: Purchasing |
When you receive goods from a supplier you will need to create a Goods Received Note (GRN) and record the receipt of goods into stock.
You may either:
Create a Goods Received Note from the original Purchase Order. See Creating A Goods Received Note From An Existing Purchase Order.
OR: Create a new blank GRN and then enter the Purchase Order number. See Creating A New Blank Goods Received Note.
Header details are then retrieved. You may amend the Date Delivered if you wish. You must also enter the reference code from the advice note provided by the supplier when the goods were delivered. See Entering Goods Received Note Header Details.
Note: For an overview of the 'goods in' procedure see Working With Goods Received Notes. To review the full purchasing procedure see the Purchasing Overview.
To create a GRN from an existing Purchase Order:
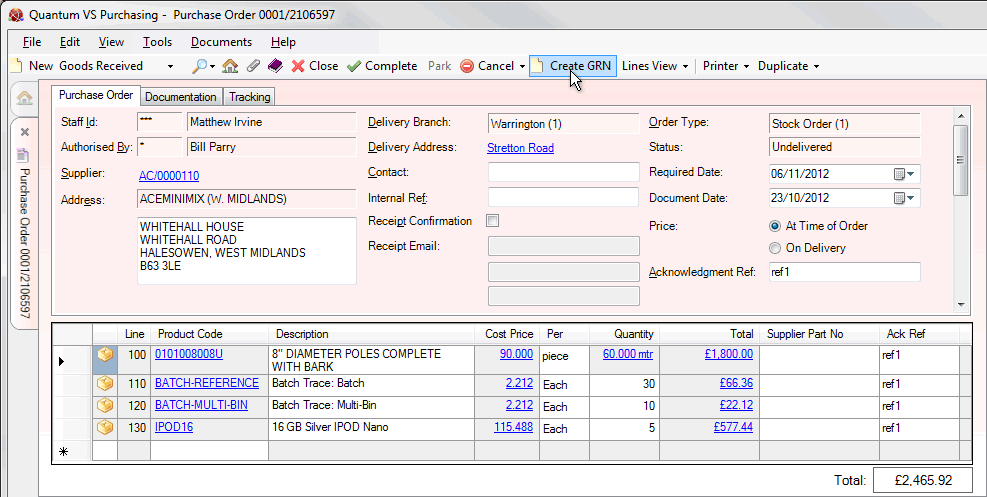
1. Locate and open the Purchase Order for which the goods are being received. See Finding Purchase Orders.
2. On the Toolbar - Sub-Menu click Create GRN:

3. A new Goods Received Note opens in a new tab - New Goods Received - on your desktop, with header details entered automatically. See Entering Goods Received Note Header Details.
Alternatively you may create a new blank Goods Received Note and then enter the Purchase Order number. To do this:
1. Create a new Goods Received Note by doing one of the following:
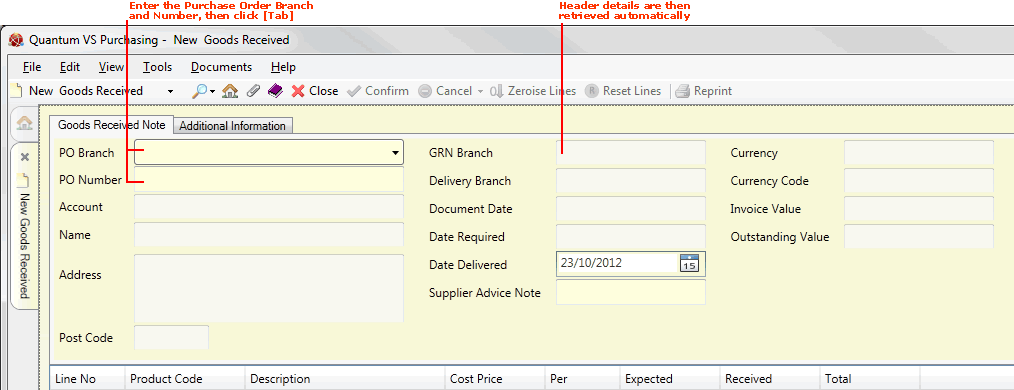
A blank Goods Received Note opens in a new tab - New Goods Received - on your desktop:

2. In the PO Branch field, use the menu to select the branch at which the Purchase Order was raised.
3. In the PO Number field, enter the number of the Purchase Order used to order the received goods.
If you do not have the Purchase Order number to hand, use the Finder to retrieve it. See Finding Purchase Orders.
4. Click [Tab] to move to the next field. The remaining header details are entered automatically. See Entering Goods Received Note Header Details.
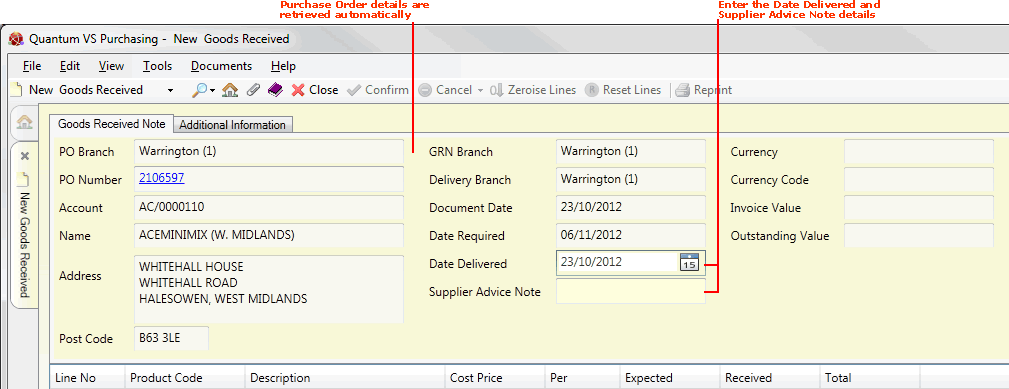
At this point the Goods Received Note header fields are populated with information:

The following fields are non-amendable and shown for information only:
Account: The Supplier's account code.
Name / Address / Post Code: The Supplier's name, address and postcode.
GRN Branch: The Branch at which the Goods Received Note was raised.
Delivery Branch: The Branch at which the goods will be received.
Document Date: The date on which the Purchase Order was raised.
Date Required: The 'required' date for goods delivery, taken from the Required Date field in the Purchase Order header.
Note: The PO Number is hyperlinked - click it to view the Purchase Order.
The remaining fields - Currency, Currency Code, Invoice Value and Outstanding Value are populated with information only after the Goods Received Note has been Confirmed:
Currency / Currency Code: Shows the purchasing currency being used by this supplier. A code greater than 1 indicates that the supplier deals in a currency which is not the 'home' currency.
Invoice Value / Outstanding Value: The Invoice Value shows the total available to be invoiced from this GRN, while the Outstanding Value shows the amount still to be invoiced against this GRN.
The Date Delivered field shows the actual date of delivery of the goods. Today's date is entered by default, but you may enter an alternative if you wish.
Click [Tab] to move to the next field.
In the Supplier Advice Note field, enter the reference code from the advice note the supplier provided when the goods were delivered. This is required for cross reference purposes.
Click [Tab] to retrieve line details from the Purchase Order and begin booking in the goods received. See Booking In Stock On A Goods Received Note.
Note: A second tab within the Goods Received Note - Additional Information - shows Header and Trailer text from the original Purchase Order. This text is for information only. If you enter any haulage details for the goods delivery, you may view these details in the Additional Information tab.