|
Quantum VS Help: Sales Desk |
When creating a Standing Order, after first creating a new Standing Order/Sales Contract you will need to select/enter certain details in the header to define the document as a Standing Order.
You must enter the Customer and other header details in the fields in the upper section.
Note: Use your [Tab] key to move from one field to the next. Mandatory Fields (fields which must contain a value before a function can be completed) are shown with a yellow background (as pictured above) or with an 'i' next to the field. Additional fields may be shown based on your system configuration.
When creating a 'Standing Order' Sales Contract, most of the header fields are the same as for Sales Contracts. For definitions and guidance see Entering Sales Contract Header Details and Creating A New Sales Contract. However, there are additional fields to consider when raising a Standing Order:
To create a Standing Order you will need to select/add values for certain fields in the header section:
Check the Standing Order field to specify that this will be a Standing Order, as opposed to a Sales Contract:

You will now need to enter the Customer and edit other header fields as necessary. Most of the header definitions are covered in see Entering Sales Contract Header Details.
However, you will need to be aware of the following:
The Standing Order Schedule header field (as shown above) displays for 'Standing Order' Sales Contracts only. Select one of the available values to allocate the Standing Order to a Standing Order Schedule.
When the Create Standing Order Sales Orders Process is later run in order to generate Sales Orders based on existing Standing Orders, this Standing Order will be either included or excluded in the process, depending on which Standing Order Schedule was selected in the Standing Order, and which option the User is processing.
Note: Standing Order Schedule menu values must first be set up in the SOSH (Standing Order Schedule Code) Table File using Table File Maintenance. Menu values may not necessarily relate directly to your existing Route Round records - they are simply text values used for selecting Standing Orders to be processed. See Configuring Quantum VS For Route Round Maintenance.
The Route/Round header field is used for defining which Route Round delivery is used for this Customer (or Customer Site), for this Standing Order.
Note: The Route/Round and Drop Sequence options are relevant to Delivered Standing Orders only and are unavailable for Collected and Direct Standing Orders.
For Standing Orders you have the following options:
Leave the Route/Round selection empty: to make the system select the Route/Round delivery for this Customer (or Customer Site) Standing Order.
Or: Select a Route/Round from the available options: to use a specific Route/Round delivery for this Customer (or Customer Site) Standing Order. This may be useful if the Customer is subscribed to multiple Route Rounds and you wish to allocate a specific Route Round delivery:

Note: The Route/Round menu displays Route Round deliveries to which this Customer/Customer Site has already been subscribed using Customer Route Round Drop Sequence Maintenance.
The selected Route Round will be used when Sales Orders are subsequently generated from this Standing Order.
When a Route/Round is selected - see above - the Drop Sequence field shows the default 'drop' position of this Customer/Customer Site in the selected Route Round, as defined in Customer Route Round Drop Sequence Maintenance. For example, a Drop Sequence value of 2 means the Customer/Customer Site is the second drop in the selected Route Round delivery.
You may enter an alternative Drop Sequence value if necessary. When Sales Orders are subsequently generated from this Standing Order and the Route Listing is generated, the Customer/Customer Site will appear at the selected position in the Drop Sequence.
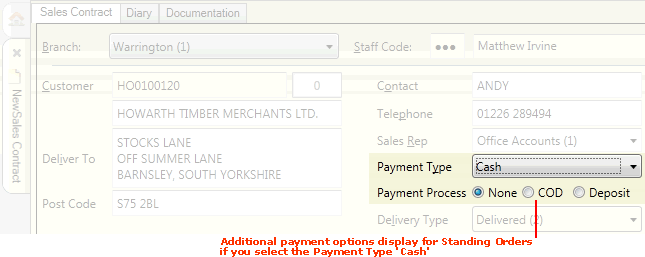
The following additional 'Payment Process' options are available for Standing Orders when you select 'Cash' as the Payment Type in the header:
Cash On Delivery: Select this option if, when Sales Orders are raised against this Standing Order, the customer will pay for the order when the goods are delivered.
Deposit: Select this option if, when Sales Orders are raised against this Standing Order, the customer will pay a deposit now and pay the balance when the goods are delivered or collected.
Note: The default option is None; i.e. do not specify additional cash payment options.

Select Prepay if you wish to allow the customer to use any positive account balance as payment against Sales Orders generated from this Standing Order:

Note: The Prepay option is available for 'Cash Deposit' Standing Orders only (i.e. Standing Orders for which 'Cash' is the selected Payment Type and 'Deposit' is the selected 'Payment Process' option).
When Prepay is selected and the Standing Order is Completed, the system takes note of any payment the customer has made against their account (see Cash Posting). When Standing Order Sales Orders are generated and Completed, the Payment Form will not require the customer to make payment if they have a positive account balance - see Processing Standing Orders After Completion.
When you have completed the header details, click [Tab] to place your cursor in the lines area and begin entering line details.
Note: At this point the Standing Order is assigned a number. The tab will now read Sales Contract 1001141 (or a similar number), rather than New Sales Contract.