|
Quantum VS Help: File Maintenance |
The Transfer procedure may be used to manually transfer a quantity of Product Inventory stock from the current bin location to one or more alternative bins.
Note: The term 'Product Inventory stock' refers to products associated with a Batch Reference, Serial Number and/or Bin Location on receipt into stock (see Allocating Batch/Bin/Serial Number Details At Goods Receipt).
Note: A User's ability to manually transfer a quantity of Product Inventory stock from the current bin location to one or more alternative bins is controlled by the User Permission: File Maintenance > Batch Stock > Transfer Stock. See Product Inventory (Batch Stock) Records: User Permissions.
For example: stock of the product MULTIBIN1 was assigned the Bin Location MBIN1 when it was received into stock. We now wish to reassign a quantity of stock to an alternative bin - MBIN2 - to reflect a change in the stock's Bin Location.
Note: A product's default bin location is defined in the Branch Stock record (Other tab) for the product. See Branch Stock Maintenance.
Note: When bin movements and stock 'put away' are performed using a remote bar code scanner the system is automatically updated with stock numbers at each bin location and the manual procedure described here is not required.
To do this:
1. Find and open the required Product Inventory record using one of the following methods:
Use the Finder. See Finding Product Inventory Records. Or:
Open the Product Inventory record from the Inventory History tab of the Product record. See Inventory History Tab: Viewing Product Batch Details. Or:
Retrieve the GRN - see Finding Goods Received Notes - and click the View Batches link in the Receipt Details column on the GRN line. See Reviewing Batch Allocations (Confirmed GRNs).
Each Product Inventory record shows the Batch Reference, Serial Number and/or Bin Location and other product details. See Viewing Product Inventory Records.
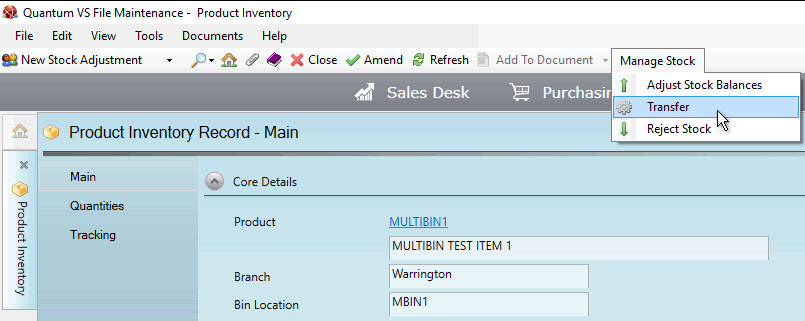
2. From the Toolbar - Sub Menu select Manage Stock then Transfer:
The Product Inventory Transfer window displays, showing the:
Product Code of the goods associated with this Batch Reference, Serial Number and/or Bin Location.
Batch Number - or Serial Number - of the goods.
Bin Location of the goods you are transferring from.
Free Stock available to transfer from the current bin location:
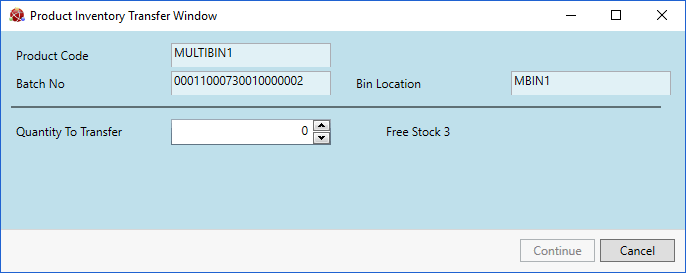
Note: To perform the transfer, free stock must be available.
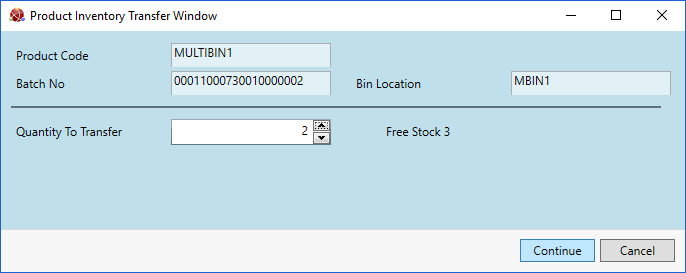
3. In the Quantity To Transfer field, select/enter the number of items you wish to transfer (2, in this example) then click Continue:
4. Enter the Bin Location you wish to transfer the stock to, and the Quantity to transfer.
Note: Use your [Tab] key to move from one field to the next.
Note that you may transfer Product Inventory stock into more than one bin. In the following example, of the 2 items we are transferring:
1 item will be transferred to MBIN2; and
1 item will be transferred to MBIN3.

5. Click Transfer - as shown in the example above.
Note: The Transfer button is available only when the total stock quantity selected for transfer (as indicated in the To Post Quantity field) has been allocated a new Bin Location.
On completion a message displays to indicate that the transfer was successful.
Note: You will need to refresh the Finder in order to display updated quantities in the Product Inventory records Finder and in the Quantities tab of the Product Inventory record.
Note: Details of any stock adjustments - including the User who made them - can be viewed in the Tracking Tab of the associated Product Inventory record.