|
Quantum VS Help: Purchasing |
After the 'matching' stage you will need to register a buying loss if you have received the goods ordered but have been invoiced for more than the value of the goods.
Note: This applies when registering Purchase Invoices of the Type 'Stock' or 'Directs' only.
This is done after you have entered invoice totals and matched/allocated the individual lines. When you click End at the end of the Purchase Invoice Registration procedure, the Buying Deficit window appears if a buying deficit exists, enabling you to offset any buying deficit.
One option available at this point is to raise a Debit Note - a request to the supplier to issue you with a Credit Note to recover the buying deficit. You may also charge for VAT and/or Carriage/Extras.
The following example illustrates how any buying deficit might be offset:

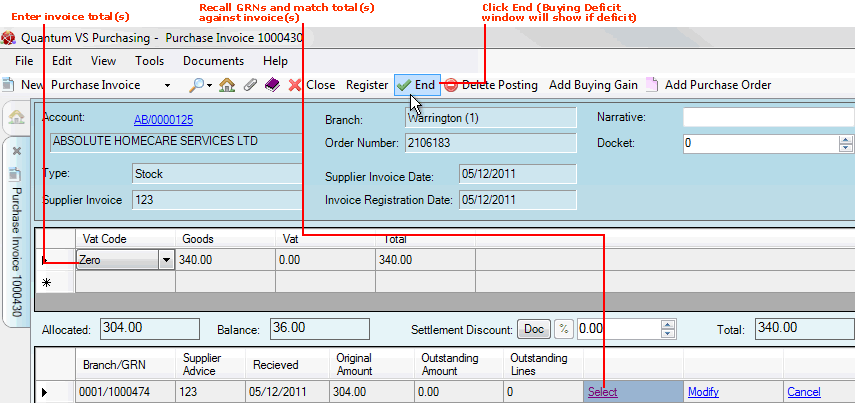
In the above example, we have been invoiced £340 for goods received worth £304 (i.e. £36 too much).
We followed the standard procedure of recording invoices and then matching goods received values against invoice totals:
We entered the amount we were invoiced for (£340) in the invoice total lines section.
We clicked Continue to recall GRNs for the Purchase Order in order to match goods received against invoice totals (and were shown the Totals Do Not Match! warning).
Given that goods worth £304 have been received, we clicked Select in order to allocate the £304 for payment.
We clicked End, since all goods received have now been allocated.
If a buying deficit applies, the Buying Deficit window will then appear:
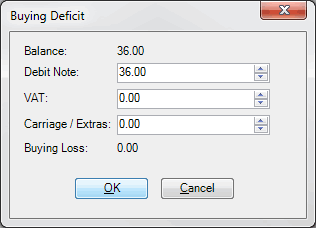
Initially the Balance (the difference between the amount invoiced and the amount allocated) and Buying Loss figures will be the same.
You can offset the Buying Loss by entering figures in the following fields:
Debit Note: To raise a Debit Note for the difference in cost, enter the figure here. The debit note then goes onto the Purchase Ledger with a status of Held. When you enter a figure in the Debit Note field a further window is displayed - see below.
VAT: To charge VAT on the Debit Note, enter a value here.
Carriage/Extras: To enter any additional cost for carriage or other extras here.
Returning to our example above: the supplier has invoiced us for £36 too much. To offset the buying loss we will raise a Debit Note. In this case the Debit Note 'goods' total is set to recoup the whole of the £36 difference, with no charge set for VAT or Carriage Charges/Extras. Hence the Buying Loss figure now shows as zero.
When you have finished, click OK to close the window.
If you entered a figure into the Debit Note field in the Buying Deficit window (see above), the Debit Note Details window is displayed. Here you may enter the details that will appear on the Debit Note:
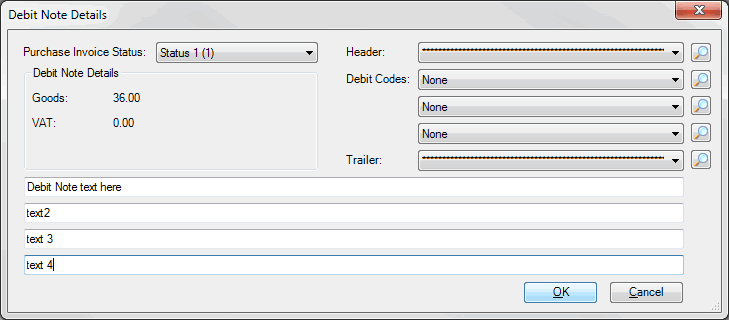
The Debit Note Details fields show the totals you are charging for Goods and VAT. Enter the necessary details as follows:
Purchase Invoice Status: Use the drop-down menu to select the Purchase Invoice status (e.g. Overcharge).
Header, Debit Codes and Trailer: You may select saved Header, Debit Code and Trailer text to be printed on the Debit Note (if available: these texts are set up by the System Administrator using Terms And Conditions Maintenance) using the drop-down menus.
Text fields: You may enter additional text to be printed on the Debit Note - for information/instructions etc. - in the four text fields.
When you have finished, click OK to close the Debit Note Details window. If all lines have been allocated the Purchase Invoice Completed message displays, listing the Purchase Invoice and Debit Note numbers.
The Debit Note is created and will now be accessible from the Finder - see Finding Debit Notes. To print the Debit Note:
1. Open the Debit Note using the Finder. For example:
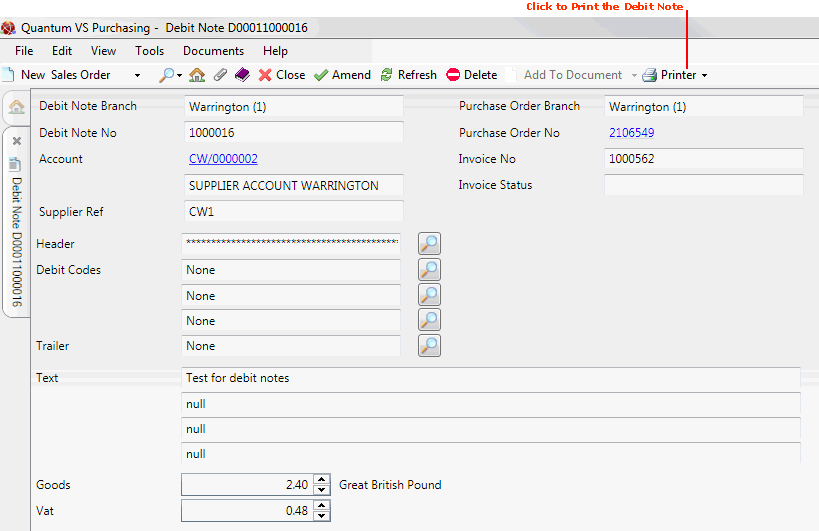
2. Select Printer > Print on the Toolbar - Sub Menu.
3. The Debit Note Print Options window is displayed:
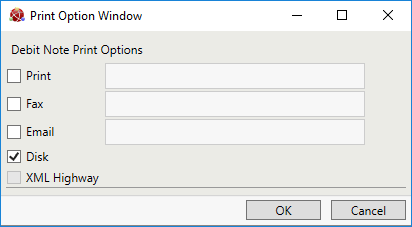
Select print options by checking Print, Fax, Email and/or Disk and entering the print destination as necessary in the field to the right.
Selecting XML Highway means the document will be transmitted to the Customer Contact via Quantum VS Highway. For this option to be available, XML Print Records must be configured - see Configuring XML Print Records For Quantum VS Highway.
4. When you have finished selecting Print Options, click OK.
Note: If a message displays asking if you wish to 'Print VAT?' click Yes or No as appropriate.
5. The document is 'printed' to the specified location. A dialogue window will indicate that printing was successful. Click OK to close it.
Note: When a Debit Note is open you may select Printer > Print Options to set or alter the print location for this Debit Note.
The default output method and Supplier Contact is the one defined for the document type 'Debit Note' in the Document Defaults Tab for this Supplier. If no Document default is specified, the default 'print' destination is the default specified for the document type 'Debit Note' in your User record > IO Control Fields tab.
Notes: (1) You may use Print Groups to view, print and email/fax any document saved to Disk (i.e. to the Linux Host Server). (2) Many Quantum VS document types and Reports are output as XML files which the system automatically converts into 'formatted' PDF files which may be printed via a printer, sent by email, faxed, saved to disk or sent via the Quantum VS XML Highway. See Setting Up XML To PDF Document Printing.
Once the Debit Note has been 'printed' you may issue it to the supplier to request a Credit Note to reimburse you for the over-invoiced amount.
When you later receive the requested Credit Note from the supplier you may register it by creating/opening a new Purchase Invoice Registration record and selecting 'Debit Note' in the Type field of the header section.