Confirming Lines And Recording Variance On Picking Notes
If your system is configured for manual Picking Note Confirmation you will need to manually retrieve and Confirm the 'printed' Picking Note.
Note: Manual Picking Note Confirmation is not required if automatic Picking Note Confirmation is enabled, as the Picking Note is automatically given 'Confirmed' status following the printing of the Collected and/or Delivered Picking Note. See Working With Picking Notes and The Picking, Delivery Assembly, Despatch And Invoicing Cycle.
When you recall the 'printed' Picking Note, the Picked Quantity of each product line (i.e. quantity confirmed for picking) defaults to the quantity ordered. If there is no variance to record you may immediately Confirm the Picking Note.
However, you will need to be aware of the following before you Confirm the Picking Note:
-
If the Picked Quantity of a particular product line does not match the quantity ordered you must record variance.
-
If a product line is 'batch traceable' you may view the batch allocation. If you want to allocate items from a different Batch/Bin/Serial Number to the one(s) allocated automatically by the system you may edit the batch allocation.
These functions can be performed:
Note: There are two Bar Code scanning options for picking. A 'keyboard wedge' type scanner, plugged in between the user's keyboard and PC, may be used to update Quantum VS directly using the procedure described below. Alternatively, a wireless RF scanner may be used (by a 'scanner user' running the Quantum VS Warehouse application on the scanner device) to update the system remotely. See Bar Code Scanning Maintenance.
The procedure for manual Picking Note retrieval and line confirmation is as follows:
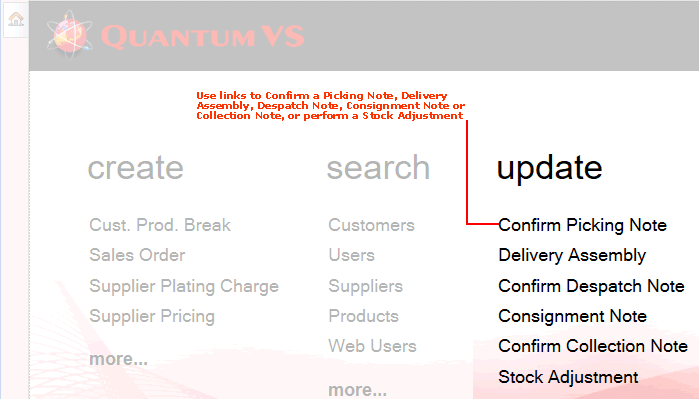
1. Retrieve and open the 'printed' Picking Note using one of the following methods:
The Picking Note opens in a new tab. For example:
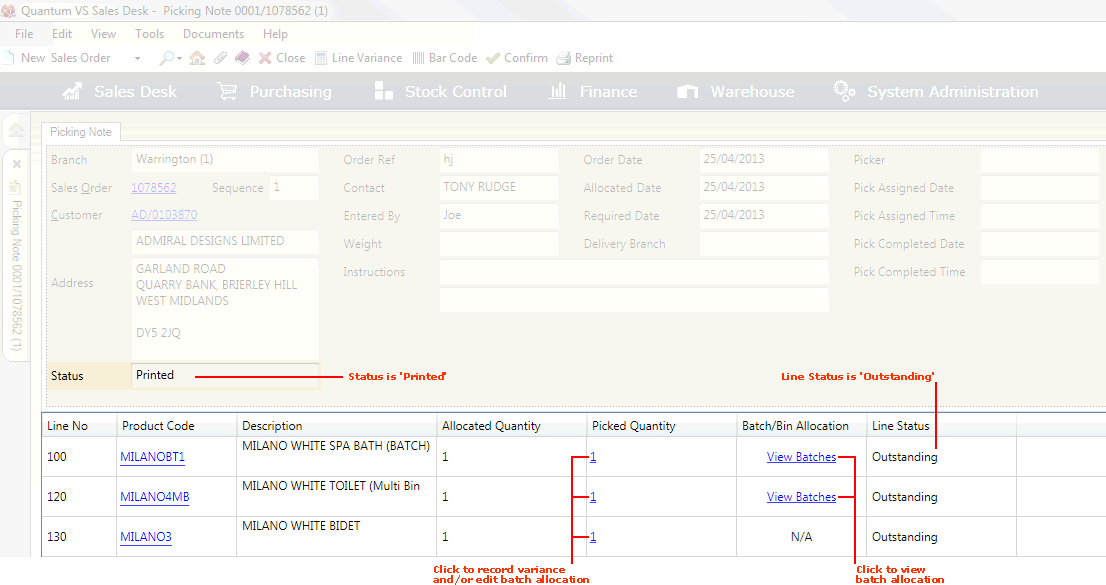
Note: The Status field of the Picking Note should be 'Printed'. If the Status is 'Unprinted' you must print the Picking Note before you can Confirm it. See Understanding The Picking Note for definitions of the header fields.
Product lines are recalled from the Sales Order. For each line:
-
The Line Status is 'Outstanding', as product lines have not yet been Confirmed.
-
The Picked Quantity column displays the quantity confirmed for picking. This defaults to the Allocated Quantity (i.e. quantity ordered).
The Batch/Bin Allocation column displays 'View Batches' if the product is 'batch traceable' (or N/A if not). Click the hyperlink to view the quantity allocated to each Batch (or Serial) Number and/or Bin Location.
Note: A product is 'batch traceable' if 'Batch Reference', 'Multi-Bin' or 'Serial Number' is selected in the Batch Bin Serial Flag field in the Issues & Stock tab of the Product record. See Product Batch Traceability Maintenance.
2. If there is no need to record variance or edit the batch allocation on any line (i.e. for all product lines, the displayed quantities have been picked or are available for picking): you may ignore the following steps and Confirm the Picking Note.
Alternatively: to Confirm line quantities for picking - entering variance and/or editing 'batch allocations' where necessary - do the following:
Picking using a Bar Code scanner: Confirming picked quantities and editing batch allocations
If you are using a Bar Code scanner to scan goods and enter 'picked' quantities, click Bar Code on the Toolbar - Sub Menu:

The Line Selection window displays for the first/next product on the Picking Note:

Scan the product's Bar Code.
Or: Type in the product's Bar Code or Product Code, click [Tab], then click Select (or [Return]).
Note: An error message displays if the Bar Code (or Product Code) is not recognised. If you see this, click Cancel and re-scan/re-enter the Bar Code (or Product Code). For the system to recognise a product's Bar Code, an 'Our' Bar Code record must have been created for the product in Bar Code Maintenance.
When the system recognises the product, the Line Confirmation window displays. If the product is:
Repeat this procedure until you have entered the picked quantity of every line (see step 7).
Recording variance and editing batch allocations manually without a scanner:
To enter variance and/or edit batch allocations for one or more lines without a Bar Code scanner, click Line Variance on the Toolbar - Sub Menu:

The Add/Modify Variance By Product window displays:

Type in the product's Bar Code or Product Code, click [Tab], then click Select (or [Return]).
Note: An error message displays if the Bar Code (or Product Code) is not recognised. If you see this, click Cancel and re-scan/re-enter the Bar Code (or Product Code). For the system to recognise a product's Bar Code, an 'Our' Bar Code record must have been created for the product in Bar Code Maintenance.
When the system recognises the product, one of the following windows will display:
Recording variance and editing batch allocations on individual lines without a scanner:
If you are not using a Bar Code scanner and wish to record variance and/or edit batch allocations on individual lines, click the hyperlink in the Picked Quantity column for the line:

One of the following windows will display:
3. Enter Picked Quantities - and edit batch allocations as necessary - in one of the windows which now displays:
The Add Picking Variance window - or the Line Confirmation window, if you are using a Bar Code scanner - displays when you have entered details for/clicked the Picked Quantity hyperlink of a product not flagged for 'batch traceability'.
Details of the product being picked and the quantity ordered are displayed:
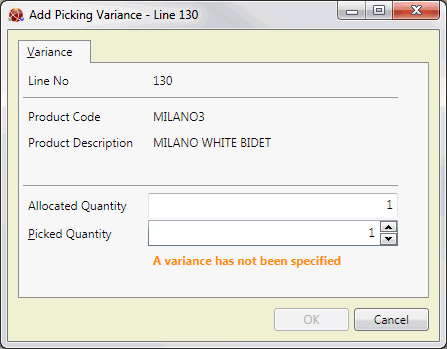
Use the Picked Quantity field to enter the actual quantity for picking.
If the Balance Action field now displays, go to step 4. Otherwise, go to step 5.
The Add Variance window - or the Line Confirmation window, if you are using a Bar Code scanner - displays when you have entered details for/clicked the Picked Quantity hyperlink of a product flagged for 'batch traceability'.
Details of the product being picked and the quantity ordered are displayed. The Batch Allocation tab lists the quantity allocated to each Batch (or Serial) Number and/or Bin Location:
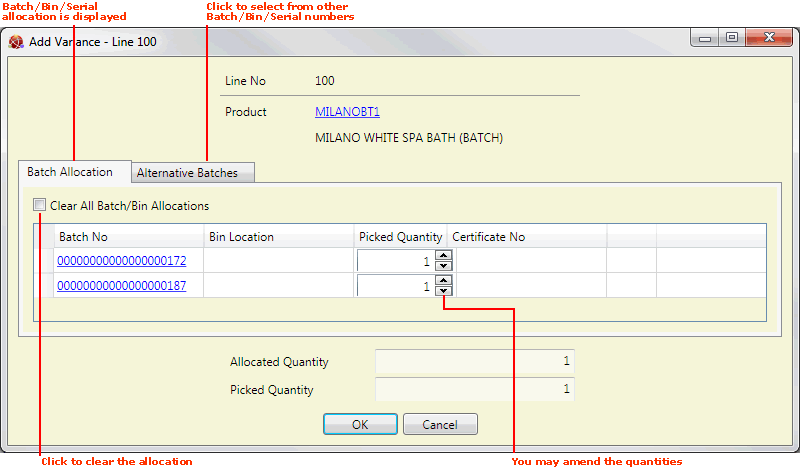
Note: Batch Reference- and Serial Number-flagged products are not required to have a Bin Location. Multi-Bin-flagged products will not display a Batch Number. A Certificate Number will display if one was entered for the 'batch'. You may click on the Batch/Serial Number or Bin Location hyperlinks to view the Product Inventory record.
You now have the following options:
-
To accept the Picked Quantity for each Batch/Serial Number and/or Bin Location displayed, click OK. (Now go to step 6.)
-
To change all of the listed Batches/Bins/Serial Numbers (i.e. when all of the items are to be picked from different Batches/Bins/Serial Numbers to those displayed): Click Clear All Batch/Bin Allocations. Or:
-
To change some of the listed Batches/Bins/Serial Numbers (i.e. when part of the allocation is correct but part is to be picked from different Batches/Bins/Serial Numbers to those displayed): Edit the quantity/ies allocated to the listed Batches/Bins/Serial Numbers as appropriate.
If you cleared or edited the Batch/Bin/Serial Number allocation: click to select the Alternative Batches tab.
Available batches of this product are displayed (i.e. Batch/Bin/Serial Numbers where there is a Free Quantity):
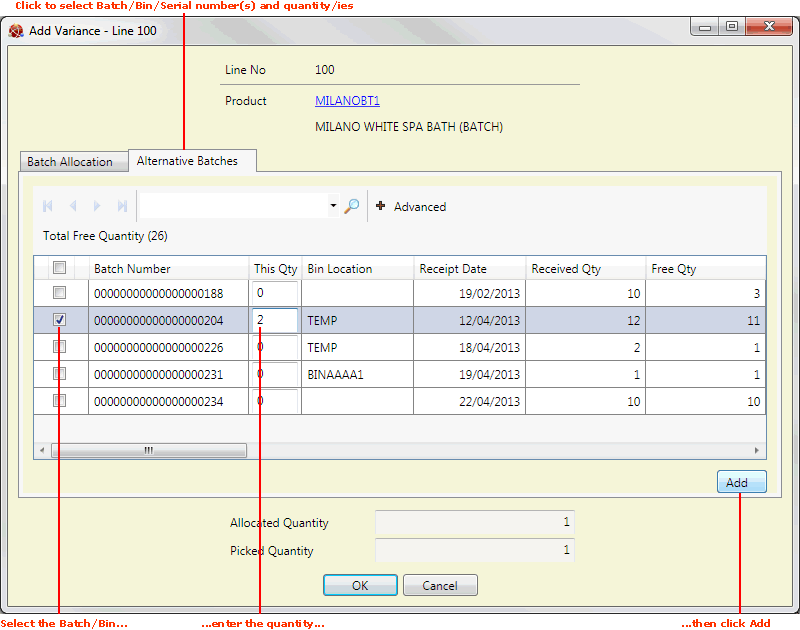
Note: Also displayed for each Batch/Bin/Serial Number are the: Sell By and/or Shelf dates - if recorded; Receipt and Issue dates; Received / Free / Physical / Allocated / Picked / Delivered / Invoiced quantities, plus Free Weight; Stock details, including Last Stock Take Date, the number of items recorded as 'on file' and 'counted' at the last stock take (Stock Take On File/Counted), and whether the product is included in an active stock take.
Note: If there are multiple lines or pages you may use the standard 'Finder' features to page through the list, re-sequence the list and search based on entered text, to find the required batch(es).
To select batches and quantities:
-
Select Batch/Serial Numbers and/or Bin Locations as appropriate using the left-hand 'check box' fields. Then:
-
Enter the quantities to allocate for each Batch/Bin/Serial Number in the This Qty column. Then:
-
Click Add.
4. A new field - Balance Action - will display if you entered a variance. Select a menu option to specify what you wish to do with the balance:
-
Back Order: To place the 'unpicked' items on back order. These will need to be released to the order when they become available - see Picking Notes: Releasing Back Order Items.
-
Cancel: To cancel the Balance Quantity from the order, so that the missing items are not placed on back order.
Note: A third option - Re-Allocate - is displayed if option 8PB00476 (476: Picking: Re-Allocate Back Ordered Lines) is selected in Optional Enhancements > Price Book tab. This generates an additional Picking Note for any items that have not been picked.
5. When you have finished entering 'picked' quantities/recording variance/editing batch allocations for a product line, click OK to close the window.
Note: For non-batch traceable products a warning displays if a variance has not been specified. In the Add Picking Variance window the OK button is only available when a variance has been entered; click Cancel if there is no variance to enter.
6. When you Confirm lines/record variance, the Line Status on the Picking Note will read 'Confirmed'.
If you entered a variance, the Picked Quantity is updated and the 'Remove' hyperlink displays in the Line Variance column:

To remove a line variance:
Click Remove on the line, then click Yes to the 'Are you sure...?' dialogue. The Line Status reverts to 'Outstanding' and you may update the Picked Quantity as appropriate.
To remove a line variance for a Batch/Bin/Serial number:
If you edited the batch allocation of a 'batch traceable' line and wish to remove variance for a particular Batch/Bin/Serial Number rather than the whole line, use the following method. Click the Picked Quantity hyperlink to display the Modify Variance window, then click the Remove hyperlink on the Batch/Bin/Serial Number line.
7. If you are using a Bar Code scanner and there are further product lines to enter, the Line Selection window displays for the next product on the Picking Note. Repeat the procedure from step 2 until the Picking Note Confirmation window displays. To Confirm the Picking Note see Confirming A Picking Note Manually.
If you are not using a Bar Code scanner you may optionally repeat the procedure from step 2 if there are further lines you need to record variance/edit the batch allocation for. If not, you may Confirm the Picking Note.
NEXT: Confirming A Picking Note Manually


