Creating And Completing An IBT Allocation
A user at the Issue Branch may raise an IBT Allocation to transfer stock to another branch, without the Receiving Branch having to first raise an IBT to request the goods.
To do this:
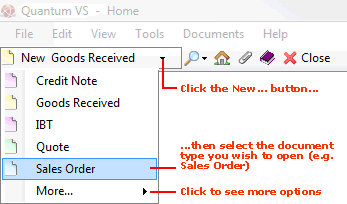
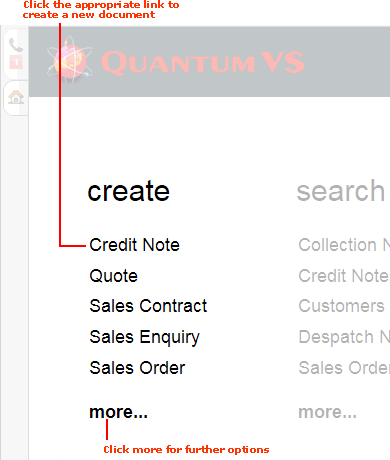
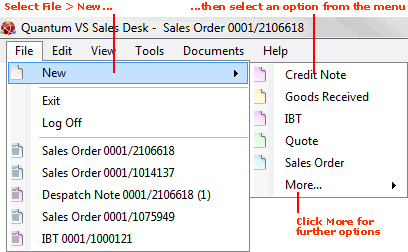
1. Create a new IBT by doing one of the following:
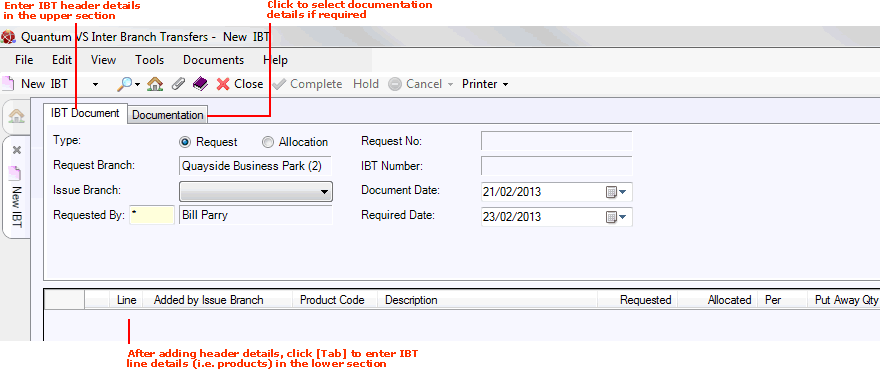
This creates a new blank IBT document in its own tab (marked New IBT) on your desktop:

2. Enter details in the various Header fields as necessary to create the IBT Allocation, using the following as a guide:
Note: You may use your [Tab] key to move the cursor from one field to the next.
|
Field
|
Definition (* = mandatory field)
|
|
Type
|
Select the alternative option - Allocation - to transfer goods to another branch without that branch having to request the goods first.
|
|
Request Branch / Issue Branch *
|
If you selected Allocation above, your own branch is selected by default as the Issue Branch; i.e. the branch which will allocate/issue the stock.
Use the drop-down menu to select the Request Branch; i.e. the branch you are requesting the stock for/transferring the stock to (which must be different to the Issue Branch).
Note: Once the Header details have been completed the Request Branch or Issue Branch cannot be amended.
|
|
Requested By *
|
Shows the member of staff requesting the goods. This defaults to your own name and staff number, but you may select an alternative if necessary.
|
|
Request No.
|
Empty - this will be added automatically. See Notes About IBT Numbering.
|
|
IBT Number
|
Empty - this will be added automatically. See Notes About IBT Numbering.
|
|
Document Date
|
Shows the date on which the IBT was raised. This defaults to today's date, but you may select an alternative if necessary.
|
|
Required Date
|
Shows the date on which the goods are required. Select an alternative from the default date if necessary.
Note: The Required Date must not be earlier than the Document Date. The default Required Date is the Document Date plus the default Number Of Days as defined on the Branch IBT Control Record for the Issue Branch.
|
|
|
Note: * = mandatory field
|
3. When you have finished entering Header details, click [Tab] to begin entering line details.
At this point the IBT is given a number, which is displayed in the tab of the IBT record. See Notes About IBT Numbering.
4. Enter product lines; i.e. specify the goods and quantities you are requesting to be transferred. Use the method described in Entering IBT Line Details.
Note: When Product line details are added to the IBT by the Issue Branch (as opposed to the Request Branch), 'Yes' is displayed in the Added by Issue Branch column.
Viewing And Editing The Batch Allocation Of A Product Line
If a product line on the IBT is 'batch traceable', you may view and edit the Batch/Bin/Serial Number allocation for the line at the Allocation/Picking stage (and also at the Despatch stage) by clicking Shift + [F4] on the product line. For further guidance see Viewing And Editing IBT Batch Allocations.
5. You may optionally add or edit documentation details for the IBT by selecting the Documentation tab. For details see Entering IBT Documentation Details.
6. Finally you will need to Complete and Print the IBT Allocation. Use the same method as described in Completing And Printing The IBT Allocation.
An IBT Picking Note is 'Printed' to the selected destination and the Status is changed to 'Confirmed'.
This completes the Allocation/Picking stage. The next stage involves the Issue Branch retrieving the IBT and Completing the IBT Issue to generate a Despatch Note. See IBTs: Despatching The Goods.
Note: When the IBT is later retrieved from the Outgoing IBTs Finder by the Issue Branch it is treated as an Unconfirmed Despatch. See Retrieving The IBT Issue.
NEXT: IBTs: Despatching The Goods


