Confirming A Despatch Note Manually
Once a Despatch Note has been printed and you have recorded variance and/or edited batch allocations for the product lines as necessary, the Despatch Note can be Confirmed. This confirms that all of the lines on the Despatch Note have been despatched (or are ready for despatch/loaded onto the delivery vehicle) in the stated quantities.
Note: Manual Despatch Note Confirmation is not required if automatic Despatch Note Confirmation is enabled, as the Despatch Note is automatically given 'Confirmed' status following the printing of the Collected and/or Delivered Despatch Note. See Working With Despatch Notes and The Picking, Delivery Assembly, Despatch And Invoicing Cycle.
There are two ways of Confirming Despatch Notes:
Note: Outstanding lines are automatically Confirmed when you Confirm the Despatch Note. If you need to record a variance or edit a batch allocation prior to Confirmation see Confirming Lines And Recording Variance On Despatch Notes.
Note: To 'Unconfirm' a Despatch Note Confirmed in error see Unconfirming A Despatch Note.
Note: To view carrier- and/or haulage-related details for a Sales Order - and related despatches/consignments - see Viewing Carrier And/Or Haulage Details For The Sales Order.
Note: You may, if necessary, use the Reprint option on the toolbar to reprint a Despatch Note either before or after confirmation. You may also use the Reprint option to print an Advanced Despatch Notification and/or Certificate Of Conformity if these options have been configured. See Reprinting A Despatch Note.
Note: You may optionally print Address/Product labels on Confirming the Despatch Note. See Printing Labels On Despatch Note Confirmation.
To Confirm a Despatch Note manually:
1. If you are:
-
Using a Bar Code scanner to scan goods and enter Confirmed quantities for despatch and have scanned/entered the Confirmed quantities of every product on the Despatch Note, go to step 3.
-
Not using a Bar Code scanner but the Despatch Note is already open, go to step 2.
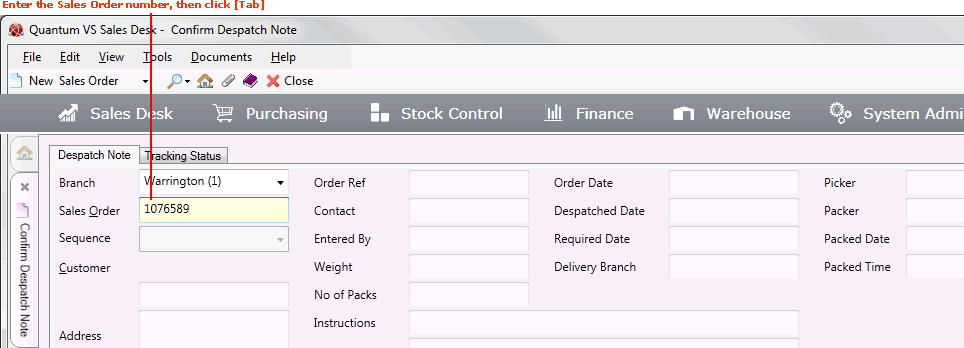
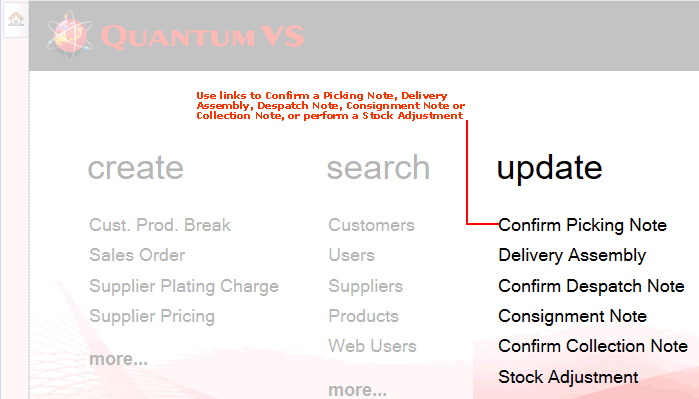
Alternatively, to retrieve and open the Despatch Note, use one of the following methods:
The Despatch Note will open in a new tab. See Understanding The Despatch Note.
If the Despatch Note has been printed, its status will be shown as 'Printed' and the Confirm option will be available on the Toolbar - Sub-Menu.
Note: The Despatch Note can only be Confirmed if the status is 'Printed'. If the status is 'Unprinted' and the 'Confirm' option is not displayed you will first need to print the Despatch Note. See Printing A Despatch Note Manually.
2. To confirm that all of the lines on the Despatch Note have been despatched (or are ready for despatch/loaded onto the delivery vehicle) in the stated quantities, click Confirm:
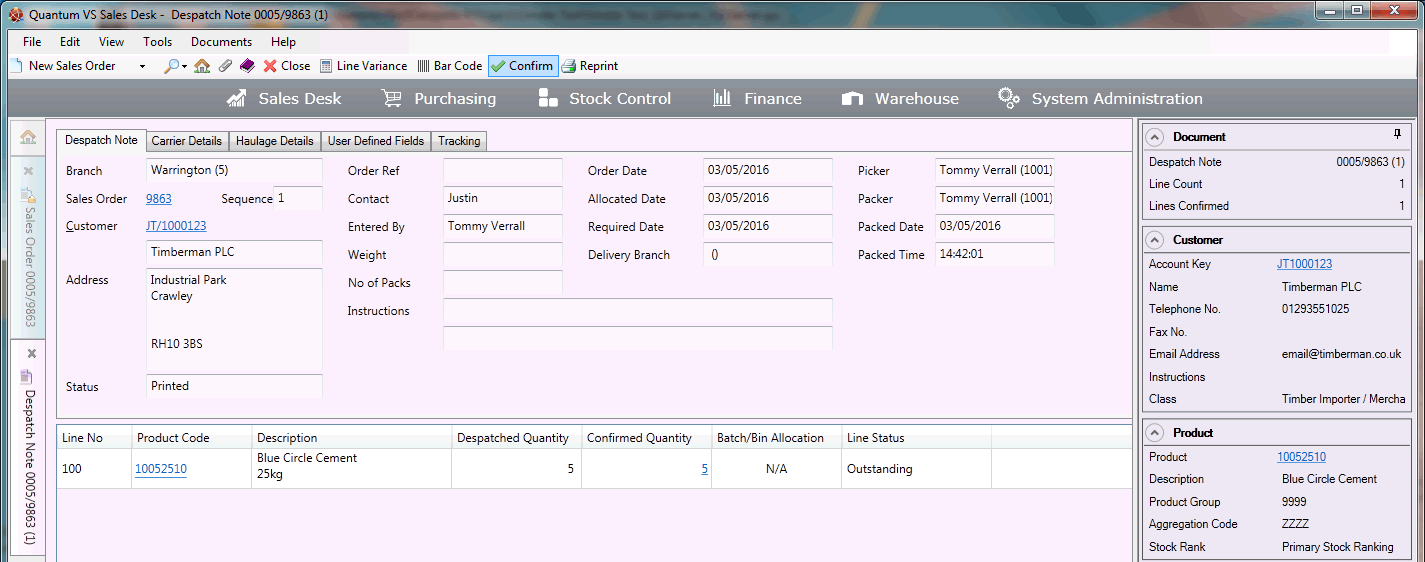
Note: If you need to enter a different Confirmed Quantity for any line (i.e. record variance), remove a line variance or edit the batch allocation on any line, see Confirming Lines And Recording Variance On Despatch Notes.
3. The Despatch Note Confirmation window displays:
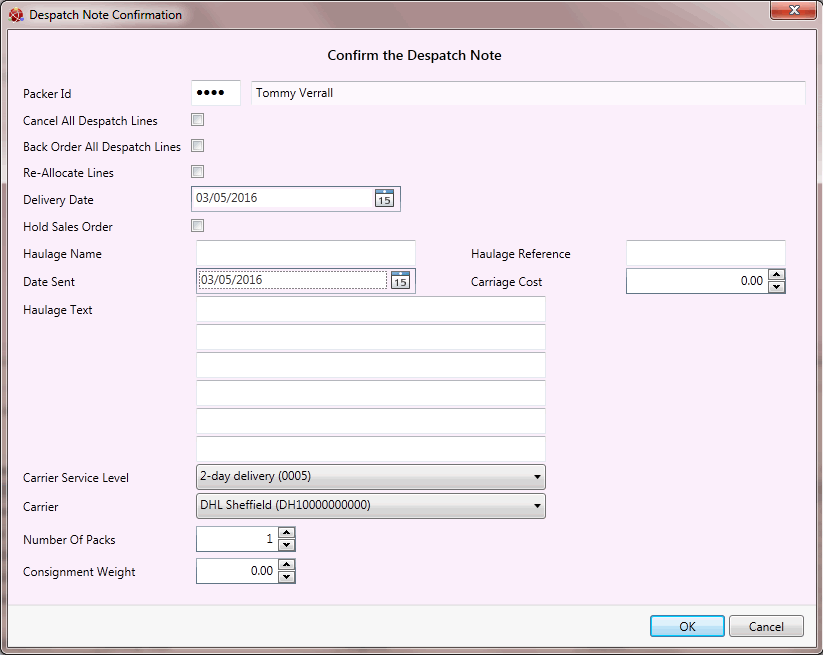
To Confirm the Despatch Note without entering/editing any details, go to the next step.
Otherwise, you may enter/edit Despatch Note details as appropriate:
The Packer ID fields show the name of the person responsible for checking/packing/confirming lines on the Despatch Note. Enter an alternative if required.
The Delivery Date shows the date of despatch and defaults to today's date. This may be overridden if option 8PB00055 (Delivery Confirmation: Tax Point Dates) is active in Optional Enhancements > Price Book tab.
Cancelling/Re-Allocating Despatch Note Lines
To cancel product lines on the Despatch Note, effectively confirming that the lines will not be despatched, select one of the following options:
-
Cancel All Despatch Lines: This cancels all Despatch Note lines and removes them from the order, so that they are not back ordered.
-
Back Order All Despatch Lines: This cancels all Despatch Note lines and places them on back order. See Despatch Notes: Releasing Back Order Items.
-
Re-Allocate Lines: Instead of cancelling or back ordering lines, this option cancels all Despatch Note lines and re-allocates them to the Sales Order. When the Sales Order is subsequently Completed, lines that have been re-allocated - along with any new lines added - will be collated onto the same Despatch Note.
An additional option is:
Note: Hold Sales Order is not available if Cancel All Despatch Lines or Back Order All Despatch Lines is selected.
Entering/Amending Carrier Details
The Carrier-related fields (if displayed - see Configuring Your System For Carrier Maintenance) display options for selecting or amending the Carrier (i.e. the company providing delivery of the ordered goods) and Carrier Service Level (i.e. the service provided; e.g. next-day delivery). Any Carrier-related details entered may be amended at the Despatch Note Confirmation stage. The procedure is the same as when selecting/amending Carrier details on Sales Order Completion - see Adding Carriage / Premium Delivery Charges / Carrier Requirements (step 2).
Additional Carrier-related fields available at this stage include:
Entering Haulage Details
If you are using a third party haulage company you may add haulage details to the Despatch Note by adding (optional) details as follows:
-
Haulage Name: The name of the haulage company.
-
Haulage Ref: A reference number for the despatch.
-
Date Sent: The date of despatch.
-
Carriage Cost: The cost of delivery.
-
Haulage Text: Additional text/instructions for the haulage company/despatch driver.
Note: Display of the Haulage fields is controlled by the following Optional Enhancements: Price Book 440 (Enhanced Streamlined Delivery Confirmation) and Price Book 356 (Streamlined Delivery Confirmation).
4. Click OK to Confirm the Despatch Note and close the window.
Note: If a pop-up window appears saying Warning - Credit Limit Exceeded it means the Customer has exceeded their Credit Limit. You will need to either obtain a Credit Authorization Code or cancel the order. See Credit Warning.
The Despatch Note is closed. It is now assigned the status of 'Despatched'. You may no longer edit the variance. However, you may view batch allocations by clicking 'View Batches' on a line. See Viewing The Batch/Bin Allocation.
If The Labels Tab Displays
After Confirming the Picking Note, the Labels tab displays in the Despatch Note Confirmation window if your Branch has been configured for label printing. To print Despatch Note Address/Product labels see Printing Labels On Despatch Note Confirmation.
When the Despatch Note is Confirmed, information is added to the Picker, Packer, Packed Date and Packed Time fields in the Despatch Note header. See Understanding The Despatch Note.
The following are possible once a Despatch Note has been Confirmed:
If any items not despatched were put on back order (e.g. because they were damaged or missing): when the stock placed on back order arrives at your warehouse or office you will need to allocate (or release) the back order stock to the Sales Order. See Releasing Back Order Stock To Sales Orders. Additional Picking/Despatch Notes are created when the back order stock is allocated to the order.
To 'unconfirm' a Despatch Note which was Confirmed in error:
1. With the Despatch Note open, click Unconfirm on the Toolbar - Sub Menu:
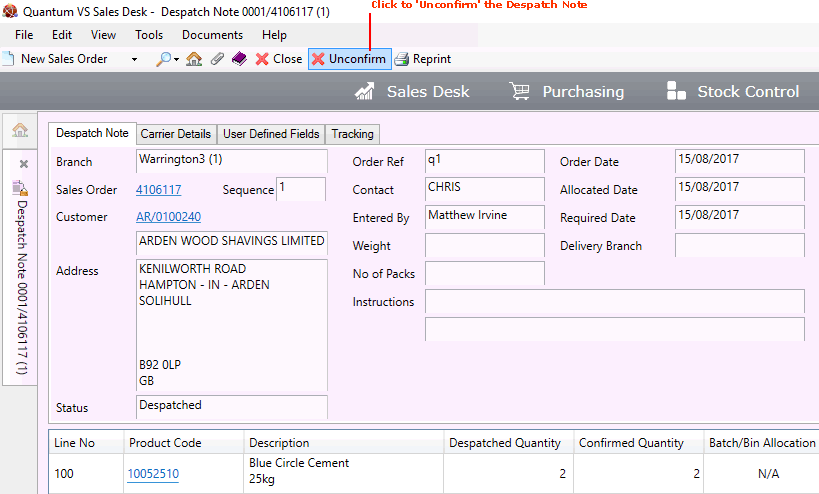
Note: The Unconfirm button displays only if: (1) you are defined as a Supervisor on your User record - see Entering Quantum User Fields Details; (2) the Status of the Despatch Note is 'Despatched'; and (3) the following Optional Enhancement is switched on: Price Book 356 - Streamlined Delivery Confirmation. See Optional Enhancements: Price Book Tab.
2. The Unconfirm Despatch Note window displays:
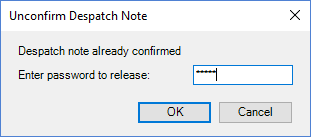
Enter the password to release the Despatch Note, then click OK.
Note: The password is stored on your server and may not be set within Quantum VS. If you do not know the 'release' password please contact your System Administrator.
The Despatch Note is now in a 'Printed' (Unconfirmed) state. You may enter variance as necessary before Confirming it as described above.
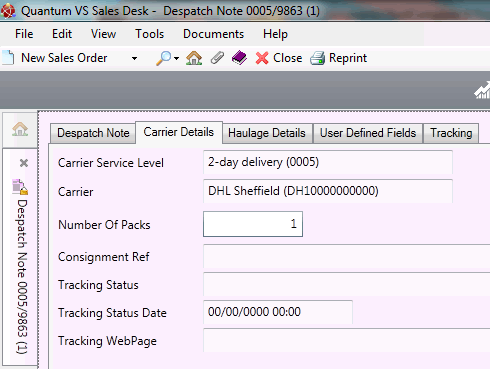
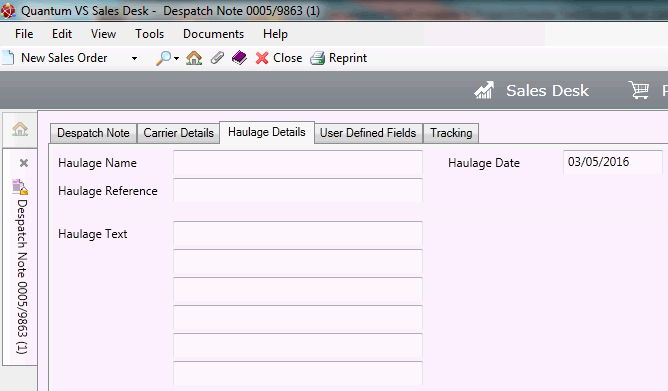
To view carrier- and/or haulage-related details for a Sales Order - and related despatches/consignments:
1. Open the Despatch Note for the Sales Order. To do this:
2. Click the Carrier Details tab or the Haulage Details tab as required. For example:
Carrier Details:
Haulage Details:
NEXT: Printing Labels On Despatch Note Confirmation
