|
Quantum VS Help: File Maintenance |
After you have opened a new Kit record and entered the Kit header details you must add the Kit components. You may add up to 300 component lines.
Note: The Kit components must have an existing Product record in Quantum VS. A Kit component may be a standard Product or another Kit (i.e. a Kit-flagged Product record).
You may either:
Add the Kit's components from scratch, by manually adding each Kit component product. See Adding Kit Component Products Manually (below).
Or: Use the 'Get Base Kit' feature to add the components of an existing Kit (the 'base kit') to the new Kit record you are creating. You may then remove or add component lines as necessary. See Adding Kit Components Using 'Get Base Kit'.
Kit components are defined in the Component Lines section.
Note: You may click Show / Hide on any of the section headers - General Details, Component Lines and Text Lines - to show or hide that section.
To add Kit component lines manually:
Note: You may use your [Tab] key to move from one field to the next.
1. Click Add... on the Component Lines header:

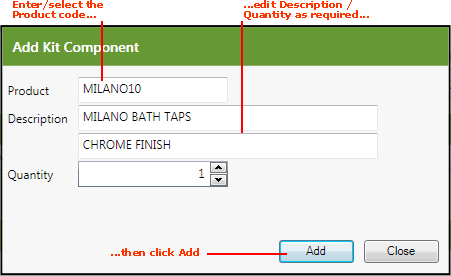
The Add Kit Component window displays:

2. In the Product field, enter the Product Code of the component you wish to add, then click [Tab].
If you don't know the Product Code, you may use the Finder to locate and select it. To do this:
Note: When you have a Product record open you may use the 'Add To Kit' feature to add that product as a component of one or multiple Kits. See Using 'Add To Kit' To Add A Component Product below.
3. The Description defaults to the selected Product's description defined in the Product record. You may edit/overtype this as necessary.
4. The Quantity defaults to 1. You may adjust this as necessary. For example, if the Kit will include 20 units of the selected component, enter 20.
5. Click Add. Details of the Product and its associated description and quantity are added to the Component Lines list in the Kit record.
6. Either:
Enter further Kit component lines in the Add Kit Component window, as described above, or:
Click Close to close the Add Kit Component window and finish entering component lines.
When you have a Product record open you may add that product as a component of one or multiple Kits using the Add To New Kit (or Add To Kit...) button. To do this:
1. Open the Product record of the product you wish to add as a Kit component. See Viewing A Product Record.
2. If you are creating a new Kit you will probably already have the 'NewKit' record open in a separate tab. Proceed to the next step.
Alternatively, if you wish to add the Product to another existing Kit:
Open the Kit record. See Viewing Kit Details. Then:
Click Amend on the Toolbar - Sub Menu to make the record amendable.
3. Click Add... on the Component Lines header to display the Add Kit Component window, as described in step 1 above.
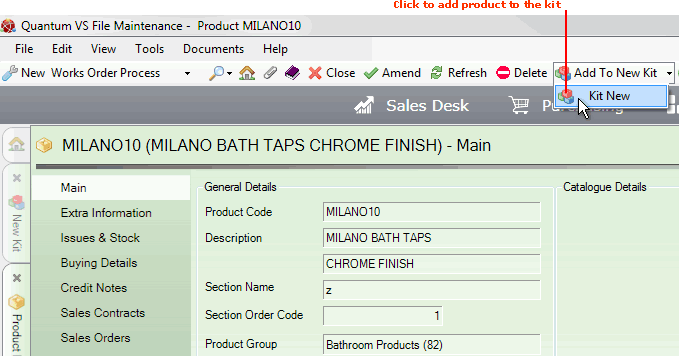
4. From the Toolbar - Sub Menu, click:
Add To New Kit (if you are adding the Product to a new Kit);
or Add To Kit... (if you are adding the Product to an existing Kit);
then:
select the Kit you wish to add the product to from the list below (e.g. Kit New):

Details of the component product are added to the Add Kit Component window. Continue by following the steps from step 3 above.
When creating a new Kit record you may use the Get Base Kit feature to load Kit components from an existing Kit (before adding/removing components as required). To do this:
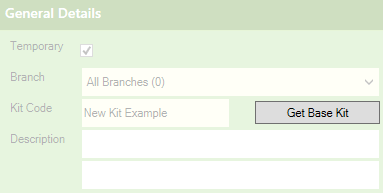
1. Click Get Base Kit in the Kit record header area:

Note: To enable the Get Base Kit button, enter the Kit Code and click the [Tab] key.
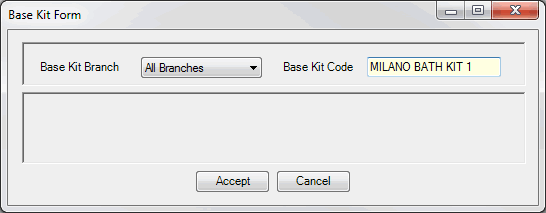
2. The Base Kit Form displays:

In the Base Kit Branch field, select the Base Kit's Branch (or All Branches); i.e. the Branch the Base Kit is stocked at. The default option is All Branches, but you may select an individual Branch if necessary.
3. In the Base Kit Code field, enter the code of the Base Kit; i.e. the Kit Code of an existing Kit you wish to base the new Kit on. There are two options:
Type it in: If you know the Kit Code of the Kit record; or
Select it from the Finder: Make sure your cursor is in the Base Kit code field and click [F3] for the context-sensitive Finder. The Finder will now appear, with Kits active, allowing you to search for, and select, an existing Kit. The code will be added to the Base Kit Code field. See Finding Kits for further details.
4. When you have added the Base Kit branch and code, click Accept (which is enabled when you Tab off the Base Kit Code field).
Details from the selected base kit - including component lines, text lines and some header details - are added to the new Kit record.
5. Edit/amend details as described below in order to complete the new Kit record.
After entering components - either manually or by using the Get Base Kit feature as described above - you may need to:
Edit header data. After using 'Get Base Kit' you may need to enter/amend header details, such as the Description, whether it is a Temporary or Permanent Kit and - if you are creating a Temporary Kit - the Sell Price/Per and Labour fields. For details see Entering Kit Header Details.
Add component lines: This is the same procedure as used when adding product lines to a sales document. For details see Entering Product Line Details.
Add/edit text lines: See Adding Kit Text Lines.
When you have finished defining the Kit you will need to save the new Kit record.
You may remove, or edit the details of, an added component by clicking the hyperlinks available on the line:

To remove a component line: click Remove. The line is removed from the list.
To edit the details of a component line: click Edit. The Add Kit Component window displays, in which you may amend the component's Description and/or Quantity before clicking Add, as described above.
Note: The Kits tab of a Product record lists any Kits (and Works Order Processes) the current product is a component of. See Kits Tab: Viewing Assemblies The Product Is A Component Of.
NEXT: Adding Kit Text Lines