|
Quantum VS Help: File Maintenance |
Packs of a 'Pack'-defined product are created when you receive the goods from the Supplier. This generates Pack records for each defined Pack, which you may then sell.
Note: The received Timber (or Sheet) product must be defined as a 'Pack'. See Defining A Timber Product As A Pack.
To create Packs of a received product:
1. Order the Product from the Supplier by raising a Purchase Order. See Working With Purchase Orders.
The procedure for adding a Pack product to a Purchase Order is similar to adding a standard Timber product. When you add a 'Pack' product to a Purchase Order, the Timber Entry window is displayed, in which you must enter the quantities of timber lengths you require for this product. See Adding Timber, Sheet Materials And Pack Products.
2. When you receive the goods from the Supplier you will need to create a Goods Received Note (GRN) for the Purchase Order items.
3. Record receipt of the goods into stock (and record any variance) by clicking the Received hyperlink on the Product line. See Booking In Stock On A Goods Received Note.
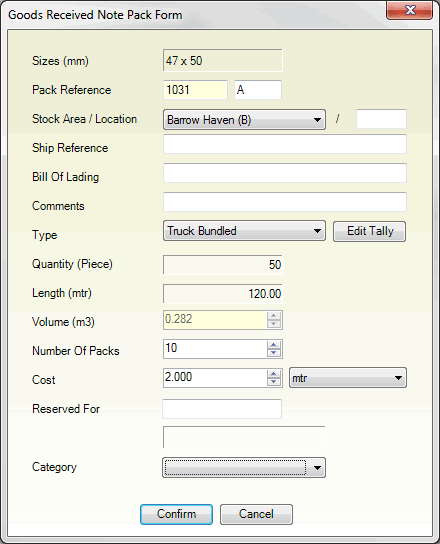
For Pack-defined products, the Goods Received Note Pack Form displays:

4. The Goods Received Note Pack Form enables you to define the Packs which will be created from the goods received. Enter details in the following fields, using the following as a guide:
Note: You may use your [Tab] key to move from one field to the next.
|
Field |
Definition
|
|
Sizes (mm)
|
This read-only field shows the timber product's dimensions.
|
|
Pack Reference
|
To create a new Pack, enter a Pack reference here (e.g. 1031).
Creating Multiple PacksTo create multiple Packs of the received goods, add a letter to the Pack Reference in the field to the right (e.g. A).
For example, if you are creating three Packs (see the Number Of Packs field below) you might enter the reference 1031/A. The references for the remaining Packs are then generated automatically as 1031/B and 1031/C.
Creating Loose PacksYou may create 'loose' or Non-Specific Allocation (NSA) packs by not entering a Pack Reference. Once the Packs have been created they will be given the status 'Loose' in the Finder. The Pack Reference is allocated later, when the Pack is picked following order completion.
Note: Though the default option is to enter a Pack Reference manually, this number may be generated automatically by the system, or the user may have the option to overwrite the auto-generated Pack Reference. This is defined by the Pack Numbering field in the Branch record > Miscellaneous tab. This tab also defines whether Packs are processed at Branch or Company level (Packs field). |
|
Stock Area / Location
|
Use the menu to select the Timber Stock Holding Area for the new Pack(s). You may add a stock holding Location in the field to the right.
Note: Timber Stock Holding Area menu options are held in the table file TSHA and must be defined using Table File Maintenance. A default area for the new Pack may be defined at Branch level using the Pack Area (and Packs) fields in the Branch record > Miscellaneous tab. |
|
Ship Reference
|
Enter the shipping reference if required.
|
|
Bill Of Lading
|
Enter the bill of lading reference if required.
|
|
Comments
|
If you need to record any useful information you may enter this in the Comments field.
|
|
Type / Edit Tally
|
Use the drop-down menu to select one of the following Pack types:
If you select Machined, Package To Length or Sheet:Enter Quantity, Length and Volume details in the fields below.
If you select Truck Bundled:Truck Bundled (or Tally) packs contain timber of different lengths. Click the Edit Tally button (to the right), then enter the tally amounts for the pack in the Tally Input window.
The method is the same as when entering tally lengths to the Timber Entry window when ordering a timber product - see Adding Timber, Sheet Materials And Pack Products.
Note: Use your [Tab] key to move from one field to the next, speeding up data entry.
In the Quantity tallies fields, enter the quantities of timber that will make up each pack, according to length size. For example, you might enter 1 x 1.5m lengths, 1 x 2.1m lengths, and so on. Running totals for Quantity, Pieces, Volume and Length are shown below.
To add non-standard lengths: Click the NSL button to the right of the Timber Entry window. This displays the Add Non Standard Length window, where you may input your required length and the quantity required. Click OK to add the values to your timber order. Non-standard lengths are shown in red within the Tally Input window. To hide/show zero tallies: Click the +/- button to the right of the Tally Input window. This removes (or shows again) all fields with zero quantities from the order.
Once you have finished entering Pack quantities, click OK. This closes the Tally Input window and adds your timber Pack quantities to the Goods Received Note Pack Form.
|
|
Quantity (piece) / Length (mtr) / Volume (m3)
|
Enter Quantity and Length (and Volume) details for the Pack here.
For example: if you wish to create Packs which contain 4 x 1 metre pieces, enter 4 in the Quantity (pieces) field and 1 in the Length field. The Volume field will update accordingly.
Note: This is not required if you selected 'Truck Bundled' in the Type field above. |
|
Number Of Packs
|
To create more than one Pack with the same specification, enter the number of Packs to create here (from 1 - 99).
A new reference for each Pack will be generated automatically (as defined in the Pack Reference field above).
|
|
Cost (Per)
|
Enter the Pack cost (in pounds sterling, or the alternative system currency) and unit of measure here.
For example: 0.370 (£0.37) per metre
|
|
Reserved For
|
If you wish to reserve the Pack for a customer, either:
Note: If you reserve a Pack for a customer, you will only be able to sell the Pack to the customer specified. If a Pack is reserved for a customer, a tab - Allocation Details - is shown on the Pack record, showing who the Pack has been allocated to. See Viewing Pack Details. The Pack will also be given the status 'Allocated' in the Finder and Product record - Packs tab. |
|
Category
|
Use the drop-down menu to select the timber category here.
Note: Timber Category menu options are held in the table file TCAT and must be defined using Table File Maintenance. |
5. When you have finished defining the pack(s), click Confirm to close the Goods Received Note Pack Form (or Cancel to cancel the procedure).
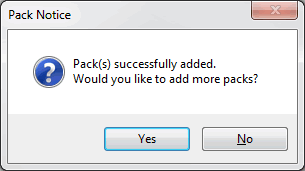
6. The Pack Notice form appears, informing you that the packs have been successfully added:

Click Yes to add more Packs, or No to end the Pack adding procedure. Use the same procedure as described above if you wish to add more Packs.
When Packs are created, the product line on the Goods Received Note is updated. An additional column - Pack Modification - appears, featuring a Remove hyperlink, which enables you to remove Packs. See Editing And Removing Packs.
Note: If the quantity you have booked into stock is different to the quantity Expected - as shown on the Goods Received Note - a window will pop up asking whether you wish to create further Packs. If the Actual amount received differs from the Expected amount you may enter variance details - see Recording Goods Received Note Variance For Timber Products.
7. Confirm the Goods Received Note to complete the 'goods in' procedure. See Booking In Stock On A Goods Received Note.
The Packs of the selected product have now been created on the system. You may view them if you wish - see Viewing Pack Details.
Once the Packs have been created, Customers may then order single Packs of the Timber product instead of multiple pieces of that Product. See Adding Pack Products To Sales Documents.
Although you may not edit individual Packs you may remove them and create new Packs as necessary. See Editing And Removing Packs.