|
Quantum VS Help: File Maintenance |
When you (i.e. a user at the Receiving Branch) retrieve the IBT Receipt, by default the Received Quantity of each product line (i.e. the quantity confirmed as received by the Receiving Branch) will match the Despatched quantity (i.e. the quantity confirmed as despatched by the Issue Branch). If there is no variance to record you may immediately Complete And Print The IBT Receipt.
However, you will need to be aware of the following before you Complete the IBT:
If the Received quantity of a product line does not match the Despatched quantity you must record variance.
Any received goods which are 'batch traceable' will retain the Batch/Serial Number assigned when they were first received into stock and their Bin Number will default to whatever it was at the Issue Branch. The user at the Receiving Branch may view - and, if necessary, edit - this batch allocation, perhaps to receive goods into a different or additional Bin Location and/or mark received goods for inspection.
To record variance - or view/edit the batch allocation of the received goods:
1. Retrieve and open the IBT document, as described in Retrieving An IBT Receipt.
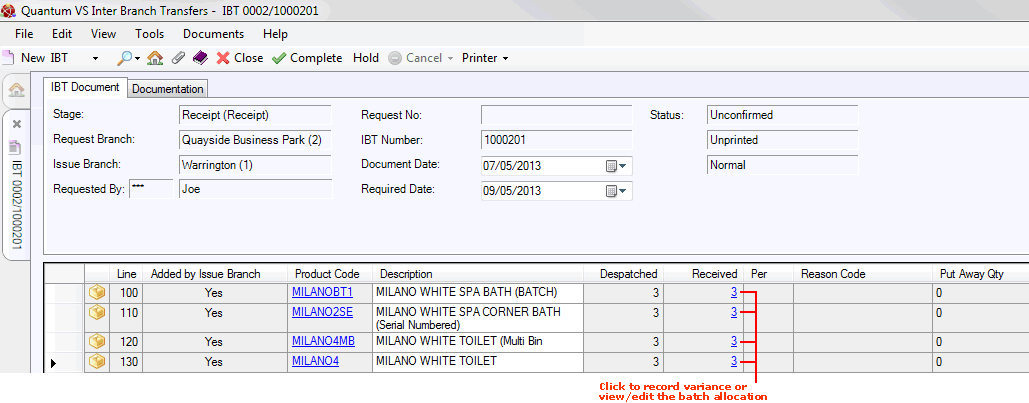
2. Click the Received hyperlink on the first line where you wish to record variance and/or view or edit the batch allocation:
Note: The Put Away Quantity shows the quantity of this Product line which has been received into stock once the IBT Receipt has been Completed.
3. Actions to take next will vary depending on whether or not the product line is 'batch traceable'.
Note: A product is 'batch traceable' if 'Batch Reference', 'Multi-Bin' or 'Serial Number' is selected in the Batch Bin Serial Flag field in the Issues & Stock tab of the Product record. See Product Batch Traceability Maintenance.
The IBT Receipt Variance window displays:
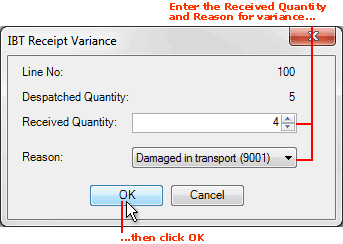
The Line No. (e.g. 100) and Despatched Quantity (i.e. quantity of units recorded as Despatched by the Issue Branch) are listed.
In the Received Quantity field, enter the actual number of units received.
If you entered a variance (i.e. edited the Received Quantity) the Reason field will display. Select the reason for the variance from the menu (e.g. Damaged in transport).
Note: The Reason codes must be set up and maintained within the Table file REA (Reason Codes) using Table File Maintenance.
Click OK to close the IBT Receipt Variance window. The new Received figure and Reason Code are displayed on the product line of the IBT document.
Now go to step 7 below.
The IBT Batch Receipt window displays. At the top are details of the product being transferred/received and the total quantities Despatched (i.e. recorded as sent by the Issue Branch) and Received (i.e. received by the Receiving Branch). These will match by default, but you may record variance - see below. The Batch Allocation tab lists the quantity allocated to each Batch (or Serial) Number and/or Bin Location:
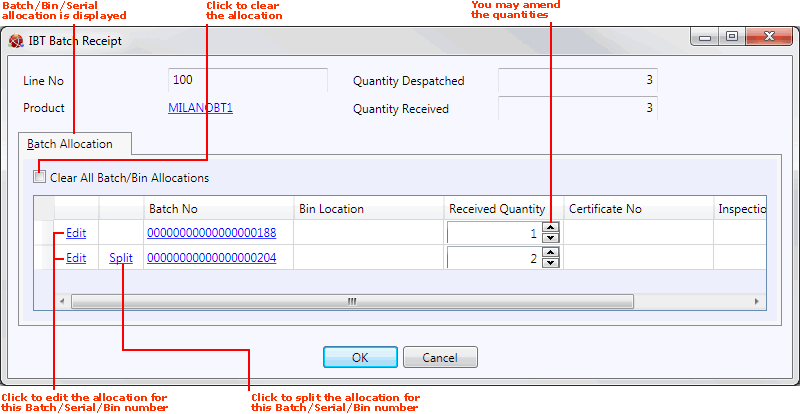
Note: Batch Reference- and Serial Number-flagged products are not required to have a Bin Location. Multi-Bin-flagged products will not display a Batch Number. A Certificate Number will display if one was entered for the 'batch'. You may click on the Batch/Serial Number or Bin Location hyperlinks to view the Product Inventory record.
Each line shows the following for each 'batch' of the product being transferred/received into stock:
Batch Number: The Batch (or Serial) Number of the goods. (It is not mandatory for Multi-Bin-flagged products to have a Batch Number.)
Bin Location: The Bin Location of the goods (at the Issue Branch). (It is not mandatory for Batch Ref- and Serial No-flagged products to have a Bin Location.)
Received Quantity: The number of items being received into the listed Batch/Serial/Bin at the Receiving Branch.
Certificate No: The certificate number (if recorded) for this Batch/Bin.
Inspection Reason: If the received goods are marked for inspection, the reason will be listed here.
You now have the following options:
To accept the Received Quantity for each Batch/Serial Number and/or Bin Location displayed: Click OK. Go to step 7 below.
To record a different Received Quantity for a listed Batch/Serial/Bin Number - i.e. record a variance, without editing any of the Batch/Serial/Bin details: Edit the Received Quantity on the line. The Reason field will display. Go to step 5 below.
To (a) enter a different Bin Location to receive the 'batch' into; and/or (b) record a different Received Quantity for a listed Batch/Serial/Bin Number; and/or (c) mark a received 'batch' for inspection: Click the Edit link on the line. Go to step 4: Editing Batch/Serial/Bin Details.
To receive goods from a listed 'batch' into more than one Bin Location: Click the Split option on the line. Go to step 4: Splitting Received Quantities Into Multiple Bin Locations.
Note: The 'Split' option displays only when more than one item is allocated to a particular Batch or Bin.
To change all of the listed Batches/Bins/Serial Numbers - i.e. when all of the items are to be allocated a different Batch/Bin/Serial Number to those displayed: Click Clear All Batch/Bin Allocations. This makes all Received Quantities '0'. You may now: (a) if the Received Quantity is '0' for all lines, go to step 5 to record a reason for the variance; (b) edit the Received Quantity on the line; (c) click Edit to receive the goods into different Batches/Serial Numbers/Bins and/or edit other details, such as the inspection reason, as described in step 4: Editing Batch/Serial/Bin Details.
4. If in the previous step you clicked Edit or Split for a Batch/Serial Number/Bin in the IBT Batch Receipt window, take action as follows:
Clicking the Edit link (see previous step) displays the Batch Details tab within the IBT Batch Receipt window, in which you may edit 'batch' details for the selected Batch/Serial Number and/or Bin Location:
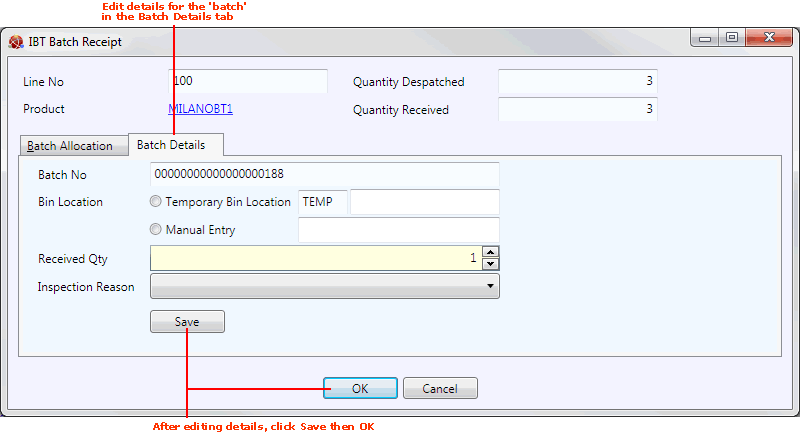
Note: The Batch Number or Serial Number of the received goods is displayed if the goods are flagged for batch traceability using the 'Batch Reference' or 'Serial number' methods, but not if they are flagged for batch traceability using the 'Multi-Bin' method.
To enter a different Bin Location for the received 'batch': Select/enter the new Bin Location of the goods at the Receiving Branch using the Bin Location buttons/fields.
Note: For 'Batch Ref'-flagged products, the 'primary' and any 'alternative' Bin Locations stored in the product's Branch Stock record will be presented as options for selection. You may select to place the goods in the Temporary Bin Location 'TEMP' (entering additional Bin details in the field to the right if necessary) or select Manual Entry and type in the Bin Location to receive the goods into in the field to the right. The Bin Location of the goods may be transferred later if required - see Transferring A Product's Bin Location.
To record a variance in the Received Quantity for the received 'batch': Enter a new Received Quantity. For example, if the Despatched Quantity is 5 but only 4 items were received for this batch, enter 4 in the Received Quantity field.
To mark the received goods for inspection: select one of the available options from the Inspection Reason menu. If you select an Inspection Reason, the batch will be held for inspection once you have Completed the IBT Receipt. To release stock which is being inspected you will need to retrieve and amend the Status of the Batch Stock record - see Editing A Product Inventory Record.
Note: The Inspection Reason field is only displayed if the Batch Inspection Flag is set to M - Manual. field (via the Batch Trace tab of the Price Book Flags control record; or in the Issues And Stock tab of the Product record). There is also an option whereby received batch/bin/serial numbered stock is automatically held for inspection. Batch inspection 'reason codes' are held in the Batch Inspection Codes (BHLD) Table File - see Table File Maintenance .
When you have finished editing 'batch' details: Click Save to save the edited details. The amended details are displayed in the Batch Allocation tab of the IBT Batch Receipt window.
Use the 'Split' option when you wish to receive quantities for a certain Batch Number or Bin Location into more than one Bin Location.
For example, say the Issue Branch despatches the following 'batches' for an IBT product line which is 'batch traceable':
10 from Batch A Bin Location XYZ;
another 5 from Batch A but Bin Location ABC;
and 6 from Batch B Bin Location DEF.
The Receiving Branch now has 15 items to book in for Batch A plus 6 items for Batch B. By default the server might allocate all 15 'Batch A' items, plus the 6 'Batch B' items, to the Bin Location 2XYZ at the Receiving Branch. However, Bin 2XYZ may not have enough capacity. Therefore, the receiver may use the Split option to put some of Batch A (and/or some of Batch B) into a different bin or bins. Although the receiver may not post more than 15 for Batch A (or more than 6 for Batch B), they may choose to receive less if some of the stock is damaged, missing etc.
On clicking the Split link next to a Batch Number/Bin Location (see previous step), a second Batch Number/Bin Location line is displayed, with a Received Quantity of zero:
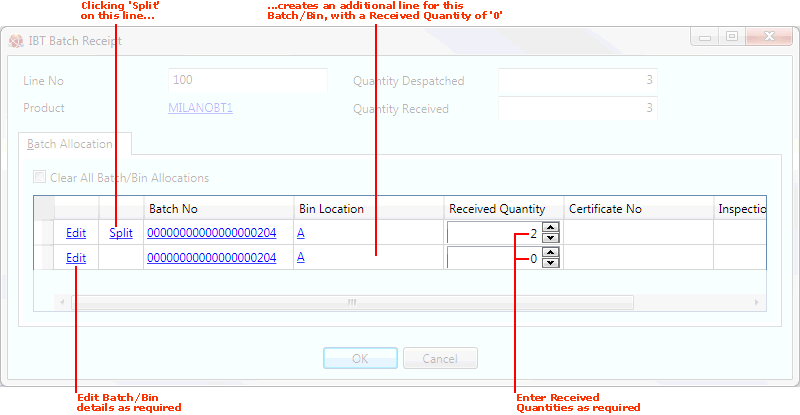
In the above example we have received 2 items allocated to Batch No 204/Bin Location A. Assume that Bin Location A can only receive one more item and therefore we wish to place the second item received from Batch 204 in Bin Location B. To do this we must click Split on that line. This creates an additional line, which defaults to the same Batch No/Bin Location and has a Received Quantity of '0'.
You may now:
Edit the Received Quantities as necessary (e.g. change the received quantity for the first line - Batch No 204/Bin Location A - to '1'); then
Edit Batch/Bin details for the additional line as described in Editing Batch/Serial/Bin Details above (e.g. to allocate the remaining received quantity of '1' for Batch No 204 to Bin Location B).
5. If you have amended Received Quantities - i.e. entered a variance - for any received 'batch', the Reason field displays in the IBT Batch Receipt window. Select the reason for the variance from the menu (e.g. Damaged in transport).
Note: The Reason codes must be set up and maintained within the Table file REA (Reason Codes) using Table File Maintenance.
6. Click OK to close the IBT Batch Receipt window. If you entered a variance, the new Received figure and Reason Code are displayed on the product line of the IBT document.
7. Repeat this procedure by clicking the Received link on further IBT product lines as necessary until you are ready to Complete And Print The IBT Receipt.
If you have permission to do so, before confirmation of IBT 'goods in' you may:
Amend the Document and/or Required Date. Use the same procedure as described in Entering IBT Request Header Details.
Hold the IBT. See Holding An IBT.
Define/edit IBT Documentation details. See Entering IBT Documentation Details.