|
Quantum VS Help: Sales Desk |
The Purchase Order Management dialogue may display on Sales Order Completion (subject to system settings) if:
Back-To-Back Sales Ordering is enabled - and the Create Back To Back PO? option was not selected (see Back-To-Back Sales Ordering);
and/or: the Sales Order contained a Special Product.
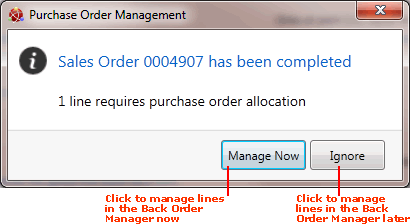
The number of lines requiring allocating to a Purchase Order is displayed:

To manually allocate the Sales Order lines to a new or existing Purchase Order now using the Back Order Manager, do the following:
1. Click Manage Now in the Purchase Order Management dialogue window.
Note: Click Ignore if you do not wish to allocate the lines immediately. You may allocate them later using the Back Order Manager. See Back Order Manager: Allocating Lines Later.
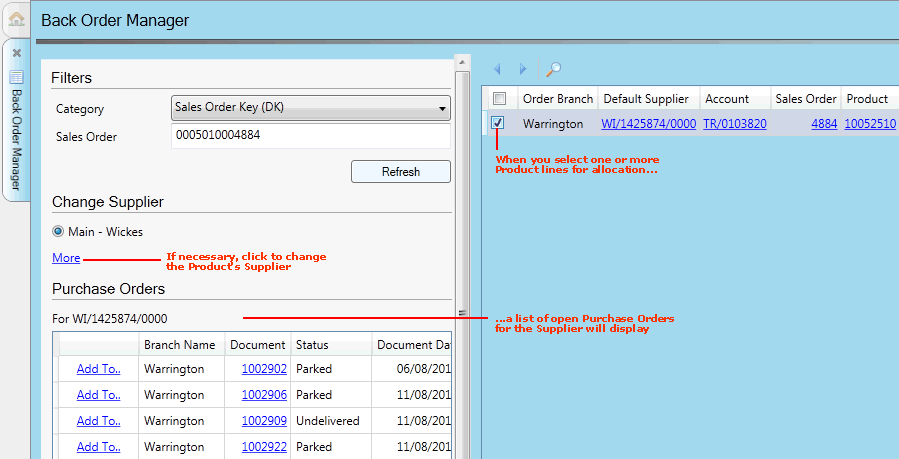
The Back Order Manager displays in a separate tab:

The Back Order Manager automatically displays Product or Special lines from the Completed Sales Order which require allocation to a Purchase Order.
In the above example, lines from Sales Order 4884 are displayed (i.e. the Back Order Manager is automatically filtered by the Category 'Sales Order Key' and by the Back-To-Back Sales Order you are dealing with). Each Product line requiring allocation is listed by Supplier and defaults to the 'Main' Supplier.
In the example there is one line - Product 10052510 - which requires allocation to a Purchase Order. However, there may be multiple lines for the listed Supplier requiring Purchase Order allocation.
2. To allocate lines to a Purchase Order using the Back Order Manager, either:
Check the field to the left of a listed line - to allocate that line individually; or
Check the uppermost field to the left of all listed lines - to allocate all lines.
A list of 'open' (i.e. Undelivered/Parked) Purchase Orders for the selected Product or Special line's 'Main' Supplier will then display in the left-hand panel:

Note: A warning displays when you select a line which has more than one defined Supplier.
3. If you do not need to change the Supplier for the selected line(s), proceed to the next step.
If you wish to change the Supplier for the selected line(s) - or change the Supplier's Cost Price used for the Product - click More in the left-hand panel. Follow the procedure described in Editing Supplier Details (Back To Back Supplier Selection Window) to select an alternative Supplier and/or Cost Price.
4. Allocate the line(s) to a new or existing Purchase Order as follows:

To add the selected line(s) to an existing Purchase Order for the listed Supplier, either:
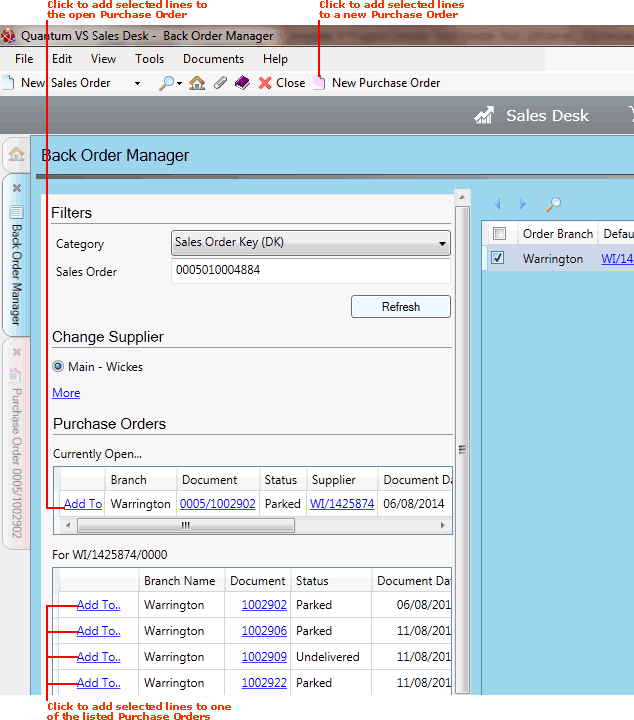
Click Add To next to a listed Purchase Order; or
Click a hyperlinked Purchase Order (displayed in the Document column) to open the document, so that it displays under 'Currently Open' Purchase Orders in the left-hand panel of the Back Order Manager, then click Add To next to the listed Purchase Order.
Note: If the selected Purchase Order was not already open, it will open in a separate tab and the selected line will be added.
To add the selected line(s) to an existing Purchase Order:
click New Purchase Order on the Toolbar - Sub Menu - to open a new, blank Purchase Order; then
add header details for the required Supplier, as described in Entering Purchase Order Header Details.
The new Purchase Order now displays under 'Currently Open' Purchase Orders in the left-hand panel of the Back Order Manager. Click Add To next to the new Purchase Order to add the lines selected in the right-hand section of the Back Order Manager.
5. The specified line(s) are added to the Purchase Order.
You may add further Product - or Text / Manual / Special - lines to the Purchase Order as necessary.
Note: To cancel a line added to a Purchase Order in error, use the same method as when cancelling a line on a sales document: click Cancel on the Toolbar - Sub Menu, then select Cancel Line. You may also cancel the whole Purchase Order if required.
6. When you have finished adding/allocating lines to Purchase Orders, you may:
Recall and open the Purchase Order(s). You may open Purchase Orders from (a) the Back Order Manager - by clicking the hyperlink as described above, (b) from the Sales Order - by clicking the Purchase Order hyperlink in the header or in the Sales Order's Tracking tab, or (c) using the Finder - see Finding Purchase Orders. Then:
Review Documentation details as necessary. Then:
Note: Once the Purchase Order has been Completed, the Back-To-Back lines are no longer displayed in the Back Order Manager.
7. You may now close the Back Order Manager if no longer required.
The remainder of the Purchasing procedure is almost the same as when processing a standard Purchase Order:
Later, when you receive Back-To-Back ordered goods from a Supplier, you will need to create a Goods Received Note (GRN) to record the receipt of goods into stock and report any variances. The method is the same as described in Working With Goods Received Notes; except in a Back-To-Back ordering situation there is an additional step:
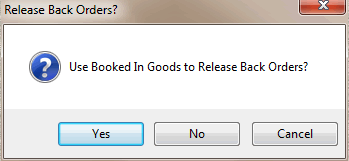
When you click Confirm, to confirm the receipt of a stated quantity of items into stock (see Confirming And Printing A Goods Received Note), the Release Back Orders? dialogue displays:

Click Yes to use the goods being received into stock to 'release back orders'; i.e. they will be used to fulfil Back-To-Back Sales Orders.
Alternative options available are:
No: if you want the goods to be released to existing back orders using the standard procedure; i.e. using the manual method, or automatically via the Bulk Back Order Release Process. See Releasing Back Order Stock To Sales Orders.
Or; Cancel: to cancel the receipt of goods into stock.
If you need to return any goods received from the supplier (or the value of those goods), you must create a Supplier Return Note (SRN).
The supplier will then invoice you for the goods. You may use Purchase Invoice Registration And Matching features to register incoming invoices and match invoice totals against goods ordered.