|
Quantum VS Help: Sales Desk |
A Back-To-Back Sales Order is created the same way as a standard Sales Order, except the User must enter certain additional details.
To create and Complete a Back-To-Back Sales Order, do the following:
Note: This section assumes the necessary Optional Enhancements have been configured on your system and that you have the requisite Role/User Permissions enabled. See Enabling Back-To-Back Sales And Purchase Ordering In Quantum VS.
2. Enter Sales Order header details then click [Tab], so that your cursor is focused on the Product Code field of the first Product line (Line 100), ready for you to enter the lines required by the Customer.
3. Add the Product line and Quantity required. See Adding Product Lines.
To enter a Special line see Special Lines And Sales Documents.
Note: If you wish to enter a Manual line or Text line, add these in the usual way.
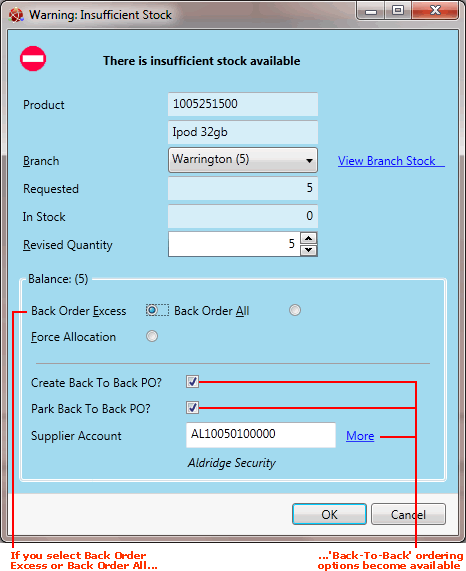
After you have entered the Quantity and tabbed away, the Warning: Insufficient Stock window displays for a Product line if there is insufficient quantity in stock to fulfil the order. You may now select one of the following Balance options:
Force Allocation: to order the items, even though they are not recorded on the system.
Back Order Excess: to back order the excess items (i.e. those out of stock).
Back Order All: to place all the items on back order.
See When You Receive An Insufficient Stock Warning for further details.
Selecting either of the latter options displays the following additional options if Back-To-Back ordering is enabled: Create Back To Back PO? / Park Back To Back PO? / Supplier Account. Continue from step 7 below:

4. Select Lines View from the Toolbar - Sub Menu, then select Back To Back View (or, alternatively, Stock View).
Note: For further details see Lines View Mode.
The Back Ordered column displays the quantity of each line which has been back ordered. This defaults to 0:

5. Click the Back Ordered hyperlink on the Sales Order line to specify - or amend - the back ordered quantity of this product.
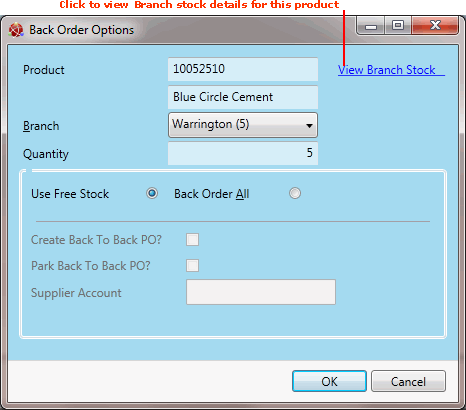
The Back Order Options window displays:

The upper panel displays the Product code/name and Quantity ordered.
The Branch ordering the product also displays. The Branch may be edited if you have Despatch From Alternative Branch features enabled (see Selecting An Alternative Delivery Branch). Click the View Branch Stock hyperlink to view Branch stock details for the Product line.
6. The Use Free Stock radio button is selected by default, meaning the specified Quantity of this Product will be taken from Free Stock.
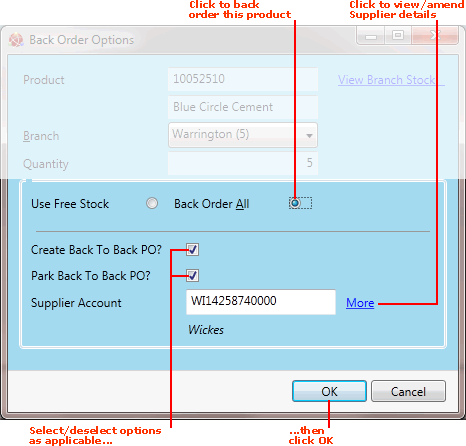
To back order the displayed quantity, click the Back Order All radio button:

You cannot split the ordered quantity of a single Product line between the Use Free Stock and Back Order All options. However, you may enter the same Product line on the Sales Order twice (or more). This enables you to use the Free Stock of a Product to fulfil part of an order and back order the rest.
For example: on line 100 you order 5 of Product 10052510 Blue Circle Cement, using free stock. On line 110 you order 10 of Product 10052510 Blue Circle Cement, which will be back ordered. You could even add further lines/quantities of Product 10052510 Blue Circle Cement to the order and specify a different Supplier.
7. Specify options for Back-To-Back ordering in the Back Order Options (or Warning: Insufficient Stock) window as follows:
Note: Depending on your assigned Role and User Permissions the following may be 'greyed out' (i.e. unavailable), meaning you may not amend these settings.
Create Back To Back PO? is selected by default, meaning the line is automatically allocated to a Purchase Order for the product's Supplier, which is created automatically on Completion of the Sales Order.
Deselecting Create Back To Back PO? means a Back-To-Back Purchase Order is not created automatically on Sales Order Completion. Instead, you - or another User - must manually allocate lines from the Completed Back To Back Sales Order to a new or existing Purchase Order using the Back Order Manager.
See Back-To-Back Purchase Ordering to understand the User actions required on Sales Order Completion based on the above settings.
Note: The Create Back To Back PO? option is also available in the Add Special Product... window if you are Back-To-Back ordering a Special line. See Special Lines And Sales Documents.
Park Back To Back PO? is selected by default, meaning the auto-created Purchase Order created on Completion of the Sales Order is Parked.
Parking Purchase Orders gives the ability to review them before they are Completed and processed. This might be desirable in a company where there is a sales team responsible for taking orders and a purchasing team responsible for ordering stock from Suppliers. In this situation, the purchasing team can review Parked Purchase Orders and 'build'/edit Purchase Orders based on factors such as lead times, which Supplier has current stock available, Supplier discounts and so on.
Deselecting Park Back To Back PO? means a standard Purchase Order will be created instead. The Purchase Order generated will automatically be Completed and will have the status 'Undelivered'. The Purchase Order is automatically 'printed' (i.e. printed as a hard copy to give/post to the supplier; emailed or faxed to the supplier; and/or saved to disk, depending on your system settings) on Completion.
See Back-To-Back Purchase Ordering to understand the User actions required on Sales Order Completion based on the above settings.
Note: The Park Back To Back PO? option is not available in the Add Special Product... window if you are Back-To-Back ordering a Special line.
The Supplier Account field shows the Account number and Name (below) of the Supplier the line will be ordered from. The 'Main' Supplier and Cost Price - as specified on the Product record - are selected by default.
To select an alternative Supplier and/or Cost Price for the Product (and/or view Outstanding Purchase Orders featuring the Product): click More. For further details see Editing Supplier Details (Back To Back Supplier Selection Window).
Note: The Create Back To Back PO? / Park Back To Back PO? / Supplier Account options are also available in the Warning: Insufficient Stock window when back ordering a line for which insufficient stock is available. For further details see Back-To-Back Orders And The Insufficient Stock Warning under step 3 above.
8. When you have finished, click OK to close the Back Order Options window.
The Back Ordered quantity is updated for the line:

Note: You may click the Back Ordered hyperlink on the line to edit back ordering details for the line.
9. Repeat from step 3 above to add further lines to the Sales Order.
10. When you have finished adding Sales Order lines, click Complete on the Toolbar - Sub Menu to Complete the Sales Order, as described in Completing Sales Orders.
11. Once the Back-To-Back Sales Order has been Completed, order lines must be allocated to a Purchase Order. This will either happen automatically or must be done manually, depending on whether the Create Back To Back PO? option was switched on or off (in step 7 above).
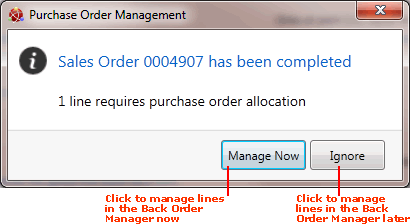
The Purchase Order Management dialogue displays on Sales Order Completion if the Create Back To Back PO? option was not selected earlier:

The dialogue indicates the number of lines requiring Purchase Order allocation for this Supplier. Click:
Manage Now: To manage the Back-To-Back order now; i.e. manually allocate the Sales Order lines to a new or existing Purchase Order now using the Back Order Manager. See Back Order Manager: Allocating Lines Now.
Or: Ignore: To manage the Back-To-Back order later; i.e. not allocate the Sales Order lines immediately. You may allocate them later using the Back Order Manager or Back Orders Finder. See Back Order Manager: Allocating Lines Later.
If the Create Back To Back PO? option was switched on (in step 7 above), order lines are automatically allocated to a Purchase Order when the Sales Order is Completed. A Purchase Order is created - with order lines allocated - for each Product (or Special) line's defined Supplier.
When Back-To-Back Sales Order lines are auto-allocated, you are not prompted to manage the back ordered lines after Completing the Sales Order. A new Sales Order will now display in a new tab. If necessary you may repeat the above steps to create another Back-To-Back Sales Order.
Note: For further details on the required actions at the Back-To-Back Purchase Ordering stage see Back-To-Back Purchase Ordering.
After the Back-To-Back Sales Order has been Completed, lines will display as follows (with Lines View > Back To Back View selected):

The Purchase Order column displays the number of the Purchase Order the line was allocated to (if the Create Back To Back PO? option was selected in step 7). Click the hyperlink to open the Purchase Order.
The PO Status column shows the status of the Purchase Order. At this point, prior to delivery of the goods, the status will display either 'Parked' (if the Park Back To Back PO? option was selected in step 7) or 'Undelivered' (if the Purchase Order has been Completed).
NEXT: Editing Supplier Details (Back To Back Supplier Selection Window)