|
Quantum VS Help: Sales Desk |
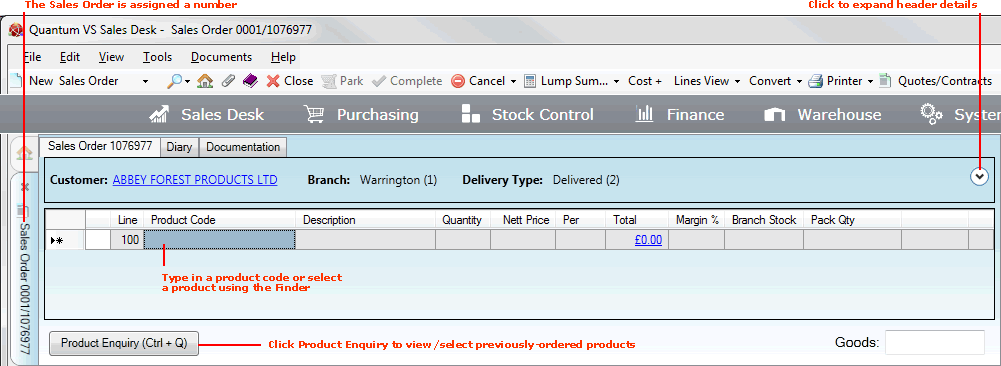
After you have completed the header details for the Sales Order (or Quote, Sales Enquiry, Sales Contract, or Credit Note) and clicked [Tab] your cursor will be focused on the Product Code field of the first Product line (Line 100), ready for you to enter the products required by the customer.

At this point:
The Sales Order (or alternative sales document type) is assigned a number. The tab will now read, for example, Sales Order 001/1076977 (or similar), rather than New Sales Order.
Header details are 'collapsed' to save screen real estate. To review/edit header details, click the 'arrow' icon.
The Customer name in the header is hyperlinked - click to open/view the Customer record.
To add a product, on the first available Product line:
If you know the Product Code:
Type it into the Product Code field; then
Click [Tab] to move your cursor to the Quantity field.
If you don't know the Product Code, either:
Use the Finder to locate and select it. To do this:
Or: Use one of the alternative methods of adding a product. Then:
Click [Tab] to move your cursor to the Quantity field.
Note: You also have the option of using Product Enquiry to add previously-ordered products. See Entering Product Lines With Product Enquiry.
Once you have entered a Product Code and clicked [Tab], as described above, the cursor will by default (see note) be focused on the Quantity field ready for you to enter a quantity.
Note: The Stock Unit Calculator will display at this point if the entered Product is associated with a Stock Unit record. If so, select the required Quantity and Unit using the method described in Selecting Stock Units At Sales Document Entry.
For example:

Enter the Quantity (e.g. 5) then click [Return].
A new Product line is created, ready for you to add more products:

At this point:
The Product Code becomes hyperlinked. Click it to view the Product record in a separate tab.
The product's Description is entered - you may edit this if necessary.
You may click the ![]() icon on the line to view price and stock data for the product.
icon on the line to view price and stock data for the product.
For further details see Understanding Product Lines.
Note: If the Select Product Process window displays after entering the Quantity, see Entering Product Process Options.
Repeat the procedure above until you have added all required Product lines.
For a list of additional useful procedures at the line-adding stage see Additional Procedures When Adding Product Lines.
Additional Product-related details display in the Properties: Product Panel.
Once you have finished adding lines you will need to Complete the Sales Order.
You may also wish to review/enter details within the other Sales Order tabs. See Additional Sales Document Tabs.
You may also wish to review details and specify options in the Properties area. See Understanding The Properties Area.