Quantum VS Help: Introduction |
Quantum VS has a variety of features enabling the user to keep their hands on the keyboard, speeding up data entry. The following describes how a 'speeded up' workflow may be achieved using the keyboard's function keys and shortcuts.
You will find that taking the time to learn the following shortcuts can drastically speed up data entry and editing within Quantum VS.
Note: The following examples refer to the default function key mapping, although the function keys may be edited - see Editing Default Function Key Mappings.
Click for further details on how to use the following keyboard functions:
The quickest way of creating a new document is to click [F5].
This creates whatever document type is the current 'default'; i.e. the document type currently active in the New... menu, on the left of the Toolbar - Sub Menu. For example:
If the New... menu currently reads New Sales Order, clicking [F5] creates a new Sales Order.
If the New... menu currently reads New Purchase Order, clicking [F5] creates a new Purchase Order.
...and so on.
See example:
If you commonly need to create the same document type each time, using the [F5] key will save you time.
If you need to create a different document type to that selected in the New... menu, use one of the alternative methods for creating that document type, such as selecting Create A New Document > (document type) from the Home menu, or selecting File > New > (document type) from the main menu.
When creating or editing a document/record you may need to use the Finder to locate and select a specific value to enter within the currently-open document. The quickest way of doing this is to click [F3] to activate the Context-Sensitive Finder. This makes the Finder active with records relevant to the currently-active field (i.e. the field where the cursor is currently placed).
For example, say you created a new Sales Order in the previous step. Your cursor will now (since Branch and Staff Code field values are inserted automatically) be placed automatically in the Customer field. Clicking [F3] brings up the Context-Sensitive Finder, with Customers ready to search and select in the Finder.
Similarly, imagine you wish to add a Supplier to a Purchase Order. When your cursor is placed on the Supplier field, clicking [F3] brings up the Context-Sensitive Finder, with Suppliers ready to search and select in the Finder.
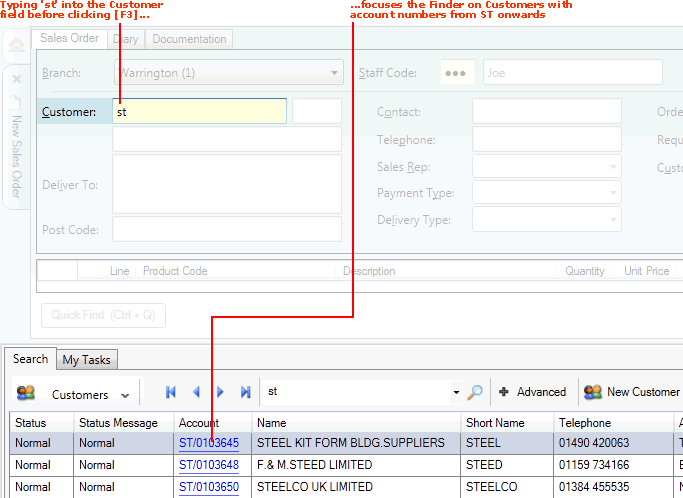
You can focus the Finder further by typing characters into the field before clicking [F3].
For example, if we type 'st' into the Customer field, then click [F3], the Finder lists Customers in sequence from the Account number 'ST':
Note: This example assumes the default Sequence option for Customers (in Advanced Finder options) - Account - is selected. Alternative Sequence option for Customers are name and Short Name. If either of these options are selected you would type in all or part of the Customer's Name or Short Name. See Changing The Search Sequence.
You can use this shortcut in a variety of circumstances when working in Quantum VS - it is not restricted to sales and purchasing documents. No matter what type of field the cursor is currently placed in, you may use this method to focus the Finder on relevant documents/records.
For further details see Using The Context Sensitive Finder.
In the previous step we activated the Finder for the relevant document/record type. The keyboard 'focus' is now placed on the first record in the Finder. We now need to search for, and select, the relevant item from the Finder.
For example, if we activated Customers in the Finder, the keyboard 'focus' will now be on the first Customer in the Sequence.
Note: This will be subject to (a) whether or not we entered any search text in the previous step, and (b) whatever the selected Sequence option is (in Advanced options). See Changing The Search Sequence.
We may now browse to find the required Customer in the Finder and then select it.
When the keyboard focus is within the Finder (for example, after you have clicked [F3] to activate the Context-Sensitive Finder), click your Down and Up arrow keys to move the cursor down - or up - the list of records on the current Finder page.
Use the following keys to change the current Finder page:
Home: Go to first page in the Finder.
End: Go to last page in the Finder.
Page Down: Go to next page in the Finder.
Page Up: Go to previous page in the Finder.
When the keyboard focus is on the Finder record you wish to select, click Return to select it (i.e. add it to the currently-open document).
Note: Alternatively you can (a) double-click on it with your mouse, or (b) right-click on it and select 'Add ... To Document'.
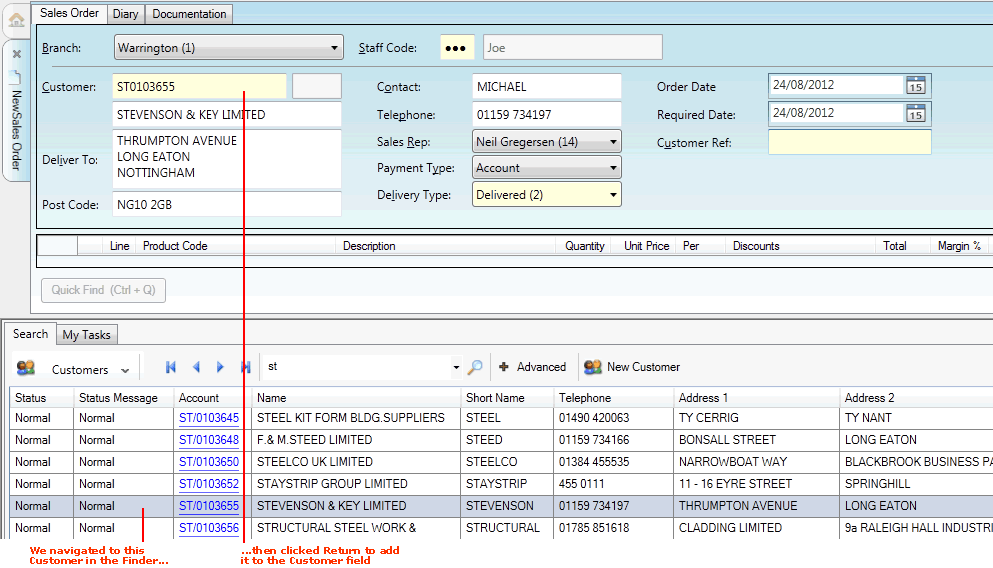
Continuing our previous example, we have navigated to the Customer 'Stevenson & Key Ltd' so that it is highlighted in the Finder, and then selected it (i.e. added it to the Customer field in our newly-opened Sales Order) by clicking Return:
When the keyboard focus is on a record in the Finder, you may open the related record by clicking your [Space] bar.
Note: Alternatively you can (a) click on the hyperlink on the Finder line, or (b) right-click on it and select 'View...'.
Examples:
When Customers are selected in the Finder: click [Space] to open the Customer record highlighted in the Finder (see example below).
When Goods Received Notes are selected in the Finder: click [Space] to open the Goods Received Note highlighted in the Finder.
When Print Groups are selected in the Finder: click [Space] to open the Print Group record highlighted in the Finder.
...and so on.
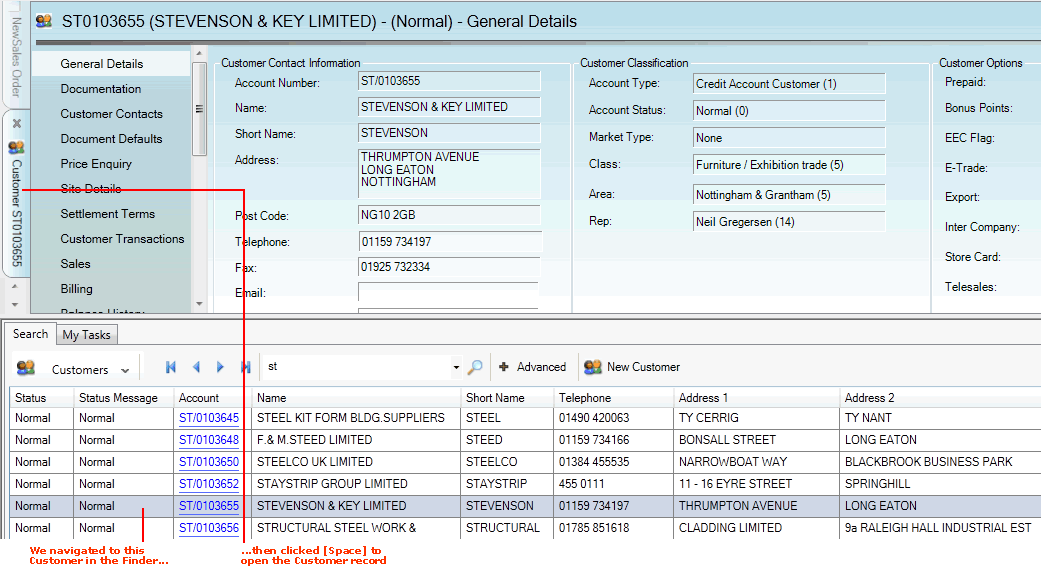
In the following example, we have navigated to the Customer 'Stevenson & Key Ltd' so that it is highlighted in the Finder, then clicked [Space] to open its Customer record in a new tab:
This method works no matter what type of document/record is selected in the Finder.
Note: When working outside the Finder in Quantum VS, clicking [Space] opens whatever link is relevant to the current field/cell. So for example, you might click [Space] when your cursor is within a Product Line to open the Product record in a separate tab.
Quick Search is another way of finding and opening a particular Customer, Product, Branch, Customer Part Number or Supplier Part Number record.
Instead of selecting Quick Search from the Home page or Edit menu, simply click [F6]. For further details see Using Quick Search.
When creating or editing a document or record there may be many fields to complete. You may use your [Tab] key to quickly move your cursor to the next available field, speeding up the entry/editing procedure.
This is especially useful when completing sales and purchasing documents (e.g. entering header and Product line details in a Sales Order) and when creating/editing file records (e.g. a Customer or Product record).
Use Shift + [Tab] to move your cursor to the previous field.
Message windows will pop up when performing certain tasks. For example, various pop-up windows may appear when adding a Customer to a Sales Order - see Working With Pop-Up Customer Windows. You may close these message windows quickly by clicking [F12].
You may use the [Esc] shortcut to close any open window.
You may empty the current field - i.e. the field where the cursor is currently placed - by clicking [F9]. This is quicker than using your mouse and backspace key.
This is especially useful when working with header fields or product lines within sales or purchasing documents, or when working with files and control records.
Note: An alternative method is to use Shift + arrow key or Ctrl + A to select all information in a field, then type to overwrite the information in that field.
When your cursor is on a field requiring you to select from a series of menu options:
use your right/left arrow keys to cycle though menu options, then
click Return to select a menu option.
When you have entered details in the final field in the header section of a sales or purchasing document, clicking [Tab] places your cursor within the Product Lines section ready to enter the first product.
If you already know the code, you can type it into the Product Code field.
If you don't know the code, you can enter part of (or none of) the Product Code, then click [F3] to make Products active in the Finder. Browse to the Product so that it is highlighted in the Finder, then select it by clicking [Return].
The cursor is then automatically placed in the Quantity field. Enter the Quantity required, then, assuming no price/discount negotiation is required, click [Return] to enter the next Product line in the same way.
Product Enquiry is a pop-up Finder window displaying products previously ordered by a customer. You may use Product Enquiry as a quick way of ordering (or adding to a sales document) products a customer has ordered before.
For further details see Entering Product Lines With Product Enquiry.
To open Product Enquiry when a sales document is open, click [Ctrl + Q], or click the Product Enquiry button beneath the Product lines section.
Note: The Product Enquiry button becomes available only after you have added header details and clicked [Tab] ready to add product lines.
In the Product Enquiry window you will see a list of products previously ordered by this customer. For each product, the relevant Sales Order, the quantity ordered and how much the customer paid for the product (which is not necessarily the product's list price) are displayed.
As when products are selected in the standard Finder, you may page through results, change the sequence and search for a specific product in the Product Enquiry window. You may also reduce the number of products listed by selecting a certain date range, and by unchecking the 'include' fields.
To add these products to an open sales document you can use the left-hand 'check box' fields to select (or deselect) all - or individual - products, then click the Add button.
Note: The Quantity defaults to the last quantity ordered by the customer, but you may overwrite this on the sales document.
You may enter/select products from the Product Enquiry window using your keyboard. The method is similar to when using the standard Finder:
Use [Tab] / arrow keys to move from one field/line to another.
Click [Space] to select/deselect product lines (i.e. toggles on/off).
When you have selected product lines to add, either:
Click [Return] to add an individual product line to the sales document. Or:
Click Alt + A to add all selected products to the sales document.
Note: You may now click [Esc] to close the Product Enquiry window.
When a sales or purchasing document is open you may use your mouse to add a Special, Manual or Text Line. See Entering Text, Manual And Special Product Lines (sales) and Adding Text, Manual And Special Lines (purchasing).
You can speed up the procedure using the following Function Keys. Click:
[F2] - to add a Text line
Shift + [F3] - to add a Manual line
[F4] - to add a Special line
Shift + [F8] - to add a 'dump code' Special line (i.e. there is no defined Supplier) - for sales documents only
When a sales document is open and you are entering product lines you may quickly switch between the available Lines View Modes by clicking Shift + [F2]. This is faster than selecting a Lines View Mode from the menu.
Each of the available Lines View Modes - Nett Price, Unit Price, Gross Price, Back Order Quantities and Stock View - gives slightly different information on prices, discounts and stock details for the product lines on the sales document. By default, Product lines are displayed in the 'Nett Price' mode, but you may select an alternative mode to see the Product's Unit Price, Gross Price, Back Order Quantities or stock details, for example.
For further details see Lines View Modes.
When a sales document is open you may (permissions permitting) re-price the whole Sales Order, Quote, Sales Contract etc. by clicking Shift + [F7] to enter Cost-Plus Mode. This is quicker than selecting Cost-Plus Mode from the menu.
Cost-Plus Mode may be used to offer a discount on the list price to a special Customer by re-pricing the sales document at Cost price PLUS the entered percentage. See Re-pricing Product Lines (Cost Plus Mode).
When a sales document is open you may (permissions permitting) use Line Pricing - also called Negotiation view - to view and manipulate the price the Customer will pay for a particular product.
To do this, click Shift + [F6] when the cursor is placed in any field on the product line you wish to view/manipulate prices for. This may be quicker than clicking the Nett Price, Unit Price or Gross Price hyperlink on that product line.
This opens the Line Pricing window, in which you may - permissions permitting - view past prices paid by the Customer and manipulate a range of price/discount variables, including the Gross Price, the Margin and the Line Discount. See Line Pricing (Negotiation View).
When a sales document is open you may (permissions permitting) use the Manual Pricing window to view and manipulate the prices and discounts for a particular product to modify the price the Customer will pay.
To do this, click [F7] when the cursor is placed in any field on the product line you wish to view/manipulate prices for. This may be quicker than clicking the Total or Discounts hyperlink on that product line.
This opens the Manual Pricing window, in which you may view and manipulate a range of price/discount variables, including the Regulator, Break Discount and Matrix Discounts 1 and 2. See Manual Pricing.
If you are working in a multi-currency set-up and the current customer uses a currency which is different to the 'Home' currency, clicking Shift + [F10] toggles the display (e.g. of prices on a sales document) between the 'home' (i.e. your) currency and the 'context' (i.e. used by the customer) currency.
With many document types (e.g. Sales Orders, Credit Notes, Supplier Return Notes, IBT Allocations and Issues), when a Product line has been flagged for 'batch traceability' you may view and edit the batch allocation by selecting the product line and clicking Shift + [F4].
You may close any open document or tab by clicking [F8].
This method can be used as a quick way of Completing - or Parking or Cancelling - an open sales document using your keyboard.
For example, when you have added product lines to an open Sales Order, click [F8]. The Close Document window appears, saying 'Sales Order (number) has changed'. Either:
Select the (default) Complete the document option; or
Use your arrow key to select Park the document; or
Use your arrow key to select Cancel the document...
...then click [Return] (or click your mouse on the OK button) to close the window and Complete, Park or Cancel the Sales Order.
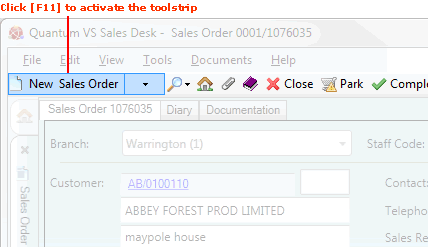
You may select Toolbar - Sub Menu options using the [F11], 'arrow' and Return keys, as follows:
1. From anywhere in an open document, click [F11] to 'focus the toolstrip' function key; i.e. place your cursor within the Toolbar - Sub Menu:
2. Use your keyboard's 'right arrow' key - and, if necessary, 'down arrow' key - to select an appropriate menu item:
3. Click your Return key to select the item from the menu.
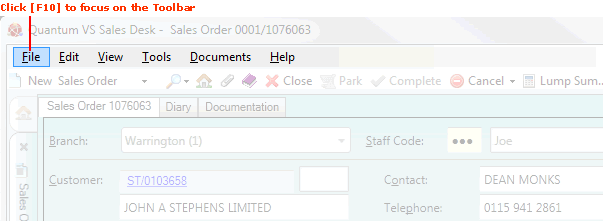
You may select main Toolbar menu options by clicking [F10] as follows:
1. From anywhere in an open document, click [F10] to focus your cursor on the Toolbar - Main Menu:
2. To select a menu option, either:
Use your keyboard's arrow keys to select an appropriate menu item, then click [Return] to select that item from the menu. Or:
Click Alt + the appropriate shortcut key to select an option from the menu. You can display these after clicking [F10] by using your arrow keys to expand the drop-down menus.
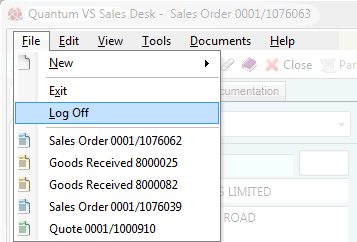
For example, to log off:
Click [F10] then 'down arrow' so that Log Off is highlighted, then Return. Or:
Click [F10] then Alt + L.
* = sales documents only