|
Quantum VS Help: Sales Desk |
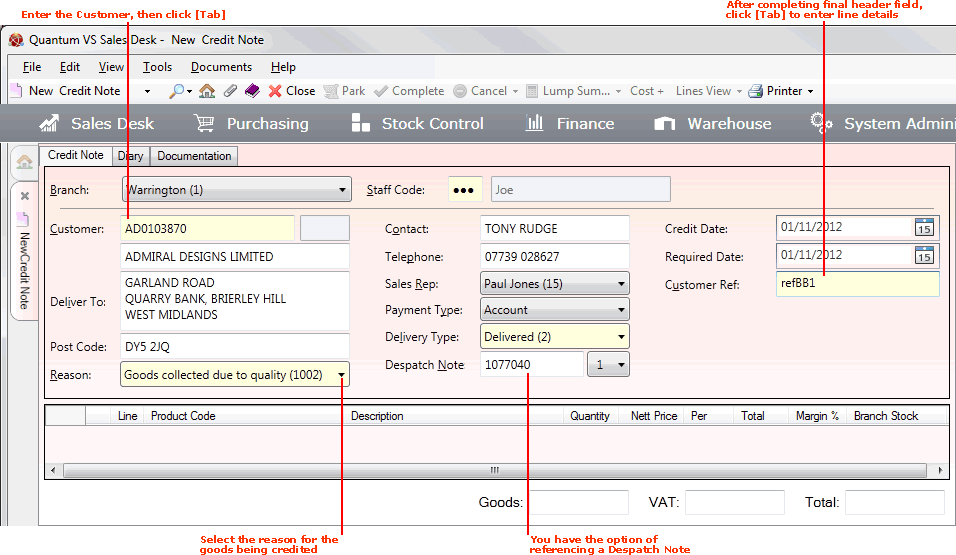
When you have created a new Credit Note your next step is to enter the Customer and other header details in the fields in the upper section. Note that:
You must enter a reason why the Credit Note is being issued.
You may also choose to enter the number of a Despatch Note, so that Product details are automatically recalled from an earlier order/despatch of goods.
For example:

The procedure for entering header details is as follows:
Note: Use your [Tab] key to move from one field to the next. Mandatory Fields (fields which must contain a value before a function can be completed) are shown with a yellow background (as pictured above) or with an 'i' next to the field. Additional fields may be shown based on your system configuration.
Note: To review the full Credit Note procedure see The Credit Note Issue And Collection Procedure.
Default Branch and Staff Code field values are added when the Credit Note is created. The Branch field refers to the Branch at which the Credit Note is being raised. The Staff Code refers to the member of staff creating the Credit Note.
If necessary you may (if your user permissions allow):
select an alternative Branch from the Branch menu; and/or:
re-enter your Staff Code if a different user is shown.
When you create a new blank Credit Note your cursor is placed automatically in the Customer field, where you must define the customer being credited.
If you know the Customer's Account Number (e.g. BA/0000010) or Short Name (e.g. Barker), type it into the Customer field.
If you don't know the Customer's Account Number or Short Name, use the Finder to locate and select it. To do this:
For further details on using the Finder to locate and select a Customer record see Finding Customers.
One or more windows may pop up when you add/enter the Customer (e.g. Customer Notes / Quotes And Contracts Window).
For details on how to proceed see Working With Pop-Up Customer Windows.
The quickest way to close these windows is to click either [F12] or the [Esc] key.
In the Reason field, use the drop-down menu to select a reason for issuing the Credit Note.
Note: These menu options are held in the Reason Codes - Credit Notes (RCR) Table File and may be set up/edited using Table File Maintenance.
Reason Codes under 1000 are used when goods are not being returned into stock. For example:
Credit due to overcharge (1).
Allowance due to damaged goods (2).
Allowance due to poor quality (3).
Credit due to short delivery (4).
Reason Codes over 1000 are used when goods are being returned into stock. For example:
Goods collected due to quality (1001).
Goods collected due to over supply (1002).
Note: On Credit Notes where the Reason code is over 1000 - i.e. where goods are being returned into stock - an Unprinted Collection Note is automatically created when the Credit Note is Completed. See Working With Collection Notes.
In the Despatch Note field you may enter a reference for an existing Despatch Note. This will recall Product details from the original Despatch Note, saving you having to enter Product line details from scratch.
Note: You may only raise a Credit Note from a Despatch Note on which a Sales Invoice has been raised.
If you know the Despatch Note reference: enter the code for the Sales Order the Despatch Note relates to. In the field to the right, enter the Sequence number of the Despatch Note. For example, 1077040/1 refers to the first Despatch Note created for Sales Order 1077040. The Sequence number defaults to 1 but you may select an alternative (e.g. 1077040/2 refers to the second Despatch Note created for Sales Order 1077040).
Note: The Customer account code on the Credit Note header and the Customer on the Despatch Note must match.
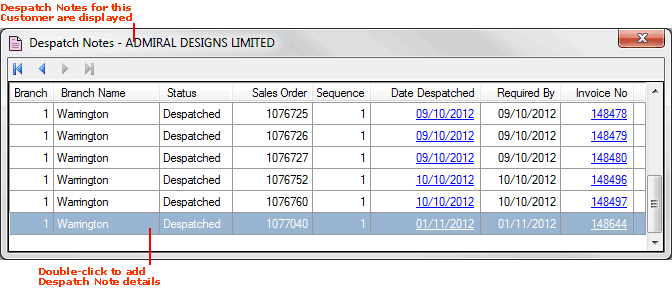
If you don't know the Despatch Note reference and need to search for the relevant Despatch Note: with the cursor placed in the Despatch Note field, click [F3] to display a list of Despatch Notes for the selected Customer. For example:

Note: Click the Date Despatched hyperlink to view the Despatch Note if necessary. For further details and column definitions see Working With Despatch Notes. If more than one page of records is displayed in the Finder you may click the blue arrow keys on the Toolbar to scroll through pages of records.
Double-click on the relevant Despatch Note to add it. The Despatch Note and Sequence number are added to the Despatch Note fields on the Credit Note header.
The Existing Credit Notes window pops up as a warning if any Credit Notes have already been raised against the referenced Despatch Note. Close this window to continue.
You may now close the Despatch Notes window and continue entering header details.
When you enter the Customer, most of the header fields are populated automatically based on settings in the Customer record (which define, for example, whether the Customer is an Account or Cash Customer, and any discounts they may be eligible for), and on other system settings.
The cursor is placed automatically in the next available header field.
Enter - or edit the default - details in the available header fields as appropriate:
The Deliver To field records the address to which the goods will be delivered/invoiced. This field is populated automatically with the Customer's main site address (as recorded in the Customer record - see General Details Tab: Viewing A Customer's General Details) when you add/enter the Customer.
You have various options if you wish to enter a different delivery address. You may:
Use the Postal Address Finder (PAF) to find and enter an address based on certain details (e.g. a Post Code/building number/street name etc.).
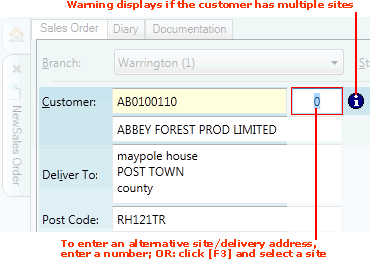
If you enter a customer which has multiple delivery addresses (Customer Sites) recorded, a warning appears in the highlighted field to the right of the Customer field:

A '0' displays by default, indicating that the main 'head office' Customer Site has been selected as the default 'Deliver To' address.
To use the currently-listed site as the delivery address (i.e. accept the default '0'): click [Tab] to move to the next available header field.
To find and select an alternative Customer Site as the delivery address: see Entering An Alternative Customer Site Address.
When you add/enter a Customer, the Customer name plus the following 'customer contact' fields are populated automatically from the saved Customer record (see General Details Tab: Viewing A Customer's General Details):
Contact - the contact at the Customer company.
Telephone - the Customer's telephone contact number.
Sales Rep - the sales person assigned to this Customer account.
If necessary you may add/overwrite these fields on the header, or select an alternative menu option.
Default values are entered, but you may select an alternative using the drop-down menus as follows:
Payment Type - refers to whether the Customer pays by Cash or on Account (i.e. credit). This is defined in the Customer Account Type field in the General tab of the Customer record.
Delivery Type - refers to whether customers take the goods away themselves (Collect Now or Collect Later), whether the goods are delivered (Delivered) or whether the goods are sent directly from the Supplier (Direct).
Note: If you select Direct under Delivery Type the additional tab Supplier is shown, in which you must enter Supplier details. For further details see Creating And Completing A Direct Sales Order.
The default values, and what other options may be available, depend on the Customer's settings in their Customer record (which define, for example, whether the Customer is an Account or Cash Customer, and any discounts they may be eligible for), and on other system settings.
The Credit Date field shows the date on which the Credit Note was created. Today’s date is entered by default. You may select an alternative date by clicking on the drop-down menu.
The Required Date field shows the date on which the credit will be applied. Today’s date is entered by default. You may select an alternative date by clicking on the drop-down menu.
Note: If Optional Enhancement Price Book 718 is enabled, rather than the system entering a default date based on system settings, the Required Date is blank and you are forced to enter it. A warning is generated if you attempt to proceed without entering the date.
In the Customer Ref field, enter a text/numeric reference which will enable the Customer and you to identify this particular sales document.
Note: This may be a mandatory field for certain Customer accounts, based on the setting of the Purchase Order field in the General Details tab of the Customer's Customer Record - see General Details Tab: Viewing A Customer's General Details.
If the Order Analysis field is displayed, use the drop-down menu to select an option to state where the Customer heard about your company/current offer (e.g. Radio, TV, Magazine).
Note: The Order Analysis field will only appear if the System Administrator has checked the Order Analysis field in the General Details tab of the Customer's Customer Record - see General Details Tab: Viewing A Customer's General Details. The menu options are maintained via the table file SOAC (Order Analysis) - see Table File Maintenance.
When you have completed the header details, click [Tab] to place your cursor in the lines area and begin entering - or amending - line details. See Entering Credit Note Product Lines.
Note: At this point the Credit Note is assigned a number. The tab will now read Credit Note 1077049 (or a similar number), rather than New Credit Note.