|
Quantum VS Help: System Administration |
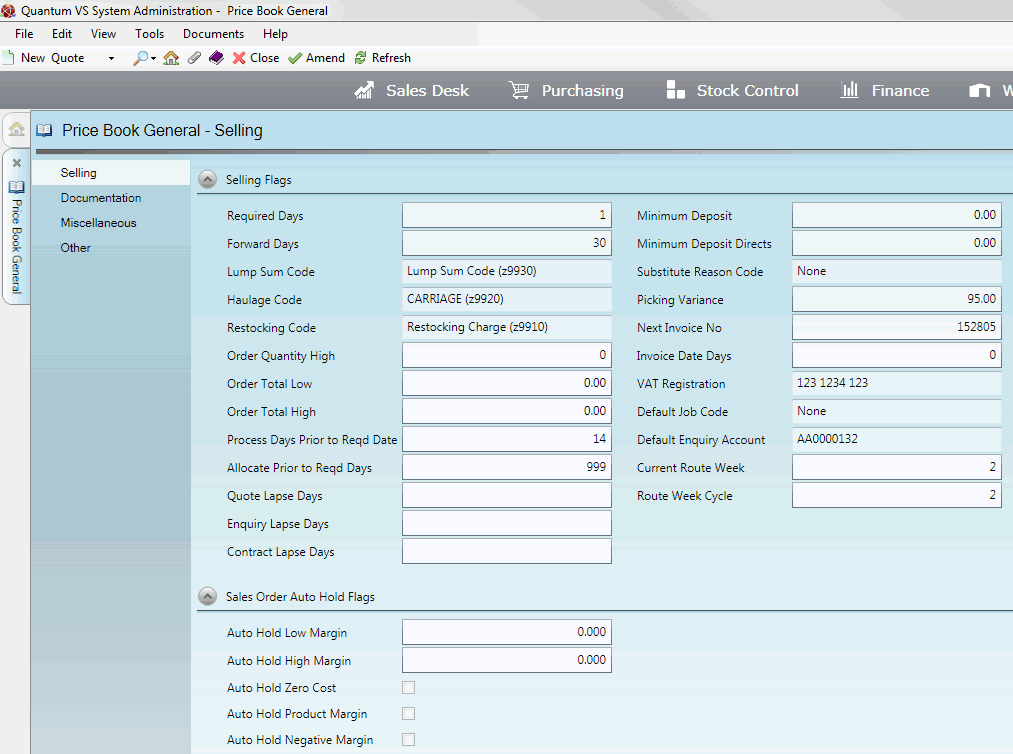
The Selling tab of the Price Book General control record defines various Sales Order and selling-related system settings.
To set up/edit the Price Book General - Selling record:
1. Do the following, as described in Price Book General Maintenance:
Open the Price Book General control record;
Select the Selling tab; then
Place the Price Book General control record in Amend mode for editing.
2. With the Selling tab/header selected, select the appropriate options under the various available fields using the following as a guide:
Note: You may use your [Tab] key to move from one field to the next.
|
Field |
Definition (* = secure field)
|
|
Selling Flags
|
|
|
Required Days
|
The Required Days field may be used to specify a default Required Date which is a certain number of days after the Order Date.
The Required Date displays in the Sales Order header and represents the date on which the order goods are required.
If required, enter a value corresponding to a number of days (the default value is 0).
The order's Required Date is calculated as follows:
Required Date = (Today's Date + Required Days)
For example: a Sales Order is raised with an Order Date of August 1.
Therefore, if 'Required Days' is set to 0, the order's Required Date is August 1.
However, if 'Required Days' is set to 14, the order's Required Date is August 15.
Note: See also the Allocate Prior To Required Days field below. |
|
Forward Days
|
This field applies to the 'legacy' (i.e. pre-9.0.1.8 release) version of Forward Ordering, in which a 'Forward Order' would be created if the difference between the Order Date and the Required By date entered in the Sales Order header exceeded the Forward Days value.
Note: See Forward Ordering In Quantum VS: The Old And New Systems.
Example (with the default Forward Days value of 30): if a Sales Order is created with an Order Date of January 1 and a Required Date of February 1 (or later), a dialogue box displays, giving the User the option of creating a Forward Order.
|
|
Lump Sum Code
|
Use the drop-down menu to select the Product Group table value to assign when Sales Order lines are lump summed. This enables the lump summed lines/codes to be analysed using Sales Analysis software.
These codes are held as values within the Product Groups (P) table file. If a suitable value does not exist it will need to be added. The code added to the table file must have a TableFileEntryID value between 9901 and 9999. For further details see Table File Maintenance.
Once you have added a suitable 'lump sum code' value to the Product Groups (P) table file it will be available for selection in the Lump Sum Code field's drop-down menu.
|
|
Haulage Code
|
Use the drop-down menu to select the default Product Group to assign when a Manual line (such as a haulage charge) is added to a Sales Order. See Manual Lines And Sales Documents. This enables the Manual/Haulage lines/codes to be analysed using Sales Analysis software.
These codes are held as values within the Product Groups (P) table file. If a suitable value does not exist it will need to be added. The code added to the table file must have a TableFileEntryID value between 9901 and 9999. For further details see Table File Maintenance.
Once you have added a suitable 'Manual/Haulage code' value to the Product Groups (P) table file it will be available for selection in the Haulage Code field's drop-down menu.
|
|
Restocking Code
|
Use the drop-down menu to select the Product Group code/value to assign when a handling charge is added to a Credit Note. This enables the Handling Charge lines/codes to be analysed using Sales Analysis software.
These codes are held as values within the Product Groups (P) table file. If a suitable value does not exist it will need to be added. The code added to the table file must have a TableFileEntryID value between 9901 and 9999. For further details see Table File Maintenance.
Once you have added a suitable 'Handling Charge code' value to the Product Groups (P) table file it will be available for selection in the Restocking Code field's drop-down menu.
|
|
Order Quantity High *
|
You may use this field to set up a 'high value' warning when a Sales Order is completed. The value entered in this field must be from 0 - 99999.
If a user attempts to complete a Sales Order with a value greater than this, the following warning message will be displayed on the screen: Ticket Total is greater than £Value. Users are then given the choice whether or not they wish to proceed.
If the warning is not required, this field must be set to zero.
Note: All calculations are exclusive of VAT. |
|
Order Total Low
|
You may use this field to set up a 'low value' warning when a Sales Order is completed. The value entered in this field must be from 0 - 99999.
If a user attempts to complete a Sales Order with a value less than this, the following warning message will be displayed on the screen: The order value is less than the minimum recommended value, do you want to proceed? Users are given the choice whether or not they wish to proceed.
Note: If the Order Quantity High value is set (see above), this value must be lower. All calculations are exclusive of VAT. |
|
Order Total High
|
You may use this field to set up a 'high value' warning when a Sales Order is completed. The value entered in this field must be from 0 - 99999.
If a user attempts to complete a Sales Order with a value more than this, the following warning message will be displayed on the screen: The order value is higher than the minimum recommended value, do you want to proceed? Users are given the choice whether or not they wish to proceed.
|
|
Process Days Prior To Required Date
|
The Process Days Prior To Required field may be used with Forward Order lines to allow goods to be picked in the warehouse before they are required.
If required, enter a value corresponding to a number of days (the default value is 0).
Effectively, this allows the order line to be held a certain number of days before the line's Required Date so that picking can take place.
Any Sales Order or Forward Order line held for this reason can be released by running the Forward Order Document Release process. This generates a Picking Note for any Sales Order/order line for which the Allocation Date is now in range of the Process Days Prior To Required Value, enabling the order to progress through the Picking and Despatch cycle, subject to the User's 'Order Flag' settings.
For details and examples see Forward Order Lines: Allocating Stock And Releasing Lines For Picking/Despatch.
|
|
Allocate Prior To Required Days
|
The Allocate Prior To Required Days field may be used with Forward Order lines to specify a default Allocation Date which is a certain number of days ahead of the Required Date (see above).
If required, enter a value corresponding to a number of days (the default value is 0).
For example: a 'Forward' Sales Order is raised on August 1, with a Required Date of August 15. Each line’s default Allocation Date is calculated as follows:
Default Allocation Date = (Required Date – Allocate Prior to Required Days)
Therefore, if 'Allocate Prior To Required Days' is set to 0, the line's default stock allocation date is August 15 - the same day as the Required Date.
However, if 'Allocate Prior To Required Days' is set to 2, the line's default stock allocation date is August 13 - 2 days before the Required Date. If the User/Sales Clerk does not change this Allocation Date, and if stock is available, then stock will be allocated to the line on this date.
For further details and examples see Forward Order Lines: Allocating Stock And Releasing Lines For Picking/Despatch.
|
|
Quote Lapse Days
|
Defines the Lapse Date in the Quote header - see Entering Quote Header Details.
For example, with the following Quote Lapse Days values, the associated Lapse Date in the Quote header will be as follows:
|
|
Enquiry Lapse Days
|
Defines the Lapse Date in the Sales Enquiry header - see Entering Sales Enquiry Details.
For example, with the following Enquiry Lapse Days values, the associated Lapse Date in the Sales Enquiry header will be as follows:
|
|
Contract Lapse Days
|
Defines the Lapse Date in the Sales Contract header - see Entering Sales Contract Header Details.
For example, with the following Contract Lapse Days values, the associated Lapse Date in the Sales Contract header will be as follows:
|
|
Minimum Deposit
|
You may use this field to enter a figure corresponding to the minimum percentage deposit to be charged on any Collected or Delivered Sales Order (i.e. any Sales Order Delivery type other than Direct) which includes a Special product (a product not normally stocked or sold by the branch, that the branch orders in specially for the customer as a one-off).
On orders of this type, the system will force the user to take a minimum deposit of x%, the 'x' being the amount entered into the Minimum Deposit field.
|
|
Minimum Deposit Directs
|
You may use this field to enter a figure corresponding to the minimum percentage deposit to be charged on any Direct Sales Order (irrespective of products ordered).
On orders of this type, the system will force the user to take a minimum deposit of x%, the 'x' being the amount entered into the Minimum Deposit Directs field.
|
|
Substitute Reason Code
|
Use the drop-down menu to select the default reason given when, following stock picking, the stock ordered is substituted for a different product (e.g. Damaged).
By default, the reason code specified here is used on the stock transaction file to denote the reason for the substitution, although the user may select an alternative reason.
Note: These menu values must be set up and maintained in the Reason Codes (REA) table file. For further details see Table File Maintenance. |
|
Picking Variance *
|
A percentage value may be entered into this field, giving the ability to pick more stock than the allocated quantity for non-timber products. This is used when a Picking Note is Confirmed, once the warehouse manager (or similar) has picked the stock.
A value from 0 to 99.99 may be entered. For example, entering 5 would allow the allocated quantity of stock plus 5% to be picked. (The default value is zero.)
|
|
Next Invoice No *
|
This field defines the number of the next cash or credit invoice that the system produces. For example, if you enter a value of 1000, the next invoice produced would be 1001, then 1002 and so on.
|
|
Invoice Date Days
|
You may use this field to enter the number of days that will be added to the current date to derive the Invoice Parameter Date.
The Invoice Parameter Date is used in the Sales Invoice Update process which generate invoices for orders whose Required By date is earlier than or equal to the Invoice Parameter Date.
|
|
VAT Registration *
|
Enter the VAT Registration number of the Company.
Note: Since the VAT Registration number is not printed within documentation it is advisable to include it on any pre-printed stationery design/layout. |
|
Default Job Code *
|
This field is used to define the default job code that is used in the creation of a Quote Request.
|
|
Default Enquiry Account
|
Enter the Customer Account code to be used as the default for Sales Enquiries when the Sales Enquiry is from a 'Prospect' (i.e. a company which does not have a Customer account set up on the system).
When entering Sales Enquiry header details this default 'Prospect' account number may be entered by clicking [Return] when the cursor is within the Customer field.
Note: You will first need to set up a dummy 'Prospect' account in Customer Maintenance - see Creating A New Customer Record. |
|
Current Route Week *
|
This field holds a number representing the current week you are in of your Route Week Cycle (see below).
Typically, you will update this number at the start of every week before printing out Driver Lists for the current week.
For example, if your Route Week Cycle is 5 (i.e. you operate a 5-weekly cycle) and the previous week was Week 1, at the start of the new week you will enter 2 to show you are in Week 2 of your 5-weekly delivery cycle, so that only the Driver Lists for week 2 are printed. If your Route Week Cycle is 1, the Current Route Week will default to 1.
Note: For further details see Route Round Maintenance and Understanding And Configuring Your Delivery Cycle. |
|
Route Week Cycle *
|
This field holds a number representing the total number of weeks in your delivery cycle. For example: 1 = weekly cycle (default); 2 = 2-weekly cycle; 4 = 4-weekly cycle.
This controls the number of Week buttons displayed/available in New Route Round Maintenance.
Note: For further details see Route Round Maintenance and Understanding And Configuring Your Delivery Cycle. |
|
Home Currency Code *
|
This field enables you to specify the default - or 'home' - currency used on your system.
Note: For further details see Multi-Currency Selling. |
|
|
Note: * = secure field |
The following fields can be used to automatically hold Sales Order lines after the Sales Order has been Completed, preventing them from being invoiced. See Holding A Sales Order (Or Credit Note).
'Held' Sales Orders/Credit Notes may be manually reviewed and, necessary, manually released to make lines Confirmed for Despatch invoiceable. See Releasing A Held Sales Order Or Credit Note.
|
Field |
Definition (* = secure field)
|
|
Sales Order Auto Hold Flags
|
|
|
Auto Hold Low Margin
|
If a percentage figure is entered in this field, a Sales Order will automatically be placed on hold prior to invoicing if the order margin is below this percentage.
|
|
Auto Hold High Margin
|
If a percentage figure is entered in this field, a Sales Order will automatically be placed on hold prior to invoicing if the order margin is above this percentage.
|
|
Auto Hold Zero Cost
|
If this field is checked, a Sales Order will automatically be placed on hold prior to invoicing if any Product line or Manual line on the order has a zero cost.
|
|
Auto Hold Product Margin
|
If this field is checked, a Sales Order will automatically be placed on hold prior to invoicing if any Product on the order has high/low margins set (via the High Sales GPM and Low Sales GPM fields on the Product record - see Recording General Product Details) and the order line is outside these tolerances.
|
|
Auto Hold Negative Margin
|
If this field is checked, a Sales Order will automatically be placed on hold prior to invoicing if any Product line or Manual line on the order has a negative margin.
|
|
|
Note: * = secure field |
3. When you have finished setting up the Price Book General - Selling Record, click Save on the Toolbar - Sub Menu to save the amended record, or select other Price Book General tabs/headers for viewing/editing as appropriate.