|
Quantum VS Help: Purchasing |
If any GRN line says Unconfirmed in the Receipt Details column when booking in stock on a Goods Received Note, you must click the link to manually enter a Serial Number, Batch Number and/or Bin Location for the received goods before you can Confirm the GRN:

Note: To understand why Unconfirmed displays see Why Does The GRN Line Say 'Unconfirmed'?
To manually record the Bin Location and/or Batch Number or Serial Number of received goods, follow the procedure below:
Note: It is assumed you have already created a new Goods Received Note, as described in Booking In Stock On A Goods Received Note.
1. Click the Unconfirmed hyperlink on the Goods Received Note line (see example above).
2. One of the following windows will display, depending on how the product is flagged for 'batch traceability' (see Product Batch Traceability Maintenance):
Bin Allocations - for Multi Bin Products
Batch Allocations - for Batch Reference Products
Serial Allocations - for Serial Number Products
The upper section shows the Product Code and Description, the GRN Line No, the Quantity Received (i.e. the expected quantity; this defaults to the line quantity ordered, unless you have recorded a variance for the line) and the Quantity Outstanding (still to be booked in).
To make the allocation, click the ![]() button:
button:

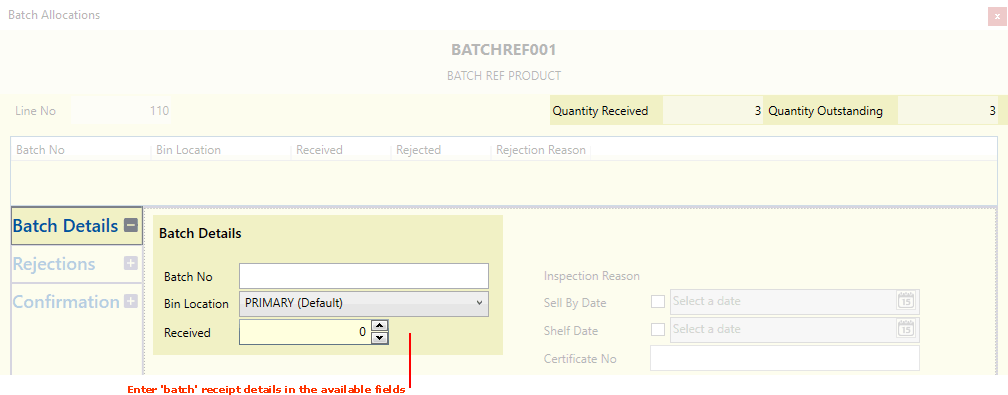
3. In the window's Batch Details tab (displayed by default), enter batch receipt details for the received goods:

Enter Batch Details in the available fields (note: the actual fields displayed, and whether or not they are mandatory, depend on (1) the product's 'batch traceability' method and (2) system settings. See Product Batch Traceability Maintenance):
|
Field |
Action
|
|
Bin Location
|
Enter/select the Bin Location into which the goods will be placed. This is mandatory for 'Multi-Bin' products; optional for 'Batch Ref' and 'Serial No' products. Either:
Note: A 'primary' Bin Location and up to eight 'alternative' Bin Locations may be defined in the Other tab of the product's Branch Stock record - see Branch Stock Maintenance. If no Bin Location is stored here, the default (for 'Batch Ref and 'Serial'-flagged products) is to place the goods in the Temporary Bin Location 'TEMP'. However, you may select an alternative Bin Location if available. The Bin Location of the goods may be transferred later if required - see Transferring A Product's Bin Location. |
|
Batch No / Serial No
|
Enter the Batch No (for 'Batch Ref' products) or Serial No (for 'Serial No' products) of the goods received.
Notes: (1) The Batch No (or Serial No) field does not display for 'Multi-Bin' products. (2) Batch Numbers may be configured to be entered automatically by the system based on settings in the Price Book Flags and Price Book General control records, and also in the relevant Product and Supplier records. See Product Batch Traceability System Settings. |
|
Received
|
Enter/select the Received quantity; i.e. the number of items being allocated to the Bin Location and/or Batch or Serial number.
Note: For 'Serial No' products the Received quantity defaults to '1'. This quantity cannot be amended.
If the received goods are to be allocated to more than one Bin Location or Batch Number you may enter a Received quantity less than the Quantity Outstanding.
Note: To reject any items (assuming Supplier Rejections features are enabled): first record all of the batch as received, so that the Quantity Outstanding (above) is zero, then reject stock in the Rejections tab - see below. |
You may enter/select additional details for the received goods in the following fields (if displayed) in the Batch Details tab:
|
Field |
Action
|
|
Inspection Reason
|
Received Batch- or Serial Number-traceable goods may be flagged for inspection on goods receipt (either using the Batch Inspection Flag field in the Issues and Stock tab of the Product record, or by the user on the Purchase Order line - see Flagging Goods For Inspection). If batch inspection was set to:
Note: The 'reason codes' available in the Inspection Reason menu are set up and maintained in the Batch Inspection Codes (BHLD) Table File - see Table File Maintenance.
Once you have selected an Inspection Reason and then accepted the completed batch allocation as described below, the batch will be held for inspection. Any batch or serial number held for inspection cannot be sold until its status has been updated to 'Available'. See Editing A Product Inventory Record.
|
|
Sell By Date
|
To set a sell-by date for the received goods, check the Sell By Date field, then select the date in the field to the right.
If a date is displayed you may select an alternative.
|
|
Shelf Date
|
To set a shelf life date for the received goods, check the Shelf Date field, then select the date in the field to the right.
If a date is displayed you may select an alternative.
|
|
Certificate No
|
Received Batch- or Serial Number-traceable goods may be associated with a certificate to prove it has passed inspection.
To do this, enter the certificate number in the Certificate No field. If a number is displayed you may enter an alternative.
Once goods receipt has been completed, saved certificates can be retrieved/viewed from the associated Product Inventory record. See Finding Product Inventory Records.
|
Note: Default settings for the above fields are specified for the product in the Product Inventory Details fields within the Issues and Stock tab of the relevant Product record. Subject to these settings it may be mandatory to enter details in some or all of the above fields.
The Notes fields enable you to record additional details about the received goods as necessary.
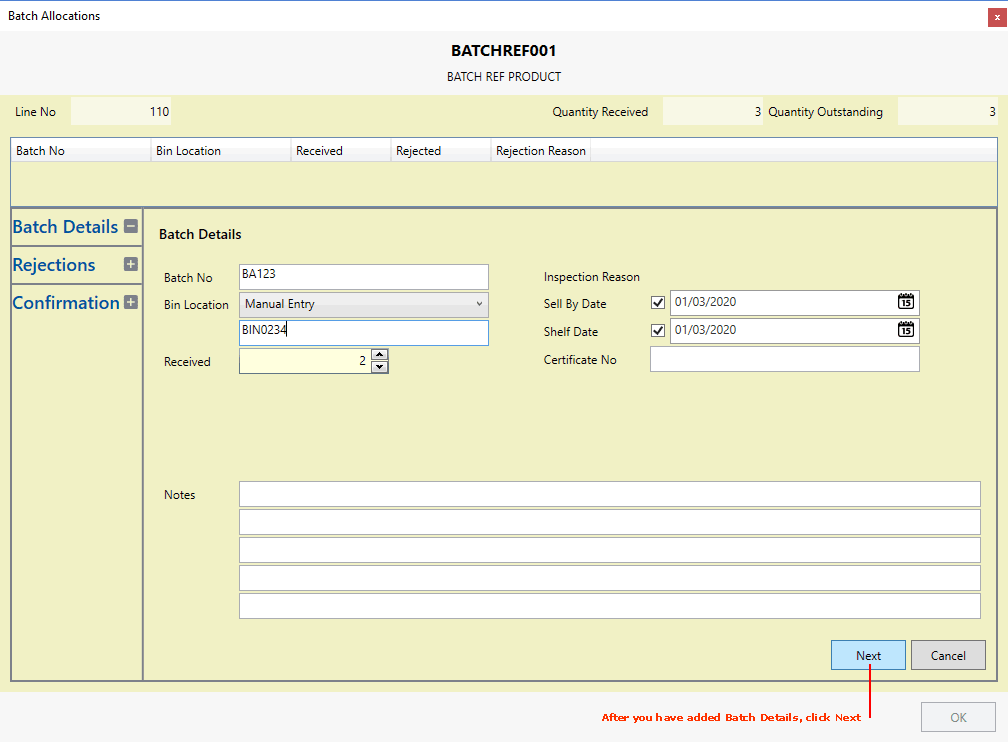
4. When you have finished adding Batch Details, click Next:

Note: At any stage you may click Cancel to cancel the batch allocation.
5. If the Rejections tab does not display - i.e. you are taken immediately to the Confirmation tab - go to the next step.
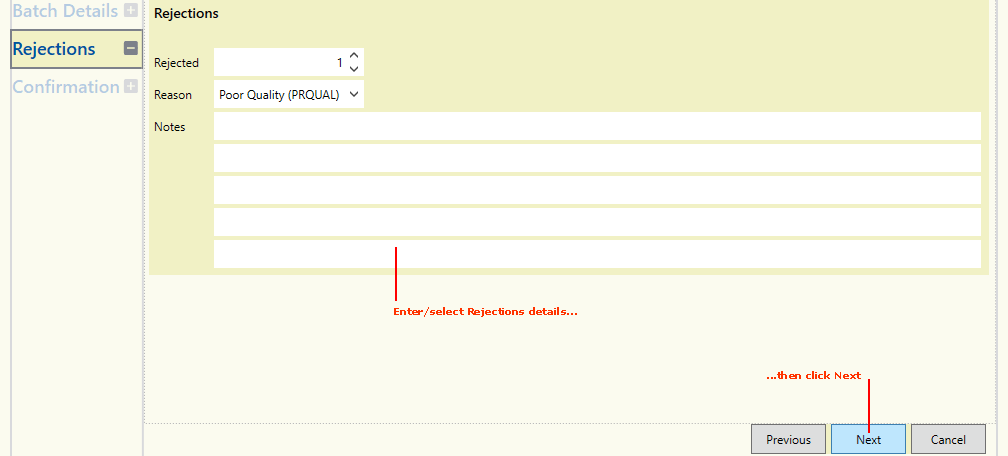
The Rejections tab displays if 'Supplier Rejections' features have been enabled:

The Rejections tab enables you to reject stock at the point of goods receipt. These details are recorded so that you may subsequently review Supplier performance. See Supplier Rejections And Performance.
IMPORTANT: Before goods can be rejected, the total batch quantity must be received into stock. If necessary, click Previous to amend batch allocation details. Ensure the total Received matches the Outstanding Quantity.
Note: The Rejections tab will not display if Summarise Rejected Batches is enabled in the Price Book General: Purchasing Record. In this case, when rejecting batch stock, batches for the same GRN line are consolidated onto a single batch and SRN line.
Enter/select details for the rejected goods in the following fields (if displayed):
|
Field |
Action
|
|
Rejected
|
Enter/select the number of items being rejected from the current batch being received into stock.
|
|
Reason |
Select the reason for rejecting the items (e.g. packet damaged; broken).
Note: Supplier Rejection Reason records must be created in order to hold details for rejecting stock from a Supplier. See Supplier Rejection Reason Maintenance. |
|
Notes |
The Notes fields enable you to record additional details about the received goods as necessary.
|
When you have finished adding Rejections details, click Next.
Note: Click Previous if you need to amend batch allocation details. At any stage you may click Cancel to cancel the batch allocation.
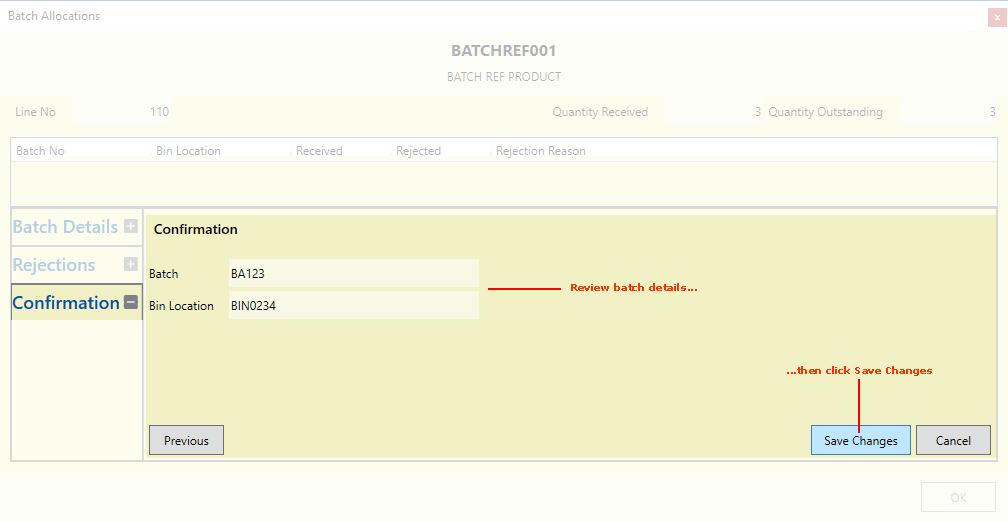
6. The Confirmation tab displays, enabling you to review batch allocation details:

If the details are correct, click Save Changes to save/add batch allocation details.
Note: Click Previous if you need to amend batch allocation details. At any stage you may click Cancel to cancel the batch allocation.
7. Added batch allocation details will display near the top of the Batch/Bin/Serial Allocations window, showing the received quantity and the assigned Bin Location and/or Batch or Serial number for each 'batch', plus any 'rejections' details:

The following hyperlinks are available on the line of each Batch/Bin/Serial allocation. If required, click:
Edit: To edit the batch allocation.
Delete: To delete the batch allocation.
Then follow the steps above to add/edit the batch allocation. See also: Reviewing, Editing And Deleting GRN Batch Allocations.
If there is still a quantity outstanding and you wish to allocate stock of the incoming product to an alternative Batch/Bin/Serial number, click the ![]() button and repeat the steps above until all incoming stock of the product has been allocated.
button and repeat the steps above until all incoming stock of the product has been allocated.
When you have finished allocating goods to a Batch/Bin/Serial number, click OK (as shown above).
Note: The OK button is enabled only when the Quantity Outstanding is 0; i.e. all stock of the incoming product has been allocated to a Batch/Bin/Serial number.
Note: If the Print Product Labels? dialogue displays at this point, you may print labels for the received batch. See Goods Received Note Label Printing.
8. The Confirmed hyperlink now displays in the Receipt Details column on the GRN line, indicating that this line of received goods has now been Confirmed and allocated a Batch/Bin/Serial number:

Note: Click the Confirmed link on a GRN line if you wish to review/edit/delete the Batch/Bin/Serial allocation. See Reviewing, Editing And Deleting GRN Batch Allocations.
Go to the next line on the Goods Received Note displaying Unconfirmed, click the hyperlink and make the next batch allocation as described above, until every 'batch traceable' product line received has been assigned a Batch (or Serial) Number and/or Bin Location and quantity (i.e. there are no more lines displaying Unconfirmed).
9. When all of the received lines on the GRN have been Confirmed - with variance recorded as necessary - you may Confirm and print the Goods Received Note.
Note: You may not Confirm a GRN until all stock flagged for batch traceability has been allocated a Batch Reference, Bin or Serial Number.
On Confirmation of the Goods Received Note, a Product Inventory record is created for each Batch Number/Bin Location allocated to the received goods - see Viewing Product Inventory Records. A confirmation message is also displayed.
After Confirming a GRN on which a Batch/Bin/Serial allocation has been made, you may:
Edit the details of a Product Inventory record, including Cost Price and Status (e.g. to make stock held for inspection available again). See Editing A Product Inventory Record.
Adjust the stock balance of a Product Inventory record to ensure that the stock figures recorded on Quantum VS match the actual physical stock in your warehouse/shop/office. See Product Inventory Records: Adjusting Stock Balances.
Transfer a quantity of Product Inventory stock from the current bin location to one or more alternative bins. See Product Inventory Records: Transferring Bin Location.
Reject a quantity of Product Inventory stock and append the items to a Supplier Return Note if required. See Product Inventory Records: Rejecting Stock.
Stock of any product flagged for 'batch traceability' must be associated with a Batch Number, Serial Number and/or Bin Location when it is booked in - see Allocating Batch/Bin/Serial Number Details At Goods Receipt. Depending on how your system has been set up, these details may be entered automatically by the system, or must be entered manually by the user (as described above).
The Unconfirmed hyperlink displays on the GRN line when the received product is flagged for 'batch traceability' and there is a 'received quantity' to be allocated to a Serial Number, Batch Number and/or Bin Location. This will be case if:
the received goods are flagged for 'Serial Number' traceability (as the system cannot auto-allocate a Serial Number to goods received);
or: your system is not set up for automatic allocation of Batch/Bin details and no manual allocation has yet been made;
or: you amended the Received Quantity or cancelled the line and there is still a Quantity Outstanding, meaning you need to allocate part or all of the Received Quantity to another Batch/Bin/Serial Number.
If Unconfirmed displays on a GRN line you must click the link to manually enter a Serial Number, Batch Number and/or Bin Location for the received goods - as described above - before you can Confirm the GRN.